You are viewing the Split Screen Van Club forum archive.
The forum archive is read-only.Unfortunately in 2021 the Split Screen Van Club forum suffered a ransomware attack and lots of the forum data was lost.
What threads that have been recovered are now searchable on this site. Some threads may be incomplete and some images are still being recovered.
Forum archive search
Forum Archive >
Spaceway experts- Now with ref pics-
Re: Spaceway experts- Now with ref pics-
by Paul_Revere's Ghia » Tue May 15, 2012 1:01 pm
No problem, PM me your address and I will stick it in the post-
As far as the random bits above, from reading the thread it seems that that van had a lot of "improvements" made by a previous owner and i think you have identified most of them-
Mine has lost its water tank so I have no idea what it would have had- any thoughts anyone?
Looks like my shoppinng list will now include two extra leg plates and one extra long leg- as well as the seat back for the bench seat for me to butcher!
Thanks for the input
Paul_Revere's Ghia
-
Posts: -
Joined: -
Re: Spaceway experts- Now with ref pics-
by BJ1 » Tue May 15, 2012 3:29 pm
I think the water tanks were plastic in the Spaceway. The later ones had a 1 gallon plastic tank with a blue top that fitted neatly behind the wardrobe. We have an OG tank and still use it
 .
.
Devon also supplied an orange washing bowl that was probably bought from Sidmouth Woolworths!
Devon also supplied an orange washing bowl that was probably bought from Sidmouth Woolworths!
BJ1
-
Posts: -
Joined: -
Re: Spaceway experts- Now with ref pics-
by big_al » Tue May 15, 2012 7:40 pm
Wow, how did I miss all this, my cooker unit has the blank door like yours, mine has a fabricated metal water container in there that looks made to measure. It's in my garage I will try and get a snap of it in a bit, I had to remove the back ply as I had a woodworm in it. Rest of unit treated now. Ok off to get picture.
Alan
Alan
big_al
-
Posts: -
Joined: -
Re: Spaceway experts- Now with ref pics-
by BJ1 » Tue May 15, 2012 7:47 pm
big_al wrote:
Wow, how did I miss all this, my cooker unit has the blank door like yours, mine has a fabricated metal water container in there that looks made to measure. It's in my garage I will try and get a snap of it in a bit, I had to remove the back ply as I had a woodworm in it. Rest of unit treated now. Ok off to get picture.
Alan
Alan
welcome back Al
BJ1
-
Posts: -
Joined: -
Re: Spaceway experts- Now with ref pics-
by big_al » Tue May 15, 2012 8:00 pm
Right trying this direct from phone.
Metal tank
Front
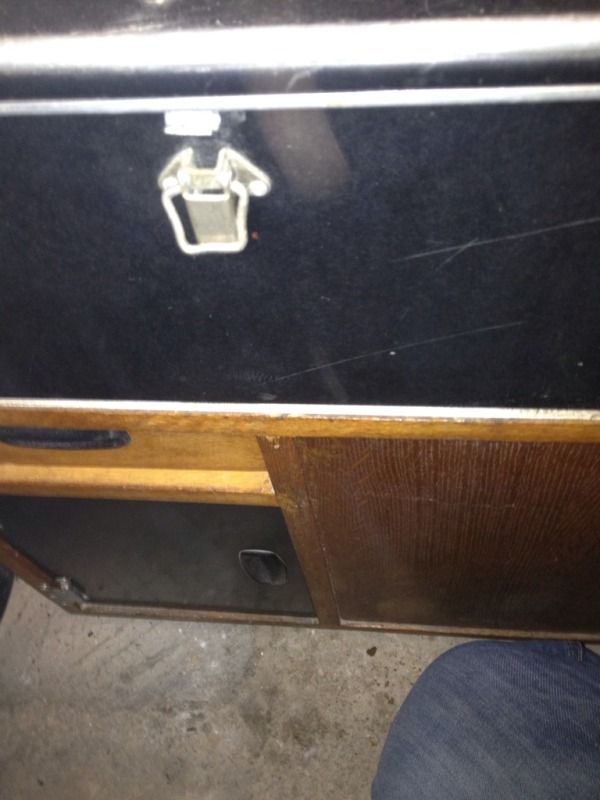
Hope they work
Also I'm sure my table only has 3 leg plates, that's out in the van.
The pictures you have of the red interior are not the best references it has been 'modified' considerably.
If anyone has drawings or measurements of the shaving mirror I would love to try and make one as I cant find one anywhere.
Metal tank
Front
Hope they work
Also I'm sure my table only has 3 leg plates, that's out in the van.
The pictures you have of the red interior are not the best references it has been 'modified' considerably.
If anyone has drawings or measurements of the shaving mirror I would love to try and make one as I cant find one anywhere.
big_al
-
Posts: -
Joined: -
Re: Spaceway experts- Now with ref pics-
by Paul_Revere's Ghia » Tue May 15, 2012 10:22 pm
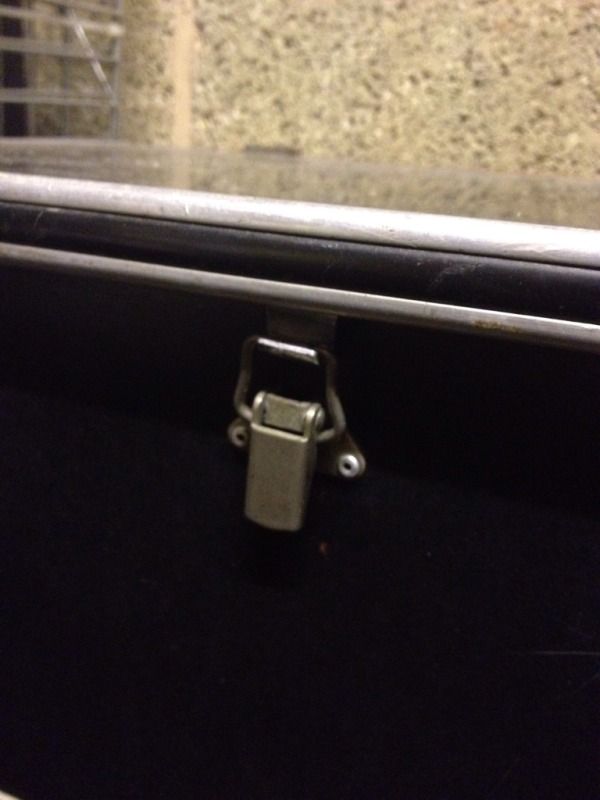
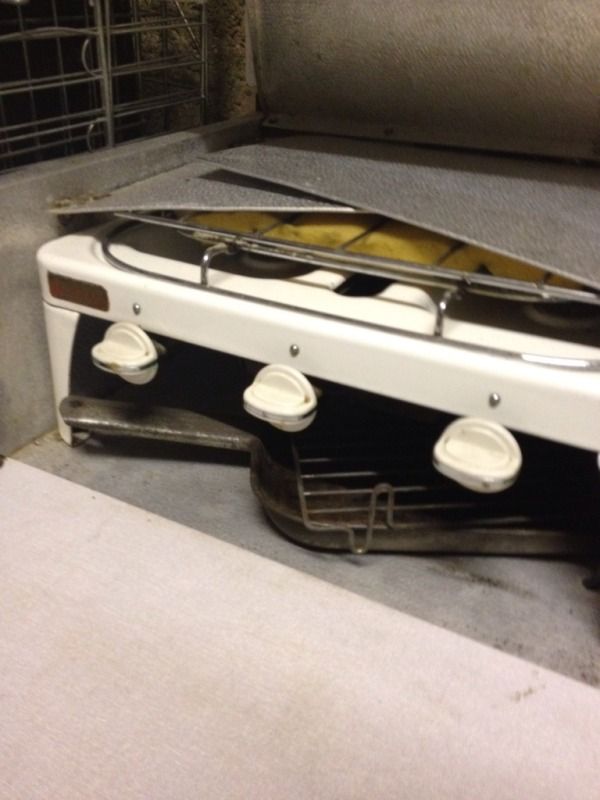
Hi BigAl, those are great shots & really glad to have you on board with this thread- I would be really grateful if you get a chance, if you can take a picture of the underside of the catch that holds the front cooker door up- both of mine have been removed and I would like to reinstate them.
Here's the results of two evenings worth of elbow grease for me:
before
after
I need to put a ply back panel on mine as it was missing and find a vent for it that looks the part then re-veneer the side panel as that has lifted then I'm on to sanding and french polishing!! Are there any particular shades that are good?
Paul_Revere's Ghia
-
Posts: -
Joined: -
Re: Spaceway experts- Now with ref pics-
by type21f » Wed May 16, 2012 5:55 am
Where did you buy the LURVE you applied all over this...?


type21f

-
Posts: -
Joined: -
Re: Spaceway experts- Now with ref pics-
by BJ1 » Wed May 16, 2012 12:31 pm
type21f wrote:
Where fif you buy the LURVE you applied all over this...?
Google Translate says this is Latvian
BJ1
-
Posts: -
Joined: -
Re: Spaceway experts- Now with ref pics-
by BJ1 » Wed May 16, 2012 12:37 pm
big_al wrote:
If anyone has drawings or measurements of the shaving mirror I would love to try and make one as I cant find one anywhere.
Great Pics Al - the tank is awesome.
I have both types of shaving mirror. One has the ply back and alloy corner pieces, the other is all alloy. I know that the all alloy mirror is OG to our 67 and the wooden one came with the 66 interior (made in Oct 65) that I bought recently. When (if) I get some time I'll sort some drawings out and take some pics. Type21f and I think that both types of mirror were around in 1966 (not sure if that stroppy Nexus7 guy agrees though
Seth - How did you clean up the alloy sheeting? I use approx 5% caustic plus a bit of wallpaper paste and paint it on to the alloy. Scrub with an old toothbrush, leave for around 30 minutes, rinse off with spirit vinegar and it comes up like new. Make sure you wear thick rubber gloves, eye protection and overalls though
 This also works well with alloy casings like gearboxes, but you need a stronger caustic solution and don't leave it on too long as it will eventually dissolve the alloy
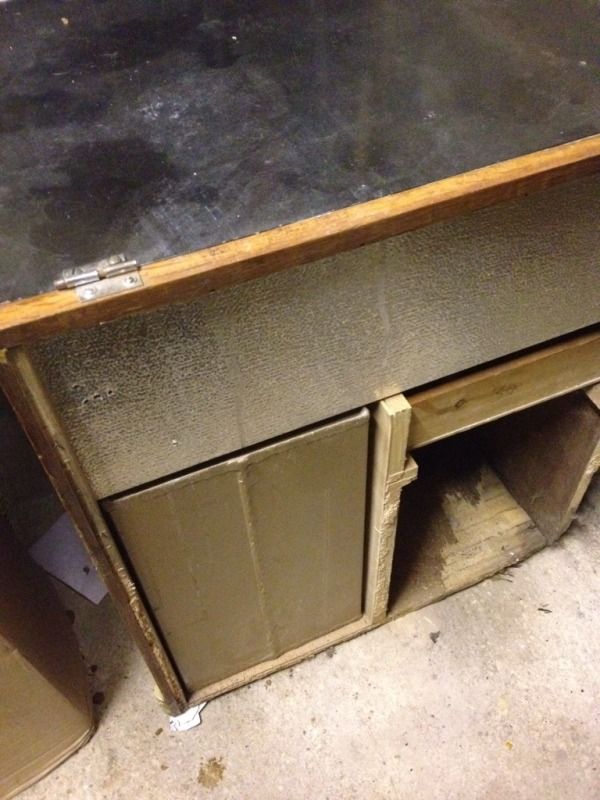
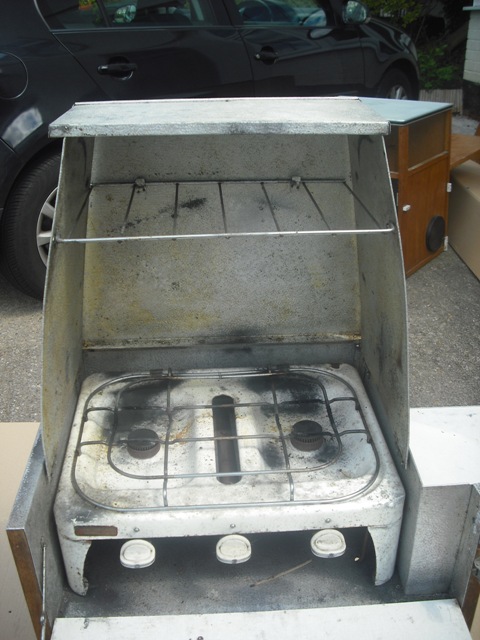
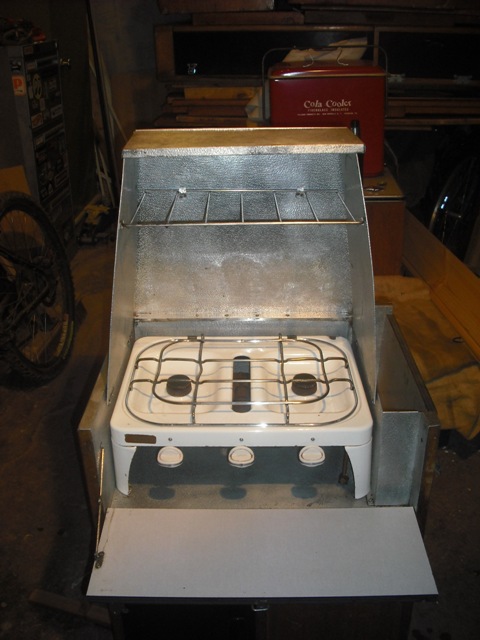
This thread has revealed something that I didn't know about Spaceways - there are definitely two different types of cooker unit - side by side in this pic
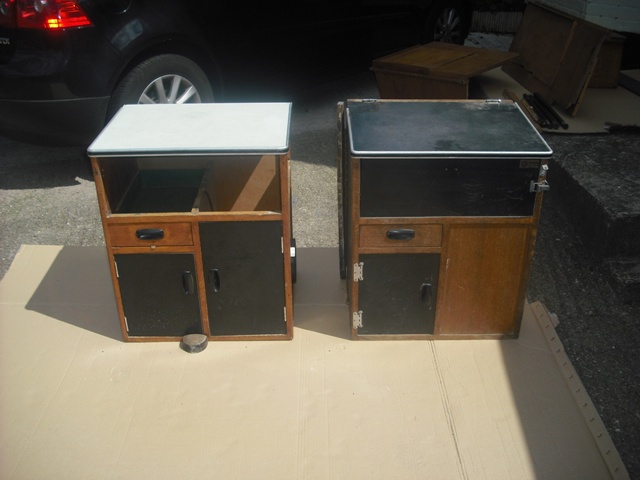
The left hand one is possibly the most common and is definitely found in OG 1966 and 1967 Spaceways. The unit on the right may be a very early version (are there any pre 66 Spaceways?) and differs by having
- a fixed water tank behind a solid ply wall (cupboard door in the later units) together with an early Whale pump/tap,
- different hinges on the small cupboard door,
- separate demountable hinges at the rear of the top cover (which has black laminate rather than Virr Varr) rather than the alloy strip,
- different rear fixing for the warming rack.
- The Argyll cooker on these units has enamelled legs whereas the later units don't have legs and the cooker is fitted on to alloy rails at the sides of the hood unit.
I may have missed something so please add to this list - it's like a 'spot the difference' game
Brian
BJ1
-
Posts: -
Joined: -
Re: Spaceway experts- Now with ref pics-
by Paul_Revere's Ghia » Wed May 16, 2012 7:14 pm
type21f wrote:
Where fif you buy the LURVE you applied all over this...?
Still, at least I know for next time!!
Paul_Revere's Ghia
-
Posts: -
Joined: -
Re: Spaceway experts- Now with ref pics-
by Paul_Revere's Ghia » Wed May 16, 2012 7:18 pm
BJ1 wrote:
big_al wrote:
If anyone has drawings or measurements of the shaving mirror I would love to try and make one as I cant find one anywhere.
Great Pics Al - the tank is awesome.
I have both types of shaving mirror. One has the ply back and alloy corner pieces, the other is all alloy. I know that the all alloy mirror is OG to our 67 and the wooden one came with the 66 interior (made in Oct 65) that I bought recently. When (if) I get some time I'll sort some drawings out and take some pics. Type21f and I think that both types of mirror were around in 1966 (not sure if that stroppy Nexus7 guy agrees though
Seth - How did you clean up the alloy sheeting? I use approx 5% caustic plus a bit of wallpaper paste and paint it on to the alloy. Scrub with an old toothbrush, leave for around 30 minutes, rinse off with spirit vinegar and it comes up like new. Make sure you wear thick rubber gloves, eye protection and overalls though
This also works well with alloy casings like gearboxes, but you need a stronger caustic solution and don't leave it on too long as it will eventually dissolve the alloy
This thread has revealed something that I didn't know about Spaceways - there are definitely two different types of cooker unit - side by side in this pic
The left hand one is possibly the most common and is definitely found in OG 1966 and 1967 Spaceways. The unit on the right may be a very early version (are there any pre 66 Spaceways?) and differs by having
- a fixed water tank behind a solid ply wall (cupboard door in the later units) together with an early Whale pump/tap,
- different hinges on the small cupboard door,
- separate demountable hinges at the rear of the top cover (which has black laminate rather than Virr Varr) rather than the alloy strip,
- different rear fixing for the warming rack.
- The Argyll cooker on these units has enamelled legs whereas the later units don't have legs and the cooker is fitted on to alloy rails at the sides of the hood unit.
I may have missed something so please add to this list - it's like a 'spot the difference' game
Brian
My later unit also has three(one missing) hinges in place of the piano hinge holding it to the shaped oak bulk head baton for the swing out- not sure if that rings true for you too?
Paul_Revere's Ghia
-
Posts: -
Joined: -
Re: Spaceway experts- Now with ref pics-
by big_al » Thu May 17, 2012 8:20 am
Paul_Revere's Ghia wrote:
Hi BigAl, those are great shots & really glad to have you on board with this thread- I would be really grateful if you get a chance, if you can take a picture of the underside of the catch that holds the front cooker door up- both of mine have been removed and I would like to reinstate them.
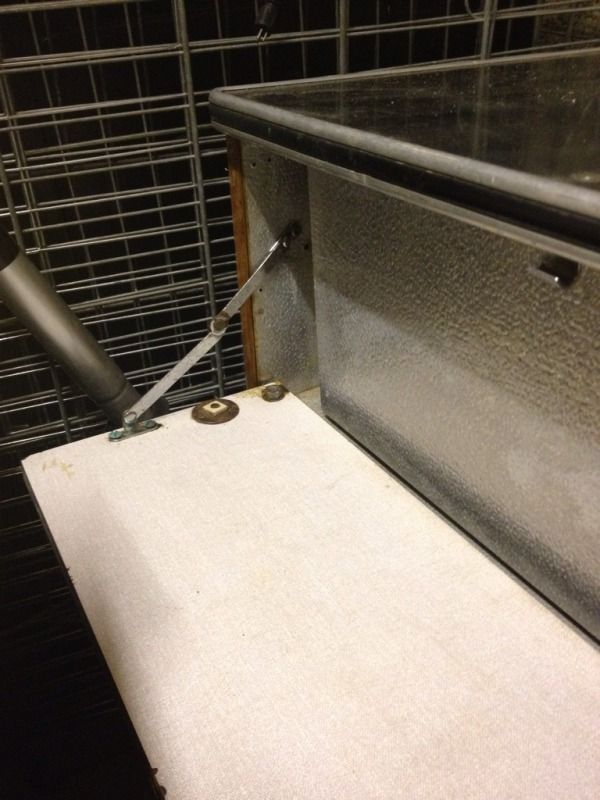
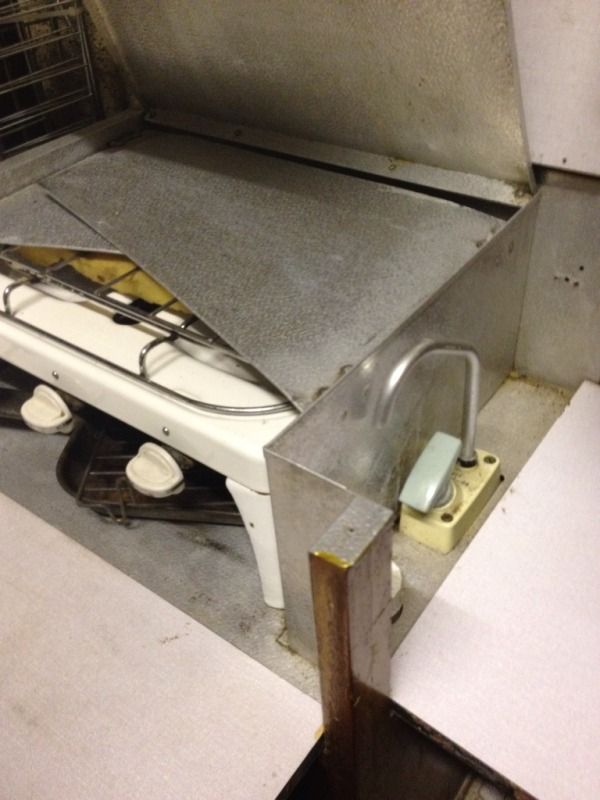
Heres the underside of catch. Upside down. I recently bought one off a67man. I'm sure he had another.
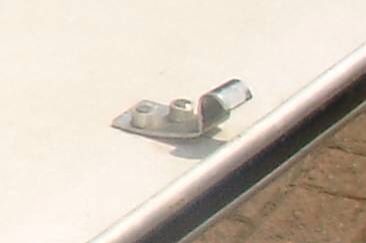
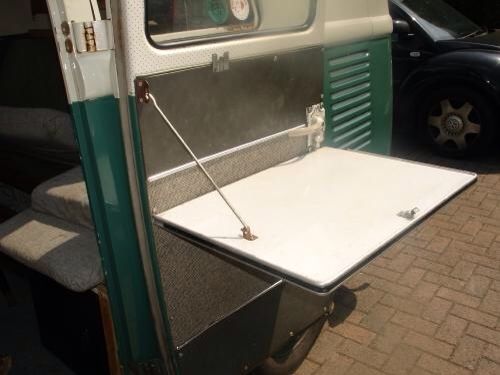
Here's how the cooker top fits to my door using those detachable hinges.
big_al
-
Posts: -
Joined: -
Re: Spaceway experts- Now with ref pics-
by big_al » Thu May 17, 2012 8:37 am
BJ1 wrote:
big_al wrote:
If anyone has drawings or measurements of the shaving mirror I would love to try and make one as I cant find one anywhere.
Great Pics Al - the tank is awesome.
I have both types of shaving mirror. One has the ply back and alloy corner pieces, the other is all alloy. I know that the all alloy mirror is OG to our 67 and the wooden one came with the 66 interior (made in Oct 65) that I bought recently. When (if) I get some time I'll sort some drawings out and take some pics. Type21f and I think that both types of mirror were around in 1966 (not sure if that stroppy Nexus7 guy agrees though
Seth - How did you clean up the alloy sheeting? I use approx 5% caustic plus a bit of wallpaper paste and paint it on to the alloy. Scrub with an old toothbrush, leave for around 30 minutes, rinse off with spirit vinegar and it comes up like new. Make sure you wear thick rubber gloves, eye protection and overalls though
This also works well with alloy casings like gearboxes, but you need a stronger caustic solution and don't leave it on too long as it will eventually dissolve the alloy
This thread has revealed something that I didn't know about Spaceways - there are definitely two different types of cooker unit - side by side in this pic
The left hand one is possibly the most common and is definitely found in OG 1966 and 1967 Spaceways. The unit on the right may be a very early version (are there any pre 66 Spaceways?) and differs by having
- a fixed water tank behind a solid ply wall (cupboard door in the later units) together with an early Whale pump/tap,
- different hinges on the small cupboard door,
- separate demountable hinges at the rear of the top cover (which has black laminate rather than Virr Varr) rather than the alloy strip,
- different rear fixing for the warming rack.
- The Argyll cooker on these units has enamelled legs whereas the later units don't have legs and the cooker is fitted on to alloy rails at the sides of the hood unit.
I may have missed something so please add to this list - it's like a 'spot the difference' game
Brian
Thanks Brian, some measurements would be great at some point, no rush.
I did see a few years ago someone making and selling them but I have not seen them for ages, does anyone know if he's still around?
I'm glad I have seen another cooker cupboard like mine, I was starting to think it was a bodge until i took the back off to reveal the tank. I have seen plenty with the two doors.
Fascinating stuff! lol
big_al
-
Posts: -
Joined: -
Re: Spaceway experts- Now with ref pics-
by Paul_Revere's Ghia » Thu May 17, 2012 5:48 pm
big_al wrote:
Paul_Revere's Ghia wrote:
Hi BigAl, those are great shots & really glad to have you on board with this thread- I would be really grateful if you get a chance, if you can take a picture of the underside of the catch that holds the front cooker door up- both of mine have been removed and I would like to reinstate them.
Heres the underside of catch. Upside down. I recently bought one off a67man. I'm sure he had another.
Here's how the cooker top fits to my door using those detachable hinges.
That's perfect! Thanks Al, and thanks for showing the pic of it in place as a table- I had no idea that was what they were designed to do! Every day is a school day!
Don't suppose anyone has any spare hinges for the table on the cargo door do they????
Cheers, Seth
Paul_Revere's Ghia
-
Posts: -
Joined: -
Re: Spaceway experts- Now with ref pics-
by Paul_Revere's Ghia » Thu Jun 07, 2012 8:49 pm
Well the van is here and I have finally been able to start tinkering proper-
A couple of questions have arisen....
1) Can anyone tell me the thickness of the ply needed for the flooring?
2) Should there be some kind of support bar behind the long panel to support the table mounting plates?
3) should there be factory style armrests on the long panel?
Any help as always much appreciated and as soon as I get a chance I will get some pics up- bloody weather and single car garage not very conducive for decent pics!!!
Paul_Revere's Ghia
-
Posts: -
Joined: -