You are viewing the Split Screen Van Club forum archive.
The forum archive is read-only.Unfortunately in 2021 the Split Screen Van Club forum suffered a ransomware attack and lots of the forum data was lost.
What threads that have been recovered are now searchable on this site. Some threads may be incomplete and some images are still being recovered.
Forum archive search
Re: Spaceway experts- Now with ref pics-
by BJ1 » Tue Jul 03, 2012 9:57 pm
ATM my cooker is fixed but I'm working on making it a swing job. I have remade the roller by freeing up the fibre rollers, turning them down a bit and sleeving them inside an alloy tube, but you could easily use a vinyl roller. I will be putting it back at the correct angle for the lhd bus. The hinge will be a bit different because I want to retain the check strap. The whole unit is about 35mm further towards the back of the bus to allow the bowl flap to clear the B post.
Pleased you like the interior - it was a lot of work but looks great in the old bus. I've tried to keep as much of the patina as I can, inspired by A67MAN's Mk 3 interior.
Just the upholstery to sort now and a few small jobs like putting in the curtain wire along the window bases.
Pleased you like the interior - it was a lot of work but looks great in the old bus. I've tried to keep as much of the patina as I can, inspired by A67MAN's Mk 3 interior.
Just the upholstery to sort now and a few small jobs like putting in the curtain wire along the window bases.
BJ1
SSVC Member
Posts: 3177
Joined: Thu Aug 30, 2007 8:12 pm
Re: Spaceway experts- Now with ref pics-
by Paul_Revere's Ghia » Thu Jul 26, 2012 7:47 pm
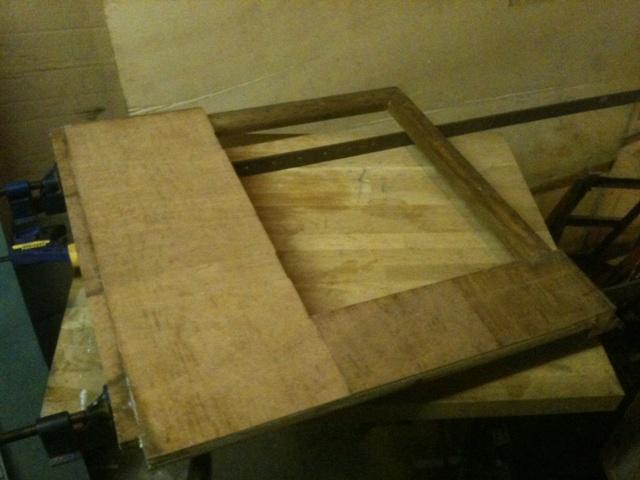
I've had a couple of days doing the cosmetic side of things as I am waiting for parts to get the bus back on all four wheels-
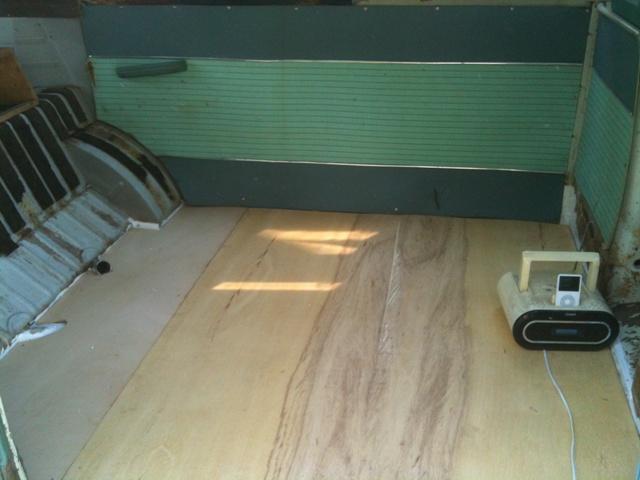
started a few days ago by getting the wirebrush on the drill and attacking the cargo floor- came up nice with a few minor surface rust patches so I treated them with kurust then painted the whole lot with hammerite-
I then used closed cell foam and 4mm WBP ply (I couldn't get hold of any 5mm)
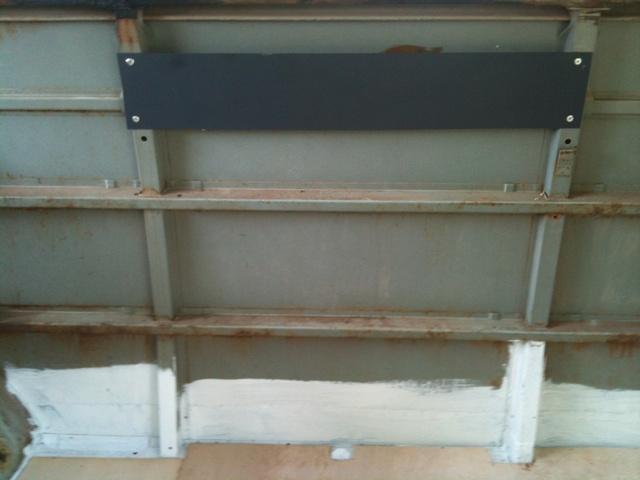
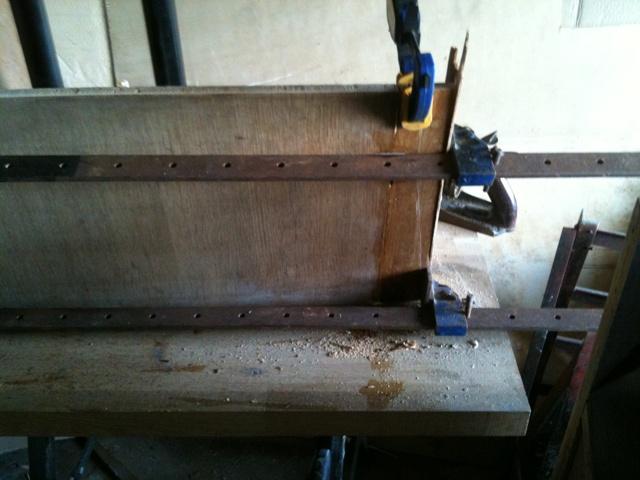
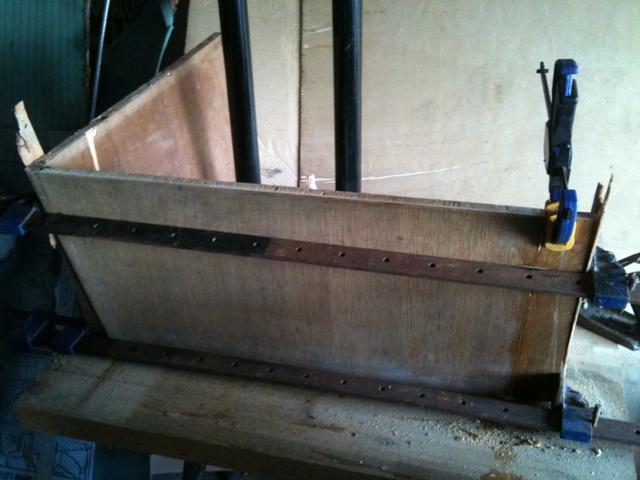
At this point I also made up a plate to support the table brackets as per BJ1's very useful info and rivetted that to the side-
With the long panel installed I then laid out the tiles
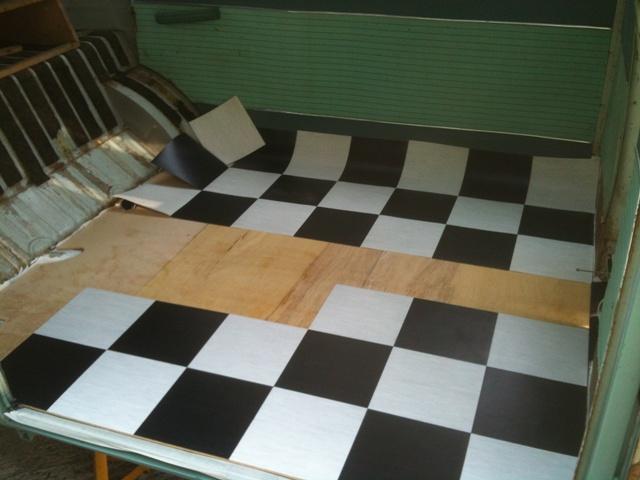
Then I glued them- I decided to work back from the opening- You may also notice I have removed the heater outlet all together- I will be running a propex heater so will block this pipe off and keep the parts in case i ever want to reinstate.
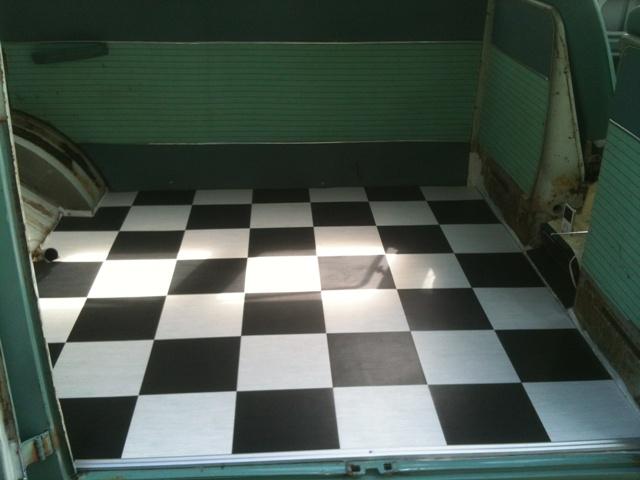
Job done- I am really impresserd with the service from madmatz- I ordered them late Tuesday evening and they arrvied today at lunchtime- and they look spot on!!!
started a few days ago by getting the wirebrush on the drill and attacking the cargo floor- came up nice with a few minor surface rust patches so I treated them with kurust then painted the whole lot with hammerite-
I then used closed cell foam and 4mm WBP ply (I couldn't get hold of any 5mm)
At this point I also made up a plate to support the table brackets as per BJ1's very useful info and rivetted that to the side-
With the long panel installed I then laid out the tiles
Then I glued them- I decided to work back from the opening- You may also notice I have removed the heater outlet all together- I will be running a propex heater so will block this pipe off and keep the parts in case i ever want to reinstate.
Job done- I am really impresserd with the service from madmatz- I ordered them late Tuesday evening and they arrvied today at lunchtime- and they look spot on!!!
Paul_Revere's Ghia
Registered user
Posts: 191
Joined: Mon Aug 23, 2010 12:07 pm
Re: Spaceway experts- Now with ref pics-
by BJ1 » Sun Sep 16, 2012 4:42 pm
Like the floor
 Any more progress pics?
Devon supplied a plastic water carrier with the Spaceway - just a 5L polythene container, usually with a blue cap. It stows in the space behind the wardrobe. After much searching I have finally found the right sized container - most are too wide but these fit perfectly.
http://www.ebay.co.uk/itm/260793687678?ssPageName=STRK:MEWNX:IT&_trksid=p3984.m1497.l2649
They come with white caps but if you want to be really nerdy like me you can pinch a blue cap from a 5L antifreeze container. Make sure you wash it well though.
The upholstery has now been done in my 64 using Ross Fabrics "Broadway" in blue, which is quite close to Duracour. It looks great with the oak in a sea blue bus. I'll get some pics up asap.
BJ1
SSVC Member
Posts: 3177
Joined: Thu Aug 30, 2007 8:12 pm
Re: Spaceway experts- Now with ref pics-
by Paul_Revere's Ghia » Sun Sep 23, 2012 8:57 pm
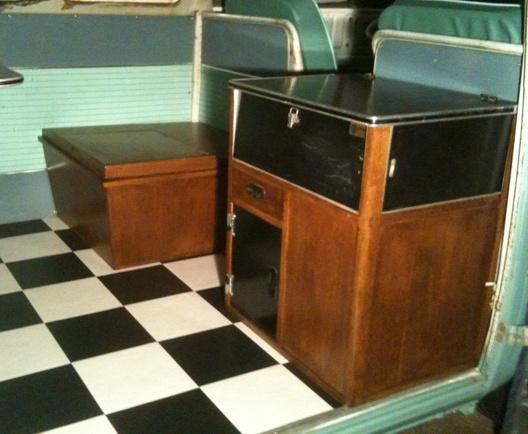
Progress has been a little slow recently- but I finally have a little update-
First up is the cooker unit-
Perhaps being a little naive I thought the original veneer on the large side was past its best so I stripped the whole side panel-
Major mistake as knowing what i have learnt now it would have been quite possible to patch repair and blend into the the original veneer-
Third attempt at veneering I finally got a finish I was happy with- 1st time I dived in and used PVA glue without realising the consequences- 2nd time I used PVA on both the base and the veneer but let it dry to a tack finish and used like a contact adhesive-This was better but still not great- 3rd time around I used Tight Bond Liquid hide Glue- this was much, much better!
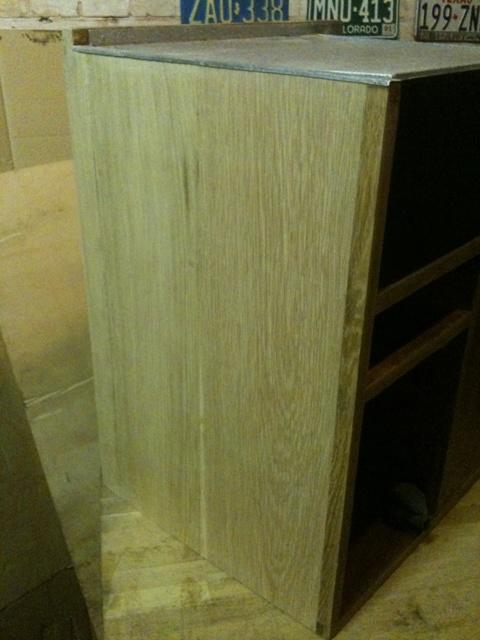
I have also now varnished it with a Wickes quick drying varnish, in warm oak finish as it was the closest match I could find to my veneer(I decided against going with the french polish as I have heard it is a little less hard wearing)
I have also re-worked the buddy seat- Inspired by Brian's excellent description.
I started by deconstructing the seat, I then measured up and cut the seat to match the width of the bulkhead.
I shaped the other edge to fit the sidewall of the van and using the offcut from the long edge I stretched the length of the seat-
I also stripped the slightly knackered veneer from the top of the buddy seat and trimmed it to fit the base, Once again I used the off cut to fill the long edge. (I figure when screwed to the bulkhead it will be perfectly strong enough!)I then re-veneered the top panel and stuck it all back together- Easy!!
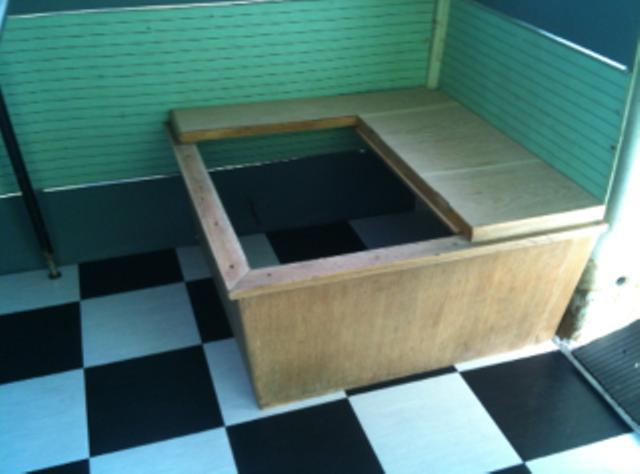
It has since been varnished but I haven't had a chance to install it in the van due to the rain!!!
First up is the cooker unit-
Perhaps being a little naive I thought the original veneer on the large side was past its best so I stripped the whole side panel-
Major mistake as knowing what i have learnt now it would have been quite possible to patch repair and blend into the the original veneer-
Third attempt at veneering I finally got a finish I was happy with- 1st time I dived in and used PVA glue without realising the consequences- 2nd time I used PVA on both the base and the veneer but let it dry to a tack finish and used like a contact adhesive-This was better but still not great- 3rd time around I used Tight Bond Liquid hide Glue- this was much, much better!
I have also now varnished it with a Wickes quick drying varnish, in warm oak finish as it was the closest match I could find to my veneer(I decided against going with the french polish as I have heard it is a little less hard wearing)
I have also re-worked the buddy seat- Inspired by Brian's excellent description.
I started by deconstructing the seat, I then measured up and cut the seat to match the width of the bulkhead.
I shaped the other edge to fit the sidewall of the van and using the offcut from the long edge I stretched the length of the seat-
I also stripped the slightly knackered veneer from the top of the buddy seat and trimmed it to fit the base, Once again I used the off cut to fill the long edge. (I figure when screwed to the bulkhead it will be perfectly strong enough!)I then re-veneered the top panel and stuck it all back together- Easy!!
It has since been varnished but I haven't had a chance to install it in the van due to the rain!!!
Paul_Revere's Ghia
Registered user
Posts: 191
Joined: Mon Aug 23, 2010 12:07 pm
Re: Spaceway experts- Now with ref pics-
by type21f » Sun Sep 23, 2012 9:17 pm
Your works looks really good.
I have not tried the veneering task but also have some repairs to make to the interior for the Caravette where the veneer is missing!
Do you have the water tank in your cooker unit?
If so can you provide the dimensions of the tank please?
If so what is it made from?
I have acquired a tank but do not know what it is from...LOL
type21f

SSVC Member
Posts: 10375
Joined: Tue May 29, 2007 12:55 pm
Re: Spaceway experts- Now with ref pics-
by Paul_Revere's Ghia » Sun Sep 23, 2012 9:40 pm
Thanks, I don't think it is anywhere near as nice as Brian's but I haven't really done any carpentry since I was at school so I am pleased with the results- I haven't got a water tank in mine- I am toying with the idea of using that space for the gas bottle and having a useable cupboard behind the door-
Brian, Lets see some pictures of the trim then???
Brian, Lets see some pictures of the trim then???
Paul_Revere's Ghia
Registered user
Posts: 191
Joined: Mon Aug 23, 2010 12:07 pm
Re: Spaceway experts- Now with ref pics-
by type21f » Sun Sep 23, 2012 9:50 pm
The one I have is plastic and up for grabs if it fits!
Need to understannd the sizes and pictures of spout direction etc..
Think this one is from a Bay...
I was looking for plastic containers for the Devonette and now thanks to Bri have an answer to where to get them from...
Need to understannd the sizes and pictures of spout direction etc..
Think this one is from a Bay...
I was looking for plastic containers for the Devonette and now thanks to Bri have an answer to where to get them from...
type21f
SSVC Member
Posts: 10375
Joined: Tue May 29, 2007 12:55 pm
Re: Spaceway experts- Now with ref pics-
by BJ1 » Mon Sep 24, 2012 7:43 am
Hi Seth
The cooker unit looks great
Never use PVA for veneering - as you found, it distorts the veneer and causes all kinds of grief. Titebond is just right - I use it for most woodworking jobs. You are right about the durability of french polish. It wears quite quickly and doesn't like water or hot tea on it but for appearance you can't beat it.
Don't put the gas bottle in the closed side of your cooker. IMO it's dangerous to do so as you can't get to the bottle quickly and you must turn it off at night.
You seem to have turned the buddy seat at 90 degrees from the original position. That's fine but check that it all works when you make up the bed - you may find the space between the rear seat face and the buddy seat is too wide for the drop down flap. Let us know how you sort it.
Thanks for the reminder - I'll take some pics of the new interior when this effing storm wends its way up country. Had a lively night in Devon - mucho wind and rain
Brian
BJ1
SSVC Member
Posts: 3177
Joined: Thu Aug 30, 2007 8:12 pm
Re: Spaceway experts- Now with ref pics-
by BJ1 » Mon Sep 24, 2012 4:00 pm
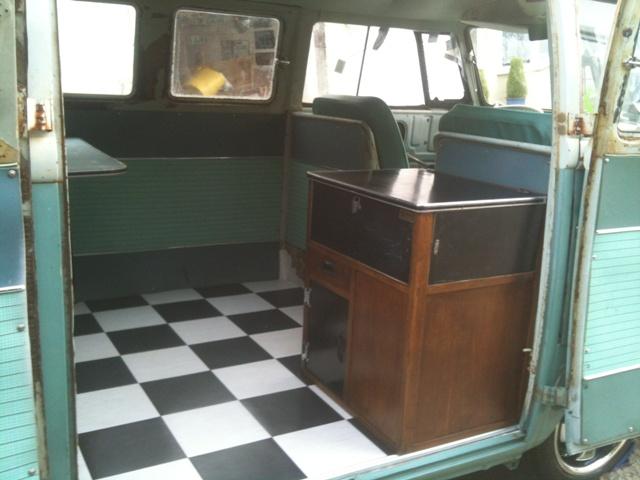
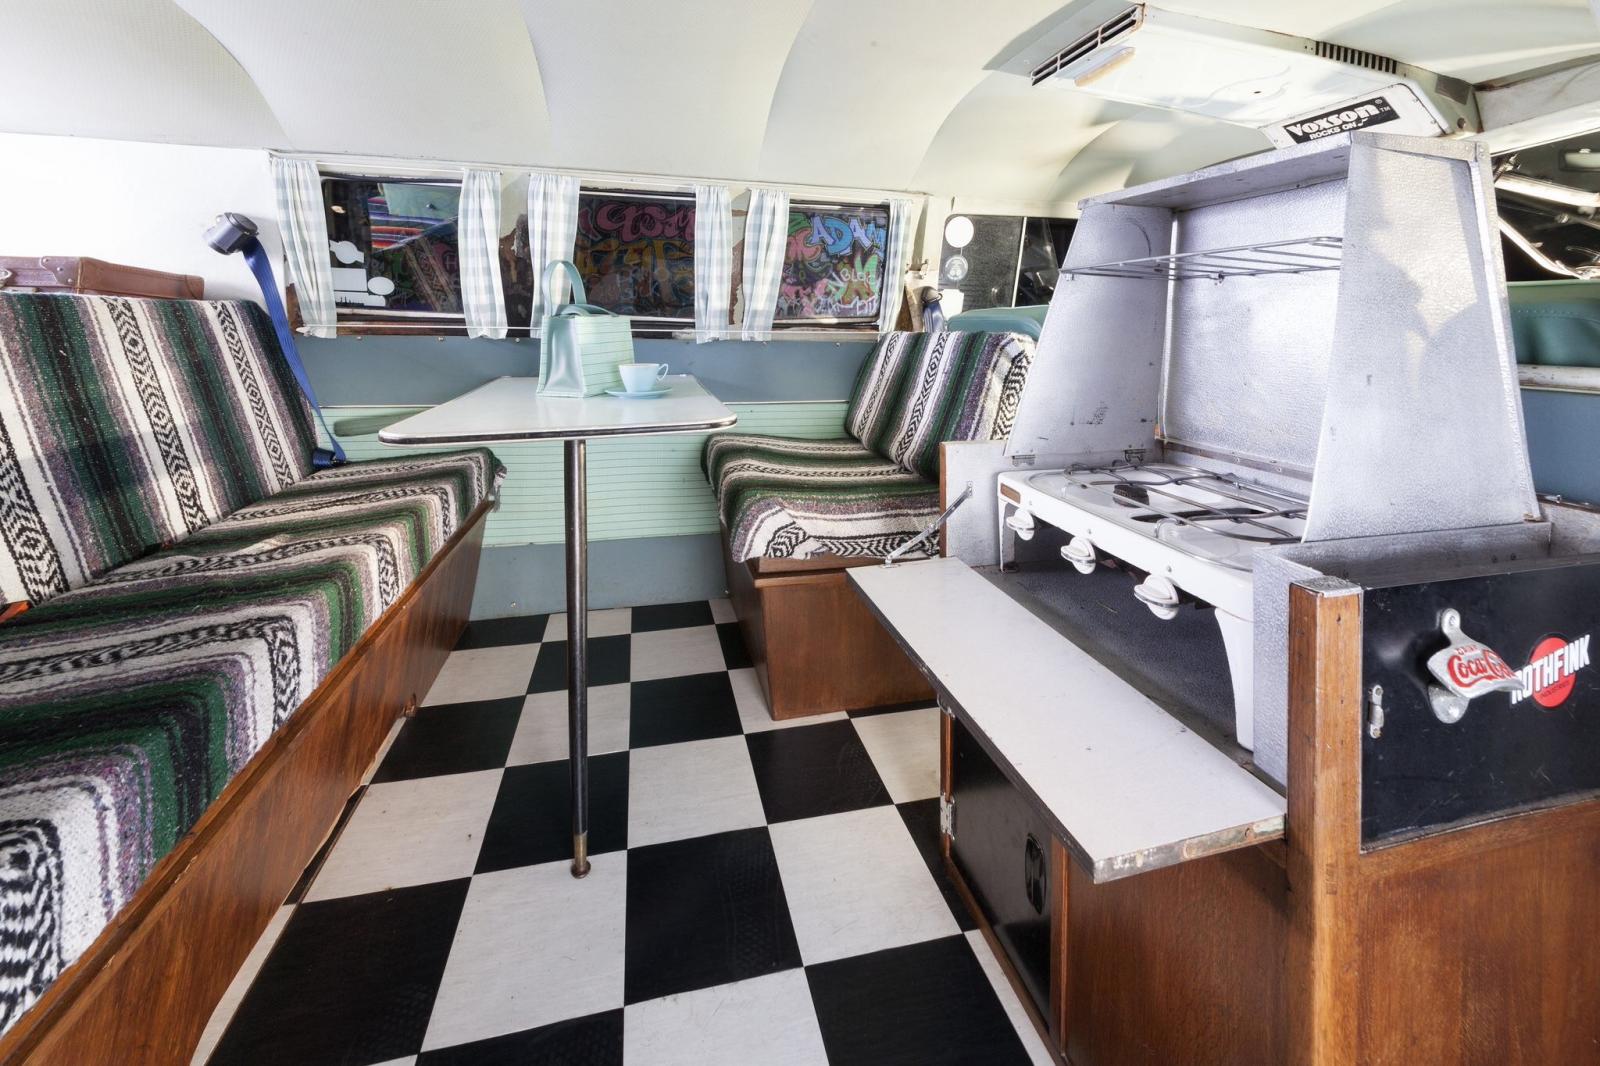
Here we go! New upholstery from Apollo Upholstery in Exeter using Ross Farbrics Broadway. Original cushions wrapped in dralon to plump them. They do a great job at amazingly reasonable prices


Looks good with the Sea Blue bus and oak furniture
Enjoy
Brian
Looks good with the Sea Blue bus and oak furniture
Enjoy
Brian
BJ1
SSVC Member
Posts: 3177
Joined: Thu Aug 30, 2007 8:12 pm
Re: Spaceway experts- Now with ref pics-
by Paul_Revere's Ghia » Mon Sep 24, 2012 8:15 pm
That looks superb Brian- I am loving the trim!
Thanks for the pointer on the gas bottle, makes perfect sense now you put it like that! Sometimes I don't think!!!
Here's the pic I was hoping to post last night.
You are right- I have essentially rotated the buddy seat through 90 degrees- Since I am having to make a piece to infill for the bed I figured I may as well make one piece a little bigger and not use the drop down flap(Hence the spare latch )
)
I am yet to work out if I need to modify the easicool slide out stool to fit between the cooker and the buddy seat but I am open to do it if needed.
Once again- congratulations on a very fine interior and thankyou for the inspiration and tips!!!!!
Thanks for the pointer on the gas bottle, makes perfect sense now you put it like that!
Here's the pic I was hoping to post last night.
You are right- I have essentially rotated the buddy seat through 90 degrees- Since I am having to make a piece to infill for the bed I figured I may as well make one piece a little bigger and not use the drop down flap(Hence the spare latch
)
I am yet to work out if I need to modify the easicool slide out stool to fit between the cooker and the buddy seat but I am open to do it if needed.
Once again- congratulations on a very fine interior and thankyou for the inspiration and tips!!!!!
Paul_Revere's Ghia
Registered user
Posts: 191
Joined: Mon Aug 23, 2010 12:07 pm
Re: Spaceway experts- Now with ref pics-
by type21f » Sun Jan 11, 2015 11:58 am
Re read..
Front to back...yet again
Excellent
Thanks Brian.
G
Front to back...yet again
Excellent
Thanks Brian.
G
type21f
SSVC Member
Posts: 10375
Joined: Tue May 29, 2007 12:55 pm
Re: Spaceway experts- Now with ref pics-
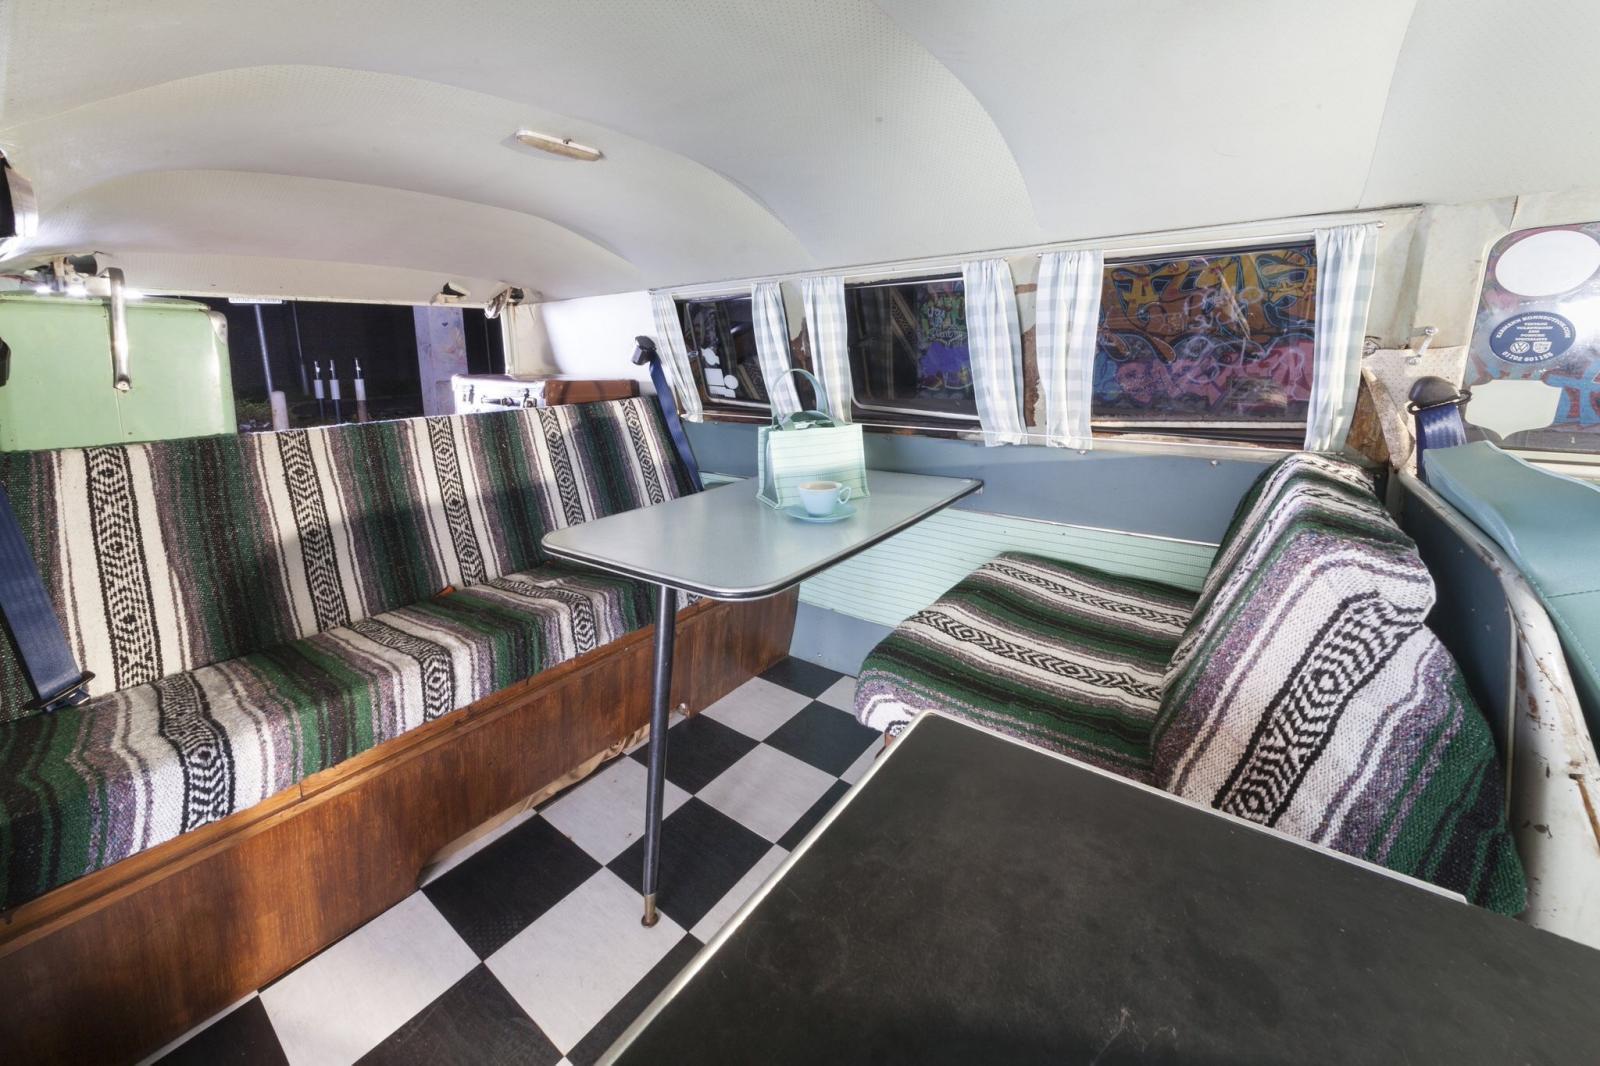
by Sethd77 » Sat Jun 13, 2015 7:45 pm
A couple of pics of my interior taken by Michael Whitestone for Volksworld

And finally one of the bed in sleep mode... Mostly hidden by duvet though I'm afraid!
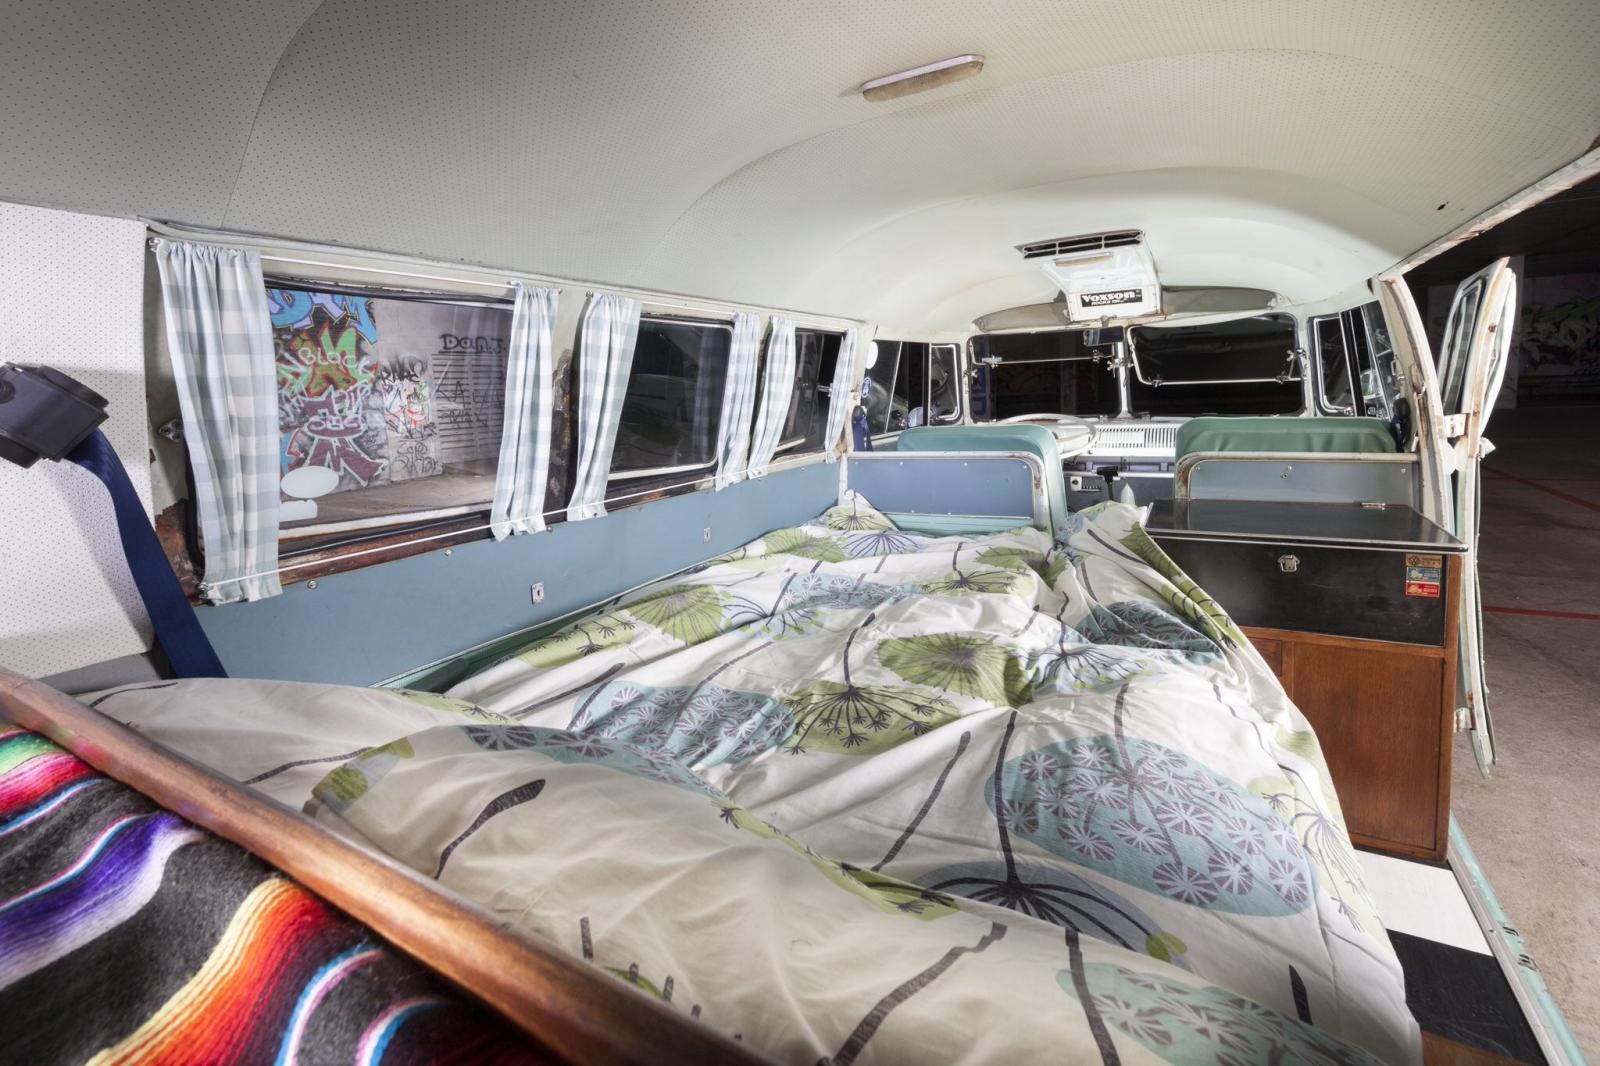
And finally one of the bed in sleep mode... Mostly hidden by duvet though I'm afraid!
Sethd77

SSVC Member
Posts: 38
Joined: Sat Sep 21, 2013 7:24 am
Re: Spaceway experts- Now with ref pics-
by type21f » Sun Jun 14, 2015 5:54 am
Re read front to back again....
Great work. .
Great work. .
type21f
SSVC Member
Posts: 10375
Joined: Tue May 29, 2007 12:55 pm
Re: Spaceway experts- Now with ref pics-
by BJ1 » Sun Jun 14, 2015 7:52 am
Looks great Seth
I've sold my bus to a nice man in Torquay and now have just one Devon and a Sundial. But watch this space
Brian
I've sold my bus to a nice man in Torquay and now have just one Devon and a Sundial. But watch this space
Brian
BJ1
SSVC Member
Posts: 3177
Joined: Thu Aug 30, 2007 8:12 pm
Re: Spaceway experts- Now with ref pics-
by type21f » Sun Jun 14, 2015 8:09 am
Bri I admire your ability to do such nice work on buses and then pass them forwards. .. I have got to the point of nearly having Peebles to how I want it... I am reserching to make Devonette furniture.
Hence reading all I can find....
Hence reading all I can find....
type21f
SSVC Member
Posts: 10375
Joined: Tue May 29, 2007 12:55 pm