You are viewing the Split Screen Van Club forum archive.
The forum archive is read-only.Unfortunately in 2021 the Split Screen Van Club forum suffered a ransomware attack and lots of the forum data was lost.
What threads that have been recovered are now searchable on this site. Some threads may be incomplete and some images are still being recovered.
Forum archive search
Forum Archive > Interiors/Conversions
1
Canterbury Pitt Interior Refurbishment
Canterbury Pitt Interior Refurbishment
by Nickg » Tue Jun 11, 2013 9:18 am
Canterbury Pitt Interior Refurbishment Project
Hi all - Thought i'd share my recent refurbishment project with you. I've gained some useful information from this forum which has helped me source bits and details. Hopefully some will find my experience useful too.
I got my 11 window Splitscreen Camper at the end of last year, and having had the engine rebuilt, i deceided to set about refurbishing the original CP interior. Although it is original i'm pretty sure it has been added later. as there is no dent in the spare wheel housing. Having said that it seems to fit perfectly without the dent.
I started off by stripping, cleaning and refurbing the cooker unit which was very dirty. I stripped it down and removed all old varnish with Nitromors. Then rough and fine sanding and finished with Sadolin exterior satin varnish. I had to repair the edging on the lid as this was broken, replace the back board with ply and replace part of the aluminium liner as it was badly damaged.
Then i refurbed the table and removed the rear cupboards, drawers and overhead lockerc in April. Various catches and handles missing but managed to source parts which were almost identical - including some excellent bronze hinges from a link on this site (thanks!) and they are almost a perfect match and even pick up the same screw holes.
Unfortunately i didn't take any photos of this work, but three weeks ago i decided to do the bench seats and floor and i have attached photos in the link below.
The whole interior had not been fitted very well - the bus was used for hire, weddings and camping trips etc. and not much care had gone into the original installation. Parts not fitting properly, metal plates fitted where hinges should be, and lots of bits damaged and broken. The varnish finish had brush strokes in all directions also.
The back plate was missing from the bulkhead bench seat which meant nothing for the cushions to rest against. The lower cupboard door surround was badly damaged, and the rear bench lower front section had a corner broken, screw holes all over and a large 'U' cutout also. I replaced all these pieces by making new and staining as best i could to match. If anyone wants the old full-length rear bench front plate as a template, you are welcome to collect it.
As i have been doing this work in my garage, i don't have any specialist woodworking machinery. Fortunatel i managed to get all the plywood cut to size and shape by a local joiners very competitively.
I sourced some black 'T-bar' plastic edge moulding for the new backboard. Half the removable hinges were still in place and i ordered some new ones off ebay, and the other half matched perfectly!
I stripped the Sink unit down and replaced all bolts with stainless. Two of the bolts have small Split pins to hold them in place. These are at the side of the sink where there is not enough space to get nuts on the bolts. I sprayed the metal hinge bars black and refurbished the Whale Pump and the wooden housing.
Once all the parts had been refinished, i decided to replace the floor. The original was individual Black & White tiles which we liked, but very scratched and some water had got underneath at some point meaning he plywood was partly blackened and soft. When i removed the flooring, the metal floor was damp and the paint was peeling and bubbling. I reved all loose paint. I was generally very pleased with the floor condition, only light surface rust in places which was treated with Hammerite treatment. Then painted with two coats of white Hammerite.
The old insulation was very basic laminate floor underlay, and i think some of the damp was due to condensation forming in the air gaps.
I got some high quality 13mm Neoprene foam rubber insulation, foil faced and sticky backing. This was stuck firmly down to reduce air gaps and seams taped. Also installed in sidewalls. This should help reduce noise and insulate the bus.
I installed a new black & white vinyl floor in roll form onto 6mm varnished plywood flooring. This should stop tile corners coming up and water getting in the gaps. While the flooring was out, i masked and resprayed the bulkhead and rear shelf areas. There were quite a few drilled holes which weren't needed so i filled them with P40 galsss fibre resin (great stuff - bridges over the holes with ease), sanded and now looks a lot better.
Once all this was done, i replaced the furniture, and it's all gone back in lovely. Very pleased with the finish and fit and all the annoying damaged bits have gone.
If anyone wants details of any bits/parts obtained, or sizes of pieces, or can use the old face plate just let me know.
http://s1347.photobucket.com/user/nickg ... slideshow/
Nickg
Registered user
Posts: 21
Joined: Fri Mar 01, 2013 8:46 pm
Re: Canterbury Pitt Interior Refurbishment
by raymond » Tue Jun 11, 2013 12:28 pm
Nick,
Excellent job, looks really impressive.
I am missing a back rest for my rear seat, so am thinking of following your one in the short term, longer term looking at building a copy of the cupboard one.
I have a favour to ask - can you please provide the size and ply gauge and also just a little detail on the fixing as it is difficult to tell from the photo if they are screw cups or the cushion press studs.
On the flooring insulation, it looks a great and would also be interested in where you sourced that from as I need to address that too.
Be very much appreciated, thanks.
Raymond
raymond
Registered user
Posts: 20
Joined: Wed Sep 21, 2011 11:39 am
Re: Canterbury Pitt Interior Refurbishment
by Nickg » Tue Jun 11, 2013 5:09 pm
Raymond:
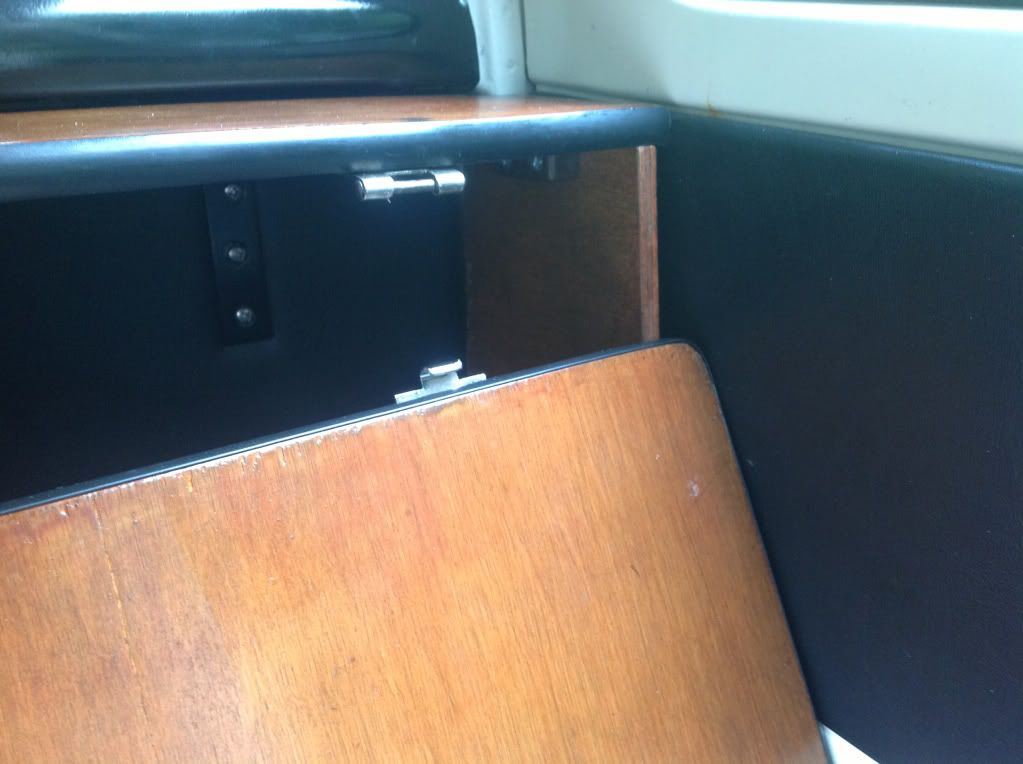
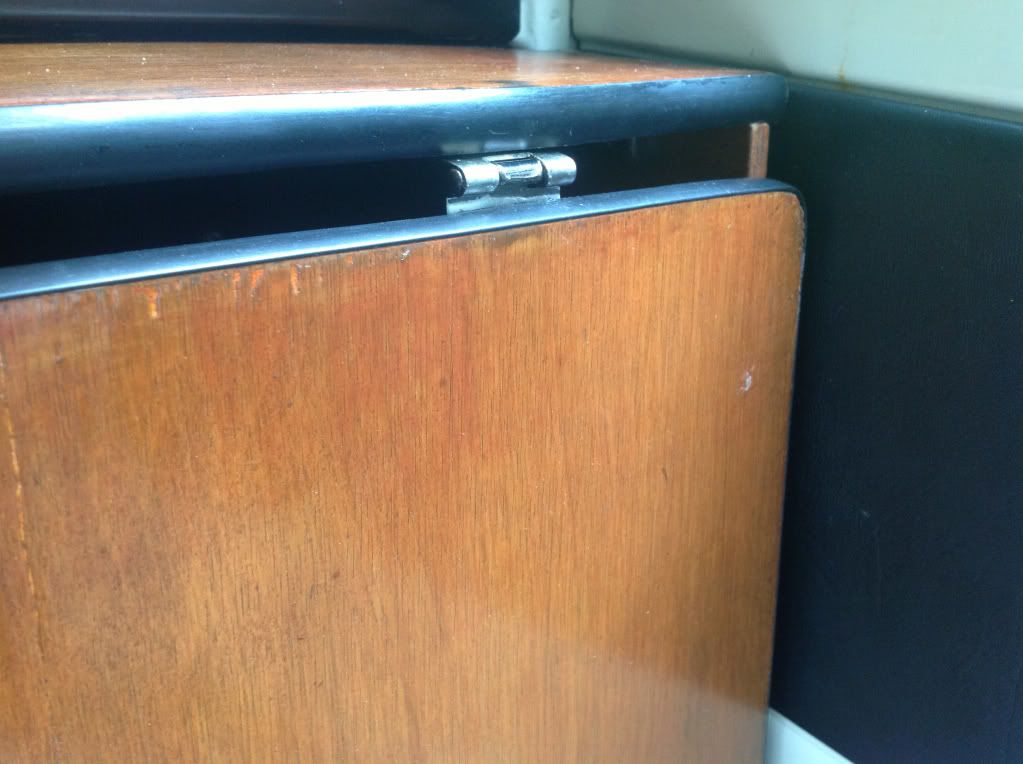
Thanks for your comments. I'm really pleased with the back board as it's the piece which has always been missing. I have attached a couple of close-up pictures to assist you. The fixings are 'lift-off' hinges which are as used on flight cases. Half the hinges were still present on mine and i managed to find some identical ones to provide the mating halves.
My board is 1165x295x12mm thick plus the plastic edging. It is removable by lifting off the hinges.
A work colleague has his own insulation company so he got me the insulation at special rates. It is very expensive but very efficient and easy to fit. I saw similar on ebay so you could try there. It came in 2mx0.5mx13mm thick sheets. I'm planning to use it for the cab floor and doors too.


Nickg
Registered user
Posts: 21
Joined: Fri Mar 01, 2013 8:46 pm
Re: Canterbury Pitt Interior Refurbishment
by raymond » Mon Jun 17, 2013 1:59 pm
Hello Nick,
Many thanks, I have done my bulk head seat as per the thread I have where Lee posted the measurements. It is the rear, rear seat back that is also missing in mine by the wardrobe cupboards and above the fold out sink.
It is the measurements for that back board that I need and be really grateful of some detail on how it is fixed please.
raymond
Registered user
Posts: 20
Joined: Wed Sep 21, 2011 11:39 am
Re: Canterbury Pitt Interior Refurbishment
by e m p i » Wed Jun 19, 2013 10:41 pm
raymond wrote:Hello Nick,
Many thanks, I have done my bulk head seat as per the thread I have where Lee posted the measurements. It is the rear, rear seat back that is also missing in mine by the wardrobe cupboards and above the fold out sink.
It is the measurements for that back board that I need and be really grateful of some detail on how it is fixed please.
There were a couple of variations on this bit. You could have either a bit of um, board that looked kind of like a window sill aboutm6" high or a bit of almost ply,sort of board that was full height from the seat base to the top of the bulk head where it joins with the bit over the engine and had some slim line cupboard accesed from the top or via 2 small sliding doors in the front. . Can't remember how it Screws on but I can have a look. Pm me an email address and I will send you over some pictures of all three and some measurements as well.
Shalom, Lee.
e m p i
Registered user
Posts: 4548
Joined: Fri Jan 28, 2005 3:51 pm
Re: Canterbury Pitt Interior Refurbishment
by Nickg » Thu Jun 20, 2013 7:09 am
Raymond:
Sorry not got back to you - been away with work this week. Mine is the 'window sill' type piece as described by empi, which fits against the rear vertical shell. Mine screws to the back of the drawer unit with a 1 1/2" spacer piece between. I'll try to post a picture at the weekend.
Sorry not got back to you - been away with work this week. Mine is the 'window sill' type piece as described by empi, which fits against the rear vertical shell. Mine screws to the back of the drawer unit with a 1 1/2" spacer piece between. I'll try to post a picture at the weekend.
Nickg
Registered user
Posts: 21
Joined: Fri Mar 01, 2013 8:46 pm
1