You are viewing the Split Screen Van Club forum archive.
The forum archive is read-only.Unfortunately in 2021 the Split Screen Van Club forum suffered a ransomware attack and lots of the forum data was lost.
What threads that have been recovered are now searchable on this site. Some threads may be incomplete and some images are still being recovered.
Forum archive search
Forum Archive > Technical
1
What to do next. paint prep.
What to do next. paint prep.
by brianjbox » Sat Apr 21, 2007 6:37 pm
Been rubbing the busses roof down today, the bus will never be a pretty bus as it has to many dents.
What I wanted to know was how much paint to take off before it's ready to be primered.
I was lucky in that there wasn't any holes anywhere only a few scabs that when cleaned off just left pitted metal, I was unlucky as it has so many coats of paint.
The pictures show the pinky colour [slight dents/depressions], a blue colour and the original army green, there are also coats of primer between each of these.
The van was rubbed down by hand with wet and dry on a block, the dents are only very slight and with the matt paint not that noticable. I think with a shiny paint, they'll be a lot more obvious, I asked about paint at a paint shop and was told to stick with gloss paint although I thought satin would look better.
1. I've treated the scabby area's with Kurust [hammerite], should these be filled to bring to paint level or the surrounding paint taken down to their level?
2. Do you primer the bare metal then fill or fill first?
3. What do people think of Hammerite rust proof primer, I have used this before and it does seem to hold the rust back longer.
4. If using the above primer, it's a brush on and will need more rubbing down, is this a good idea?
5. I intend to spray the bus back to army green, the bus has a few ripples/dents, not really bad but will show. I didn't want to try and fill the lot as afraid of it cracking, do you think satin or gloss paint?
6. Does buying a marquee thing sound like a good idea to spray a bus in, I have a big concrete drive but not enough room in the garage to enable spraying?
7. How much more paint should be removed from roof?
I'm on a real budget here so any idea's welcome especially if it saves a few pounds


One more thing please, are sunroofs easy to remove or can I expect problems there.
Cheers guys.
What I wanted to know was how much paint to take off before it's ready to be primered.
I was lucky in that there wasn't any holes anywhere only a few scabs that when cleaned off just left pitted metal, I was unlucky as it has so many coats of paint.
The pictures show the pinky colour [slight dents/depressions], a blue colour and the original army green, there are also coats of primer between each of these.
The van was rubbed down by hand with wet and dry on a block, the dents are only very slight and with the matt paint not that noticable. I think with a shiny paint, they'll be a lot more obvious, I asked about paint at a paint shop and was told to stick with gloss paint although I thought satin would look better.
1. I've treated the scabby area's with Kurust [hammerite], should these be filled to bring to paint level or the surrounding paint taken down to their level?
2. Do you primer the bare metal then fill or fill first?
3. What do people think of Hammerite rust proof primer, I have used this before and it does seem to hold the rust back longer.
4. If using the above primer, it's a brush on and will need more rubbing down, is this a good idea?
5. I intend to spray the bus back to army green, the bus has a few ripples/dents, not really bad but will show. I didn't want to try and fill the lot as afraid of it cracking, do you think satin or gloss paint?
6. Does buying a marquee thing sound like a good idea to spray a bus in, I have a big concrete drive but not enough room in the garage to enable spraying?
7. How much more paint should be removed from roof?
I'm on a real budget here so any idea's welcome especially if it saves a few pounds
One more thing please, are sunroofs easy to remove or can I expect problems there.
Cheers guys.
brianjbox
Registered user
Posts: 3064
Joined: Fri Jun 24, 2005 9:42 pm
Re: What to do next. paint prep.
by tonuptony » Sat Apr 21, 2007 7:00 pm
My experiences with spraying are that preperation is the most important part of the job. How much time you spend is all down to personal choice but if you can get all the paint off - back to bear metal, you stand a better chance of a better paint job.
When using filler this should be applied to clean metal- not paint, I used Upol easy sanding filler- worked well.
If you brush on primer it will need to be rubbed down
Using a tent is a good option choose a still warm day to paint.
Use 2 pack paint if you can - (beware of health and safety implications) you can get a good finish from the gun with very little hand finishing and take your time.
Practice on something else first - neighbours car. old panels, thinners tins.
Try and buy all of your paint in one tin to be sure of getting exactly the same clour all over.
Check out "for sale- better than a split" my morris commercial that I painted at home!
tonuptony
Registered user
Posts: 959
Joined: Wed Nov 15, 2006 9:36 pm
Re: What to do next. paint prep.
by brianjbox » Sat Apr 21, 2007 9:12 pm
Cheers for that Tony and I'd already been admiring your Morris.
If I get a tent bought it can be bare metalled, at present though it's out in the open and being used
If I get a tent bought it can be bare metalled, at present though it's out in the open and being used
brianjbox
Registered user
Posts: 3064
Joined: Fri Jun 24, 2005 9:42 pm
Re: What to do next. paint prep.
by crass camper » Mon Apr 23, 2007 7:01 pm
I'm no expert but I painted my Fiat 500 and I agree, take the roof back to bare metal you can use a dual action sander with an 80 grit to take off the paint then go over the bare metal with I think a 240 grit.
I used a self levelling filler called dolphin glaze and after sanding smooth I coated the bare metal with a wash primer to help the paint bond, then filler primer and top coats all in 2k paint.
I have the pics and how I did it on my drop shots site, link below go to months then back to may 2006 through to middle of June past the gearbox rebuild.
crass camper
Registered user
Posts: 645
Joined: Wed Jan 17, 2007 1:15 pm
Re: What to do next. paint prep.
by brianjbox » Mon Apr 23, 2007 7:44 pm
Cheers and off to check your site out nowcrass camper wrote:I'm no expert but I painted my Fiat 500 and I agree, take the roof back to bare metal you can use a dual action sander with an 80 grit to take off the paint then go over the bare metal with I think a 240 grit.
I used a self levelling filler called dolphin glaze and after sanding smooth I coated the bare metal with a wash primer to help the paint bond, then filler primer and top coats all in 2k paint.
I have the pics and how I did it on my drop shots site, link below go to months then back to may 2006 through to middle of June past the gearbox rebuild.
brianjbox
Registered user
Posts: 3064
Joined: Fri Jun 24, 2005 9:42 pm
Re: What to do next. paint prep.
by matt » Mon Apr 23, 2007 8:20 pm
Im doing mine at the moment
mine didnt really have much rust either, i used Granville rust converter, it turns the pitting to a dark colour ( a bit like Krust )
The key is sanding down any other imperfections, my bus had been sprayed in SA and it had lots of runs in it
I sprayed the bottom half today, ive never sprayed B4 in my life, i brought a HVLP spray gun ( they cost about 60 quid ) and 2 tins of Synthetic truck / car paint , the finish is really good im really pleased
i put up a 10 ft X 20 ft portable garage on my drive, put down some black plastic sheetng on the drive and away i went
I spent along time over the last few weeks prepping the paint and sanding out any runs / filling dents etc
the only downside of today was i must have not spent long enough sanding the drivers and passenger doors, the first coat of spray showed up loads of runs in the paint below, so i stopped spraying with the idea of sand them down on the weekend and hang them in my garage to spray them again
as i said, i am very hapy with the finish, i guess if i spent a while with some wet and dry the finish would come up really good, i might do that when i have some spare time, but as it is, its a nice job anyway, nice enough to have been happy with if i had taken it to a spray shop
matt
Registered user
Posts: 1087
Joined: Thu Jun 16, 2005 7:25 pm
Re: What to do next. paint prep.
by brianjbox » Tue Apr 24, 2007 5:28 am
Hi Matt
Just what I wanted hear we're using the bus weekends and although I do want a good job I haven't got the time/dosh to put into it at present.
It's never going to be a show bus [swedish army used it for target practice and they started to get good ] but just to get it looking nice'ish [one colour] will do for now.
Cheers for the info
Brian
Just what I wanted hear
It's never going to be a show bus [swedish army used it for target practice and they started to get good
Cheers for the info
Brian
brianjbox
Registered user
Posts: 3064
Joined: Fri Jun 24, 2005 9:42 pm
Re: What to do next. paint prep.
by buggirl » Tue Apr 24, 2007 9:23 am
I have found this thread really helpful, thanks guys! i am just about to attempt to do my Single Cab on my drive under a gazeebo thingy! I am going to roller her and see what happens!!! I am hoping by sanding her down on Friday, that i am not going to find too much wrong!
I will post my progress.
Vic
x
Vic
x
buggirl
SSVC Member
Posts: 468
Joined: Fri Jun 09, 2006 7:51 pm
Re: What to do next. paint prep.
by SPLIT 1 » Tue Apr 24, 2007 9:44 am
As mentioned above, its all down to the prep.
Any monkey can spray paint but it will show up every mark and tiny dent or differance between previous paint levels.
If you can get it back to bare metal, then use the filler, sand back and then when it is flat and smooth go over the lot with etch primer.
I would use a 2 pac solid paint as this gives a great finish from the gun.
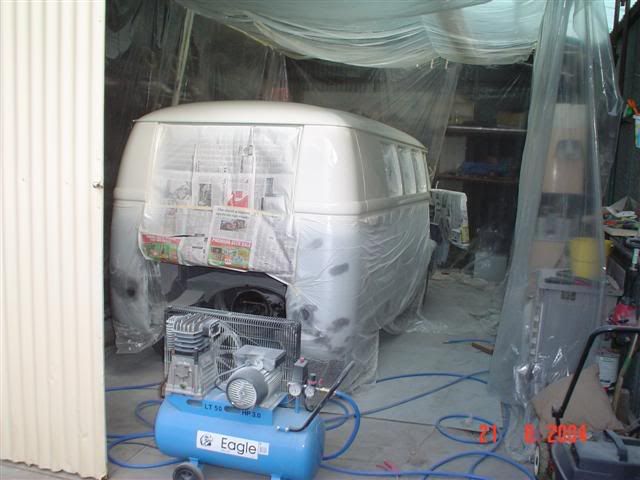
Use a portable garage or make one out of tarps as you will be supprised at how much dust settles or rubbish is in the air.
Dave
Any monkey can spray paint but it will show up every mark and tiny dent or differance between previous paint levels.
If you can get it back to bare metal, then use the filler, sand back and then when it is flat and smooth go over the lot with etch primer.
I would use a 2 pac solid paint as this gives a great finish from the gun.
Use a portable garage or make one out of tarps as you will be supprised at how much dust settles or rubbish is in the air.
Dave
SPLIT 1
Registered user
Posts: 1549
Joined: Sun May 11, 2003 6:40 am
Re: What to do next. paint prep.
by dalester » Tue Apr 24, 2007 10:01 am
I too, am finding this thread super-useful......
My question - having removed rust on my bus with Kurust, & sanded-down by hand, I am left with pitted metal in the roof sill above the windscreen.
What next?
Do I need to sand further to smooth out the pitted metal - & if so how?
Or do I use a filler, then sand again to achieve a smooth finish?
Thx
My question - having removed rust on my bus with Kurust, & sanded-down by hand, I am left with pitted metal in the roof sill above the windscreen.
What next?
Do I need to sand further to smooth out the pitted metal - & if so how?
Or do I use a filler, then sand again to achieve a smooth finish?
Thx
dalester
Registered user
Posts: 283
Joined: Thu Nov 30, 2006 2:33 pm
Re: What to do next. paint prep.
by brianjbox » Tue Apr 24, 2007 11:36 am
Hidalester wrote:I too, am finding this thread super-useful......
My question - having removed rust on my bus with Kurust, & sanded-down by hand, I am left with pitted metal in the roof sill above the windscreen.
What next?
Do I need to sand further to smooth out the pitted metal - & if so how?
Or do I use a filler, then sand again to achieve a smooth finish?
Thx
If you sand down the surrounding metal till you reach/sand out the pit's, you will have greatly reduced the thickness of what was good rustfree metal around it.
I have a few scabby area's on my roof that now the rust has been removed have left pitted lower area's, I have treated with kurust and intend to fill these so flush with surrounding metal.
I hate putting filler in but it's to easy to attack your bus with a sander/grinder until the area is bright and shiny, better I think to get a wire brush type attatchment for your drill and use this in the pitted area to remove all the rust and leave the surrounding metal at the thickness it is.
Treat with a rust cure type stuff, fill/prime/paint
brianjbox
Registered user
Posts: 3064
Joined: Fri Jun 24, 2005 9:42 pm
Re: What to do next. paint prep.
by matt » Tue Apr 24, 2007 5:49 pm
i was planning to roller mine, but what i have read is it takes 4 coats to cover the vans old paint 100 % then you need a extra 2 coats , added to it the sanding time between every 2nd coat, thats going to be time consumingbuggirl wrote:I have found this thread really helpful, thanks guys! i am just about to attempt to do my Single Cab on my drive under a gazeebo thingy! I am going to roller her and see what happens!!! I am hoping by sanding her down on Friday, that i am not going to find too much wrong!
Vic
x
buy a HVLP setup, about 60 quid and you can spray the SC in 1 day, 2 days if you use 2 colours
matt
Registered user
Posts: 1087
Joined: Thu Jun 16, 2005 7:25 pm
Re: What to do next. paint prep.
by SPLIT 1 » Wed Apr 25, 2007 6:31 am
If the panels have pitting, do not try and sand these out, it will make the metal too thin.
There is nothing wrong with using filler if used correctly.
Just using it to fill small areas is fine.
Always remember it is best to use filler on bare metal, then you know it is going to stick properly, if you put it over old paint it can peel off after time.
Always use an etch primer or an epoxy one.
Prep is 99% of the job, if you do a quick prep job it will show on the final finish.
I had never painted before and used a 2 pac, with a good 3M breathing mask, not air fed but the proper cartidges.
My paint job came out fine and I did manage to win a show first time out.
Its also a great acheivement to be able to do the job yourself.
If you use a solid colur 2 pac there is no sanding between coats ect, just get it ready and spray, I managed to get it shiny from the gun but you can also polish it afterwards with cutting compound ect if you end up with any dry spots.
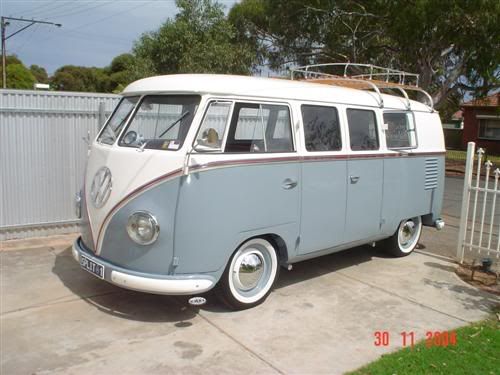
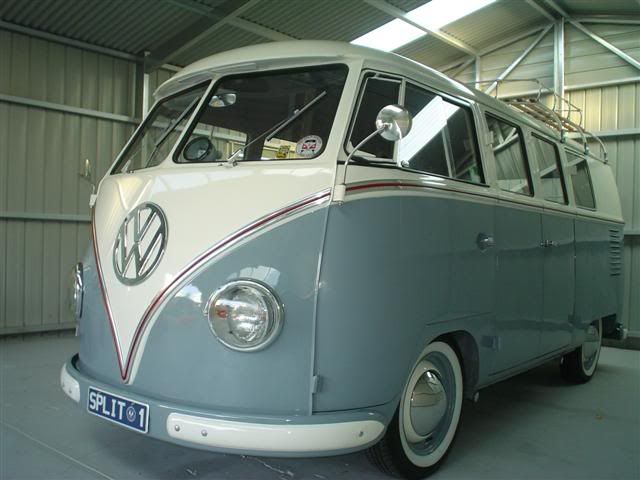
Here we go, chance to show a pic of my self painted van, I just love it when people do their own work.
And trust me, if I can do it anyone can
There is nothing wrong with using filler if used correctly.
Just using it to fill small areas is fine.
Always remember it is best to use filler on bare metal, then you know it is going to stick properly, if you put it over old paint it can peel off after time.
Always use an etch primer or an epoxy one.
Prep is 99% of the job, if you do a quick prep job it will show on the final finish.
I had never painted before and used a 2 pac, with a good 3M breathing mask, not air fed but the proper cartidges.
My paint job came out fine and I did manage to win a show first time out.
Its also a great acheivement to be able to do the job yourself.
If you use a solid colur 2 pac there is no sanding between coats ect, just get it ready and spray, I managed to get it shiny from the gun but you can also polish it afterwards with cutting compound ect if you end up with any dry spots.
Here we go, chance to show a pic of my self painted van, I just love it when people do their own work.
And trust me, if I can do it anyone can
SPLIT 1
Registered user
Posts: 1549
Joined: Sun May 11, 2003 6:40 am
1