You are viewing the Split Screen Van Club forum archive.
The forum archive is read-only.Unfortunately in 2021 the Split Screen Van Club forum suffered a ransomware attack and lots of the forum data was lost.
What threads that have been recovered are now searchable on this site. Some threads may be incomplete and some images are still being recovered.
Forum archive search
empsters ongoing ride.......pics of a little local classic car show
Re: empsters ongoing ride.......pics of a little local classic car show
by e m p i » Mon Aug 03, 2015 6:54 am
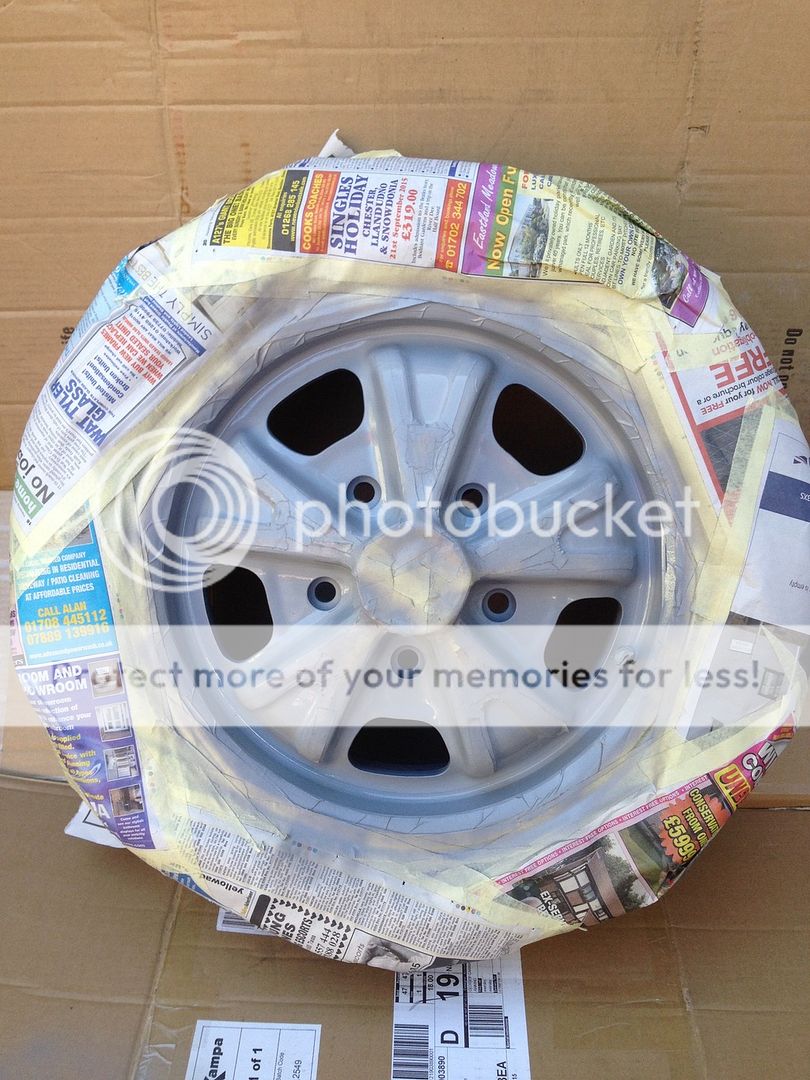
Right, once the masking up was all done I called it a day (night) and went to bed. To be honest I wasn't that impressed with the lining tape I'd used as it didn't do the curves as well as I'd hoped. If I had more time (story of my life
 ) I would have bought some more and done them again.
Anyway, off to work nice and early after checking the tape was still stuck down. It was for the most part so I just had to re-stick a few bits. Once home I got a couple of coats of primer on and let it dry in the shed with the assistance of a small fan heater (it was quite late by now so quite cold outside)
Thought I'd give it a day to dry properly then do the top coats.
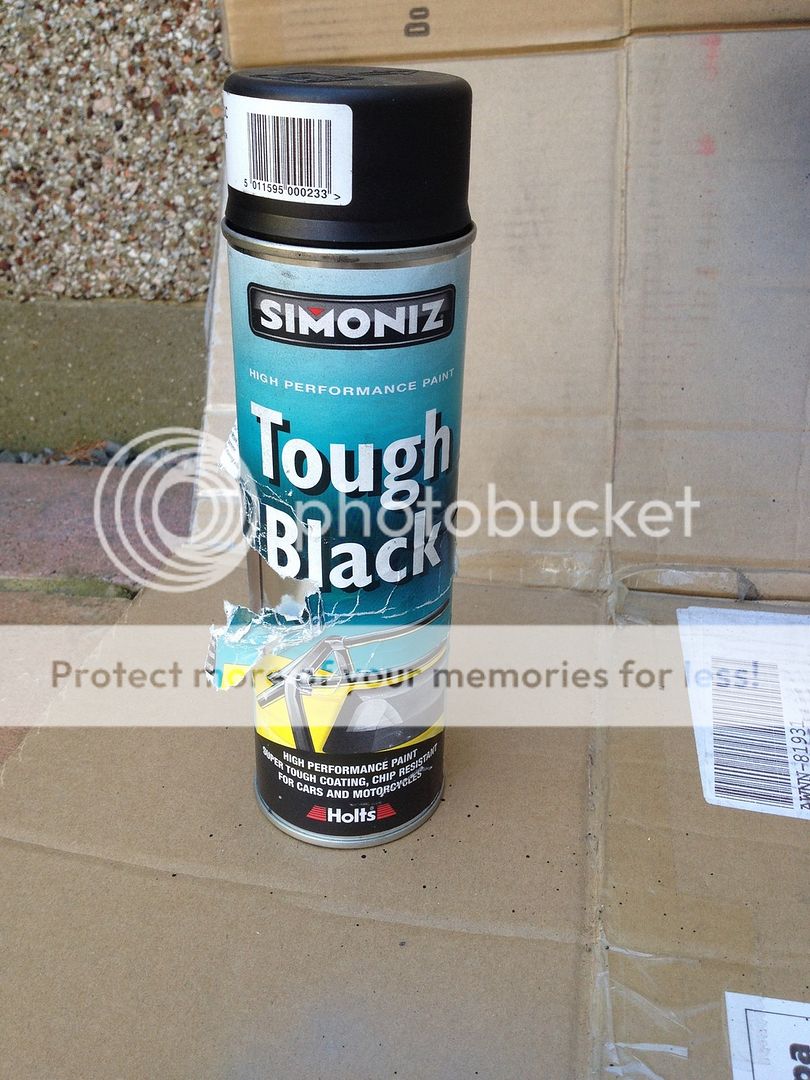
Having done then (badly) before with normal rattle cans I thought I'd have a go with the same stuff I used on the valence as it's not only heat resistant but allegedly also chip resistant.
It seems a bit thicker as it goes on but other than that we will have to see. I laid a mahooooosive bit of cardboard on the patio to put the wheel on so I didn't get any over-spray on anything and went for it.......
Cheers, Lee.
Anyway, off to work nice and early after checking the tape was still stuck down. It was for the most part so I just had to re-stick a few bits. Once home I got a couple of coats of primer on and let it dry in the shed with the assistance of a small fan heater (it was quite late by now so quite cold outside)
Thought I'd give it a day to dry properly then do the top coats.
Having done then (badly) before with normal rattle cans I thought I'd have a go with the same stuff I used on the valence as it's not only heat resistant but allegedly also chip resistant.
It seems a bit thicker as it goes on but other than that we will have to see. I laid a mahooooosive bit of cardboard on the patio to put the wheel on so I didn't get any over-spray on anything and went for it.......
Cheers, Lee.
e m p i
Registered user
Posts: 5148
Joined: Fri Jan 28, 2005 3:51 pm
Re: empsters ongoing ride.......pics of a little local classic car show
by wejjy » Mon Aug 03, 2015 7:08 am
Looking forward to the results mate, when do we get the big reveal??
wejjy

Registered user
Posts: 1465
Joined: Sun Jun 05, 2005 8:40 am
Re: empsters ongoing ride.......pics of a little local classic car show
by e m p i » Tue Aug 04, 2015 8:28 pm
wejjy wrote:Looking forward to the results mate, when do we get the big reveal??
Got home from work and thought I'd give it a couple of coats in between the nightmare of getting the polystyrene coving off my ceilings then having to use a 1" chisel to slowly go around the walls and ceiling to very very slowly and tediously chip off the coving adhesive
Anyway, back to the wheel........
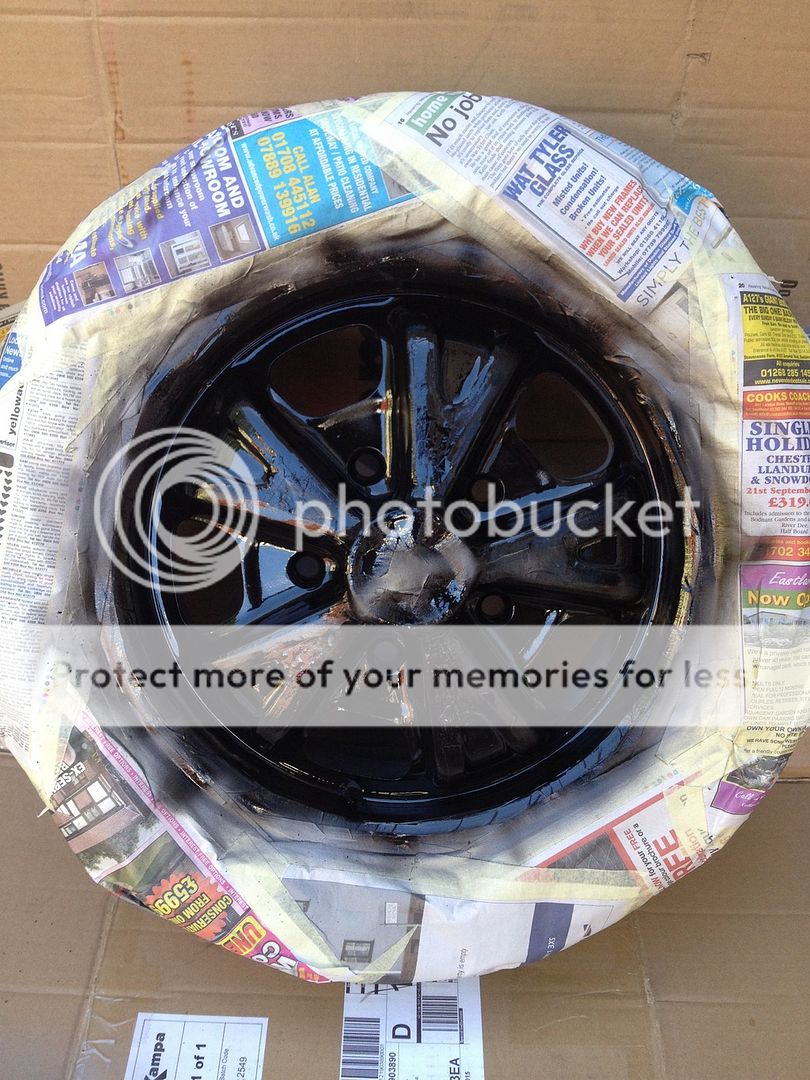
So that's it, a couple of coats. It seemed to go on easier than normal rattle can stuff as I think it seems slightly thicker and so less prone to runs. Then comes the best/worst part of it all.........pulling the masking off to see what is all come out like
So I'll let you know how that came out another day

Cheers, Lee.
Ps Wejji, I haven't forgotten about the ARB it's just a bit manic as we are having new windows, living room plastered and flooring done so,everything is a bit up in the air at the moment. I will sort out getting a quote to courier it as soon as I get a chance
e m p i
Registered user
Posts: 5148
Joined: Fri Jan 28, 2005 3:51 pm
Re: empsters ongoing ride.......pics of a little local classic car show
by e m p i » Tue Aug 11, 2015 6:42 am
So off comes the masking tape vary carefully. There were a few bits where it had bled slightly under the lining tape but I cleaned these up with the use of a Stanley blade.
Had to let the paint dry and looked on the internet about temps that it cures at best and it seemed 30* is about right for 12 hours but a) the oven doesn't go that low and b) it wouldn't fit anyway
So found a viable alternative............lowered the back seat on the car and left it in the sun with the windows closed all day with the wheel in the back
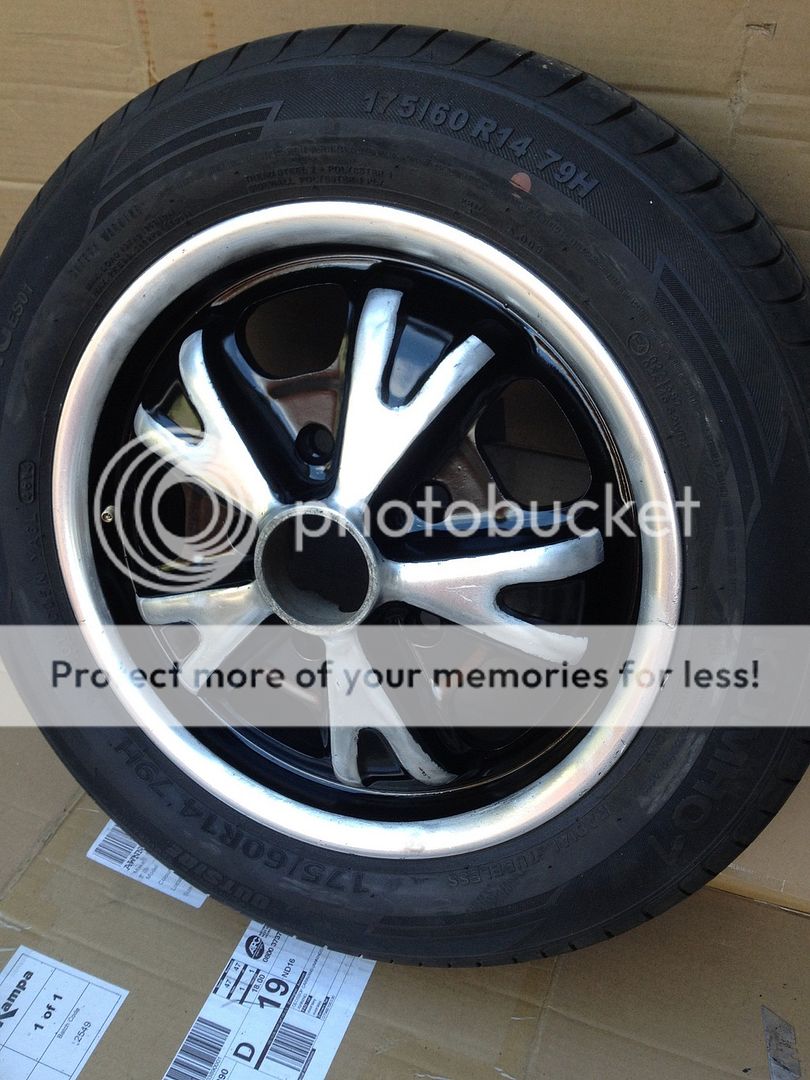
Not too shabby and certainly looked better than it did before with all the chips. Just gotta find the time to do the other three wheels now
When I get a chance I'll also polish the highlights up a bit more as well but as we've bad the plasterers and window fitters in for the last few weeks trying to get anything done gas been a complete nightmare.
Cheers, Lee.
Had to let the paint dry and looked on the internet about temps that it cures at best and it seemed 30* is about right for 12 hours but a) the oven doesn't go that low
So found a viable alternative............lowered the back seat on the car and left it in the sun with the windows closed all day with the wheel in the back
Not too shabby and certainly looked better than it did before with all the chips. Just gotta find the time to do the other three wheels now
When I get a chance I'll also polish the highlights up a bit more as well but as we've bad the plasterers and window fitters in for the last few weeks trying to get anything done gas been a complete nightmare.
Cheers, Lee.
e m p i
Registered user
Posts: 5148
Joined: Fri Jan 28, 2005 3:51 pm
Re: empsters ongoing ride.......pics of a little local classic car show
by clymoj » Tue Aug 11, 2015 10:54 am
Looking nice Lee
clymoj
Registered user
Posts: 1124
Joined: Tue Mar 27, 2012 12:10 pm
Re: empsters ongoing ride.......pics of a little local classic car show
by wejjy » Tue Aug 11, 2015 12:12 pm
They look awesome mate, nice work!! Looking forward to seeing them all back on the van, bet you are too!!
wejjy
Registered user
Posts: 1465
Joined: Sun Jun 05, 2005 8:40 am
Re: empsters ongoing ride.......pics of a little local classic car show
by e m p i » Thu Aug 13, 2015 6:47 pm
Cheers guys
 Yup, can't wait to get the others done and all back on the van.
Next big project is going to be getting the pop-top hole welded up EEK !!
Next big project is going to be getting the pop-top hole welded up EEK !!
e m p i
Registered user
Posts: 5148
Joined: Fri Jan 28, 2005 3:51 pm
Re: empsters ongoing ride.......pics of a little local classic car show
by e m p i » Fri Sep 04, 2015 9:59 pm
Well nothing much done really. I managed to get another wheel done so that's two down and four left to go
(I have two spares). At this rate I might have them all done by christmas
I'm not going to bother with pics as they're the same as the last set when I did the other wheel...
Hoping that over the weekend I'm going to get a chance to have two new rear tyres fitted and then keep the best one as a spare as I've got 4 different sizes in total now - two on the front 175/60x14, two on the back 185/65x14, one spare for the front 155/65x14 and an odd-bod spare for the back 185/60x14 that I can't remember where it came from but is a bit scrubbed on one edge.
Also had a play about with the passenger side seatbelt as I need a 3-point to strap the child seat into. I was using an inertia reel with a ratchet strap as well (don't ask - it didn't look too god but it worked fine) on the rear facing baby seat but now that Little Empi has gone up a seat to a forward facing one it was a bit of a pain to get it to fit tight. I used the inertia reel but it wouldn't stay tight enough so I had to basically tie the base down with a length of old seatbelt I had lying about. It looked worse than the ratchet strap set-up but also worked fine I've bought a static 3-point now so I can pull it all in tight and I'm hoping that will work without any bits needing to be tied down
My B-post has had a slit cut into it and then folded back to allow me to carefully slide a threaded seatbelt anchor inside it but the problem was that once the bolt was undone the anchor can drop down inside the pillar never to be seen again
 Wasn't sure how to get round this until I found a small magnet out of something electrical (no idea what it was but it was definitely something electrical) and I managed to open the slit again (ooeerr missus) and put the magnet across the gap and got it to latch on to the anchor plate. I then undid the bolt and the magnet held it in place (sort of) until I could jam a screwdriver through the hole in the B-post and into the anchor plate to stop it disappearing. I then managed to get the new belt/bolt in position by holding it all in place with the magnet. Job done and it's all secure. Due to rain and time constraints I've not tried the new baby seat in it yet but I'm hopeful
Cheers, Lee.
Hoping that over the weekend I'm going to get a chance to have two new rear tyres fitted and then keep the best one as a spare as I've got 4 different sizes in total now - two on the front 175/60x14, two on the back 185/65x14, one spare for the front 155/65x14 and an odd-bod spare for the back 185/60x14 that I can't remember where it came from but is a bit scrubbed on one edge.
Also had a play about with the passenger side seatbelt as I need a 3-point to strap the child seat into. I was using an inertia reel with a ratchet strap as well (don't ask - it didn't look too god but it worked fine) on the rear facing baby seat but now that Little Empi has gone up a seat to a forward facing one it was a bit of a pain to get it to fit tight. I used the inertia reel but it wouldn't stay tight enough so I had to basically tie the base down with a length of old seatbelt I had lying about. It looked worse than the ratchet strap set-up but also worked fine
Cheers, Lee.
e m p i
Registered user
Posts: 5148
Joined: Fri Jan 28, 2005 3:51 pm
Re: empsters ongoing ride.......pics of a little local classic car show
by e m p i » Mon Sep 07, 2015 9:11 pm
So had a couple of tyres put on the back today, cost £75 the pair inc valve and balance so not too bad. Went for the same size as before of 185/65HR14. I also ditched the odd-bod size spare and had the best of the old rear tyres put onto the spare. I now have two matching fronts and two matching rears plus a spare which is almost the same size for the front and a spare that is the same size as the rears. Only thing is that the spare for the rear is a directional. I had a Google and according to the AA it isn't dangerous to run a directional the wrong way but it is an MOT fail, which i thought odd as if it isn't dangerous why is but a fail ? Anyway, as most punctures are near side I had it fitted directionally for the near side. I also cleaned up the back of the wheels as per before to remove all the caked on road gunk and baked on brake dust. As they were rears it wasn't too bad a job this time and I just used a wire brush attachment on a drill then finished them off with some wet and dry and a clean up with some alloy wheel cleaner.
I'm still putting off that roof job
Cheers, Lee.
I'm still putting off that roof job
Cheers, Lee.
e m p i
Registered user
Posts: 5148
Joined: Fri Jan 28, 2005 3:51 pm
Re: empsters ongoing ride.......pics of a little local classic car show
by lids_2001 » Tue Sep 08, 2015 5:25 am
Remove the spare wheel when you get the MOT it can't fail then
Sent from my iPhone using Tapatalk
Sent from my iPhone using Tapatalk
lids_2001
SSVC Member
Posts: 195
Joined: Sat Dec 10, 2005 7:09 pm
Re: empsters ongoing ride.......pics of a little local classic car show
by e m p i » Wed Sep 09, 2015 8:50 am
lids_2001 wrote:Remove the spare wheel when you get the MOT it can't fail then
Unless the mot tester is planning to climb up onto the roof rack it's not gonna be a problem
Dug the other spare out from behind the front bench seat yesterday and cleaned all the gunk off the back of that as well. I've sussed that the easiest way of doing it is a wire brush attachment on a drill and do it with it all dry then finish it off with some wet n dry. It's a grubby job and the dust is horrible so I've been wearing a mask. Still get black bogies though
Just gotta find the time to do the other wheels and the roof now
Cheers, Lee.
e m p i
Registered user
Posts: 5148
Joined: Fri Jan 28, 2005 3:51 pm
Re: empsters ongoing ride.......pics of a little local classic car show
by e m p i » Sat Sep 19, 2015 9:23 pm
If you cast your mind back a fair few months , remember that last year at Slough I bought some oval bug coat hooks that I polished up
Well today I actually got around to fitting them in the bus
I was going to put them just above the front cargo door but decided that I couldn't face putting any holes in the OG Canterbury Pitt interior wood strip that runs along the edge just under where the roof goes on. There wasn't anywhere else to screw then into without damaging the interior so in the end I put one on each of the cargo doors it the top corner by where the door lock rods are as I'd rather drill the doors than the interior. Well it's only taken me 10 months to get round to fitting them
Still keep looking at that roof which I want to tackle over the winter
Cheers, Lee
e m p i wrote:But enough bad vibes.......let's have some good vibes
Remember the two small coat hooks from up there ^^^ which I bought at Slough? Well after a polishing session they came up rather nicely.
Here's a pic of one before and one after
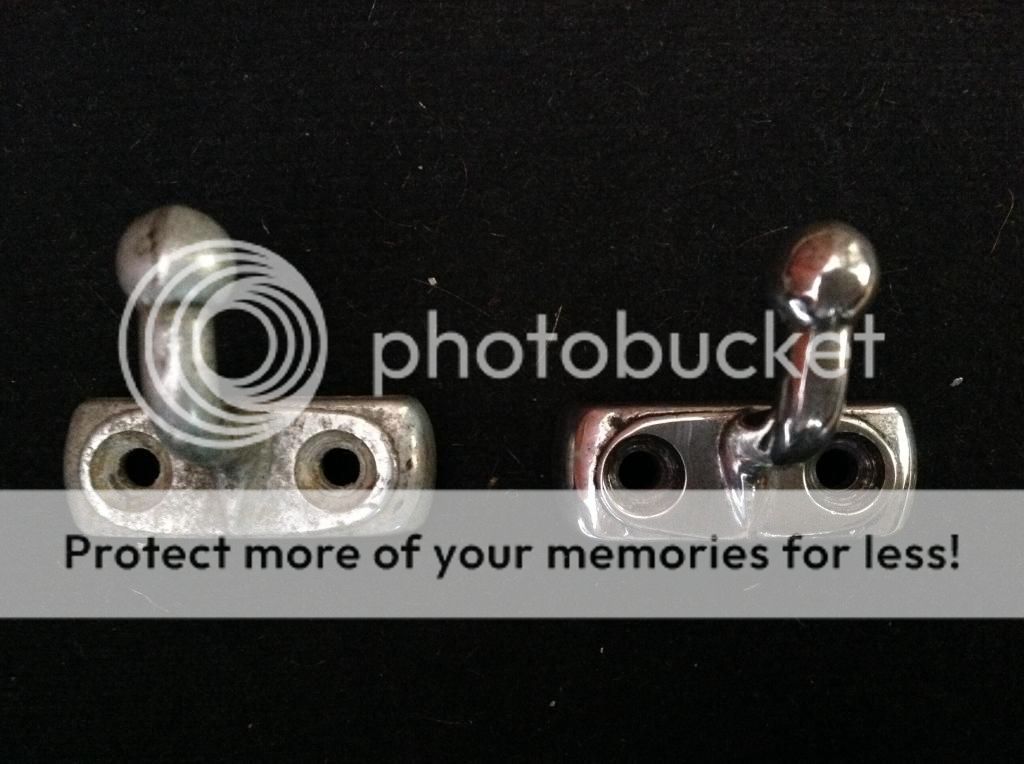
Bit of autosol and some elbow grease and they're sparkling nicely back and front


Just gotta work out where in the bus I'm going to put them but I'd like them to go on the forward cargo door as that's generally where we hang out coats when we go camping/surfing. All I need to do now is to find a slightly smaller one for little Empi to hang his little coat on
Cheers, Lee.
Well today I actually got around to fitting them in the bus
I was going to put them just above the front cargo door but decided that I couldn't face putting any holes in the OG Canterbury Pitt interior wood strip that runs along the edge just under where the roof goes on. There wasn't anywhere else to screw then into without damaging the interior so in the end I put one on each of the cargo doors it the top corner by where the door lock rods are as I'd rather drill the doors than the interior. Well it's only taken me 10 months to get round to fitting them
Still keep looking at that roof which I want to tackle over the winter
Cheers, Lee
e m p i
Registered user
Posts: 5148
Joined: Fri Jan 28, 2005 3:51 pm
Re: empsters ongoing ride.......pics of a little local classic car show
by e m p i » Sat Sep 26, 2015 10:06 pm
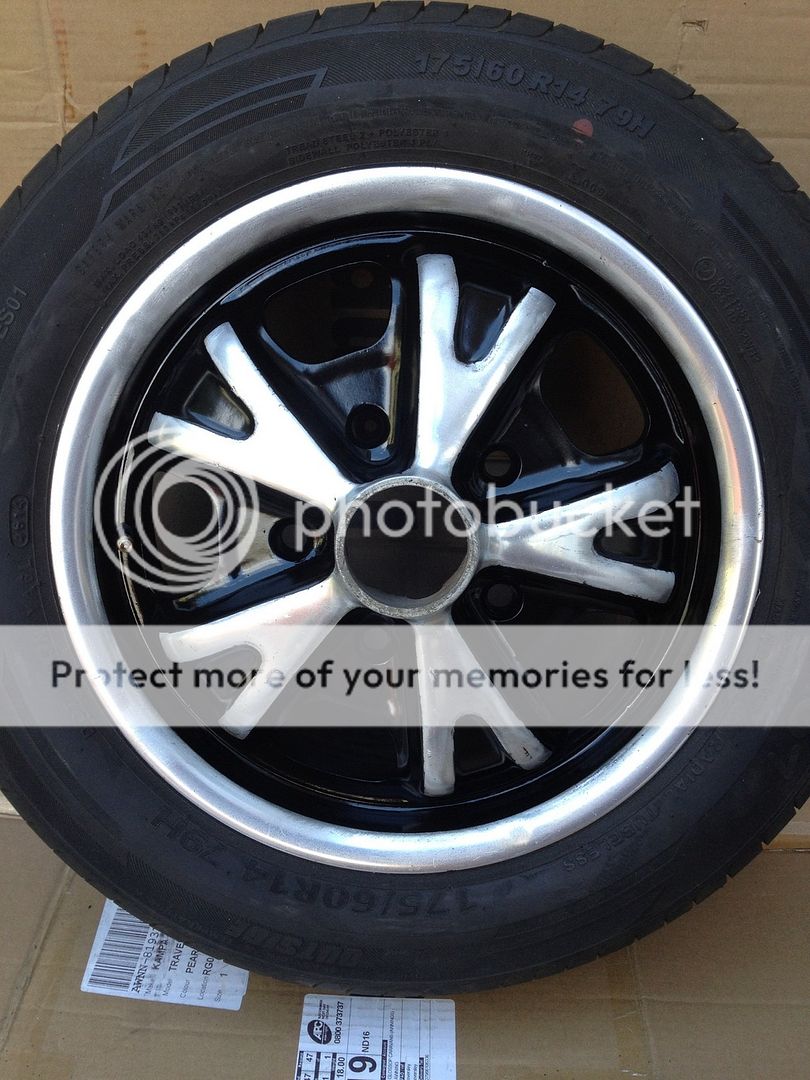
Well at last I've finally finished painting all the wheels
I did the last one the other night after work with it propped against some cardboard on the patio (no overspray allowed on the patio or Mrs. Empi will do her nut ). I'd spent the morning stripping the paint off the last one and getting it masked up but then it started raining so I couldn't paint it and then I ran out of time and had to go to work

By the time I got in from work it was gone 9pm so I ended up doing it using the light from our security light and a torch I had a fan heater going in the shed with the wheel propped against it to warm it up and the cans in a bowl of hot water in the kitchen
I was running back and forth to the shed with the wheel between coats to dry it off before the next coat went on and I hate to think (again) what the neighbours though I was doing
Anyway, managed to got it done and get the masking off without trashing the paint then it was time for bed as I had a 7am start at work the next day
Got up nice and early and knowing it was supposed to be a nice sunny day and before I went to work I put the painted wheel in the car with the seats folded down and made sure it was gonna be parked in the sun all day
It's been in there along with another one for a couple of days so it should be all dry and set by now. All going well I shall dig them out tomorrow and give them a wax n polish and get them back on the bus. Gotta make sure it's all done by about 10am though as I'm off to pick up a rather large "little tikes" playhouse for Little Empi. Not sure if it comes apart but if not I'll strap it to the roof. Can't look any more odd than the "little tikes" slide that I had strapped to the roof a few weeks ago
Onwards and Upwards....
Cheers, Lee.
I did the last one the other night after work with it propped against some cardboard on the patio (no overspray allowed on the patio or Mrs. Empi will do her nut
By the time I got in from work it was gone 9pm so I ended up doing it using the light from our security light and a torch
I was running back and forth to the shed with the wheel between coats to dry it off before the next coat went on and I hate to think (again) what the neighbours though I was doing
Anyway, managed to got it done and get the masking off without trashing the paint then it was time for bed as I had a 7am start at work the next day
It's been in there along with another one for a couple of days so it should be all dry and set by now. All going well I shall dig them out tomorrow and give them a wax n polish and get them back on the bus. Gotta make sure it's all done by about 10am though as I'm off to pick up a rather large "little tikes" playhouse for Little Empi. Not sure if it comes apart but if not I'll strap it to the roof. Can't look any more odd than the "little tikes" slide that I had strapped to the roof a few weeks ago
Onwards and Upwards....
Cheers, Lee.
e m p i
Registered user
Posts: 5148
Joined: Fri Jan 28, 2005 3:51 pm
Re: empsters ongoing ride.......pics of a little local classic car show
by clymoj » Sun Sep 27, 2015 10:36 am
Looking forward to some pics once they're all fitted back up.
clymoj
Registered user
Posts: 1124
Joined: Tue Mar 27, 2012 12:10 pm
Re: empsters ongoing ride.......pics of a little local classic car show
by e m p i » Sun Oct 11, 2015 9:19 pm
Took a couple of trips out over the last month or so to collect various stuff and use it for what it's meant - hauling random gear about
First up was a little tikes childrens slide. Very awkward as I couldn't work out how it all came apart do I just strapped it to the roof First of all I just stood it upright but is just looked too dangerous (like a fool I didn't get a picture) so finally settled for it lying on it's side and strapped down
fairly well. Although it did move about enough for people to stay well back on the motorway
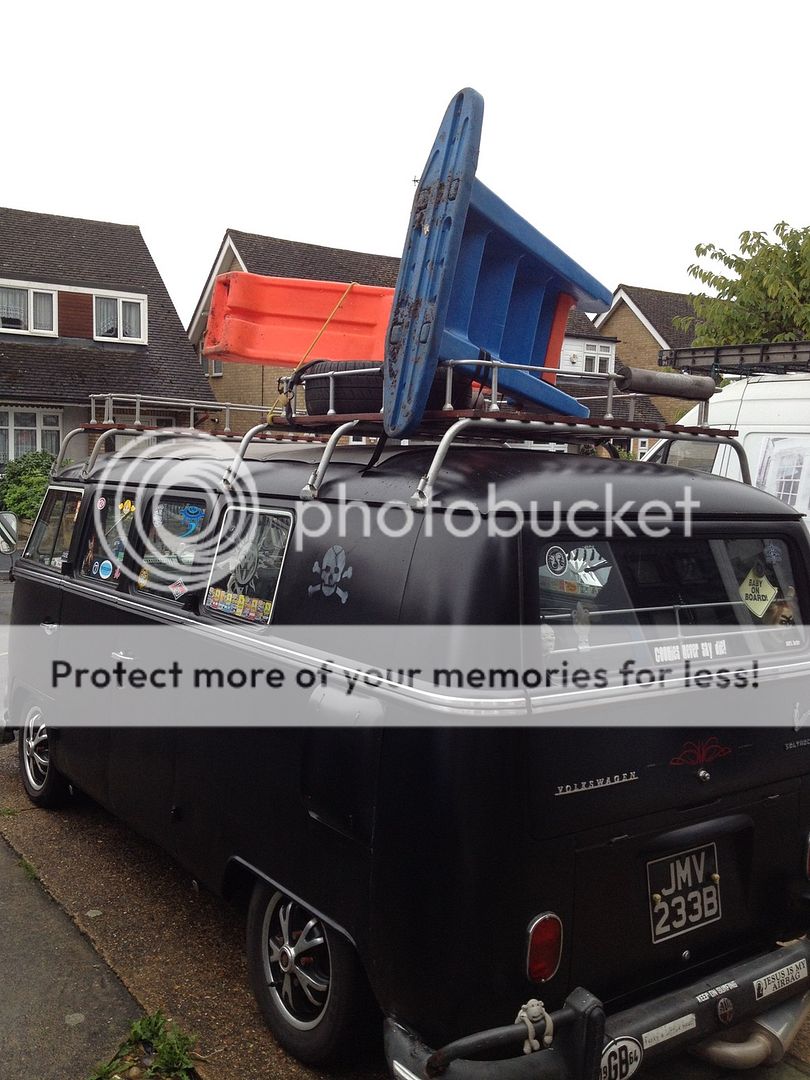
Next trip out was to pick up a little tikes childrens playhoue/school house. Thankfully this one came apart or it could have been quite interesting Once again, all strapped to the roof as well as can be expected
This time it must have looked even
more un-safe as people was giving me an even wider berth and just getting last as fast as they could. Anyway, made it home without losing so much as a wall or roof panel

Next up I'm thinking of strapping his new bunk bed to the roof....
Cheers, Lee.
First up was a little tikes childrens slide. Very awkward as I couldn't work out how it all came apart do I just strapped it to the roof
Next trip out was to pick up a little tikes childrens playhoue/school house. Thankfully this one came apart or it could have been quite interesting
Next up I'm thinking of strapping his new bunk bed to the roof....
Cheers, Lee.
e m p i
Registered user
Posts: 5148
Joined: Fri Jan 28, 2005 3:51 pm