You are viewing the Split Screen Van Club forum archive.
The forum archive is read-only.Unfortunately in 2021 the Split Screen Van Club forum suffered a ransomware attack and lots of the forum data was lost.
What threads that have been recovered are now searchable on this site. Some threads may be incomplete and some images are still being recovered.
Forum archive search
Rusty, our 1962 11 window bus, resto now in year two……er, three...
Re: Rusty, our 1962 11 window bus, resto now in year two……er, three...
by rusty1962 » Mon Mar 14, 2016 2:40 pm
Thanks Karl
Coolair do a "Hurst" type spacer, as shown above which is basoically just a folded bit of steel. I can make that easily enough but would brace the corners a little.
A machined one would be very nice though, possibly made of precious metal or, if not, aluminium
I was going to use washers to gauge the height.
Cheers
Steve
rusty1962

SSVC Member
Posts: 2590
Joined: Wed Sep 11, 2013 10:35 pm
Re: Rusty, our 1962 11 window bus, resto now in year two……er, three...
by rusty1962 » Tue Mar 15, 2016 8:32 pm
Not a lot to report today. A couple more packages arrived , but more on those in a future update.

It's Beavers night………. which means I get to have a ……………………..beer
but earlier I did a bit of snagging……. I've been struggling with the rear indicators. I've checked my wiring and that's all correct. The S/H rear units are in good order but a bit corroded, so I spent some time sorting out and cleaning the terminals and making sure there's a good earth. Still nothing at the rear
So, in order to get at the internals a bit better, I removed a spring (didn't want to bugger it at this stage though. These switches are expensive and I knew I could use it just using the front outputs) Sorry about focus…..

and then, in for a penny etc. I removed the two smaller springs

An hour or two later and after lots of air and spray and I got it working perfectly
Taillights are also working, main beam warning light now works…..on low beam…….. as the new fuse box lacks a terminal where it's needed (on the high beam fuse way) but annoyingly has extra terminals on the low beam fuse ways
I've now got only two faults to rectify………..
The hazards still only work with ignition….I thought I'd sussed that but no………and
the warning light for the indicators only works if it's grounded….and there's no ground on the speedo for the indictor warning light
Anyway…….happy with how it's looking. Should be easy to see when broken down in a lay-by
That's all for today.
Cheers,
Steve
rusty1962
SSVC Member
Posts: 2590
Joined: Wed Sep 11, 2013 10:35 pm
Re: Rusty, our 1962 11 window bus, resto now in year two……er, three...
by wizard 1066 » Tue Mar 15, 2016 10:41 pm
The spacer on our bus is a 5mm high square box to raise the shifter enough of the floor, without it the shifter can't move when it's bolted down, it came with the shifter when we bought it, hopr this helps.
wizard 1066
Registered user
Posts: 296
Joined: Fri Jan 03, 2014 7:47 pm
Re: Rusty, our 1962 11 window bus, resto now in year two……er, three...
by rusty1962 » Tue Mar 15, 2016 10:51 pm
wizard 1066 wrote:The spacer on our bus is a 5mm high square box to raise the shifter enough of the floor, without it the shifter can't move when it's bolted down, it came with the shifter when we bought it, hopr this helps.
Yes thanks.
It seems that there were two sizes of spacer, dependent on the depth of the cup. I'm planning to pack with some washers to gauge the required height before making/buying one.
Cheers
Steve
rusty1962
SSVC Member
Posts: 2590
Joined: Wed Sep 11, 2013 10:35 pm
Re: Rusty, our 1962 11 window bus, resto now in year two……er, three...
by Cleverchap » Wed Mar 16, 2016 12:07 am
I've just got in from my cave where I have been chasing my own electrical issues. It looks like we are both at very similar stages of our (very radically different) builds and it got me thinking.... what are you doing about interior?
Will you be making your own or is this something you'll farm out so you can get The Sheilas kombi on the road asap?
Will you be making your own or is this something you'll farm out so you can get The Sheilas kombi on the road asap?
Cleverchap
Registered user
Posts: 485
Joined: Thu Mar 10, 2005 2:08 pm
Re: Rusty, our 1962 11 window bus, resto now in year two……er, three...
by type21f » Wed Mar 16, 2016 5:18 am
Build a pseudo sundial riviera...?
Drawings on vintagebus.com?
SteveT made a lovely interior...
Drawings on vintagebus.com?
SteveT made a lovely interior...
type21f

SSVC Member
Posts: 10322
Joined: Tue May 29, 2007 12:55 pm
Re: Rusty, our 1962 11 window bus, resto now in year two……er, three...
by rusty1962 » Wed Mar 16, 2016 7:17 am
Cleverchap wrote:I've just got in from my cave where I have been chasing my own electrical issues. It looks like we are both at very similar stages of our (very radically different) builds and it got me thinking.... what are you doing about interior?
Will you be making your own or is this something you'll farm out so you can get The Sheilas kombi on the road asap?
It's a process that's still evolving!
What we know so far is that there will be a Rusty Lee full width bed, which we have. That will be installed by me, but Ian at P&M Taylor will do the upholstery at the same time as doing the headlining - there's not much of the roof left
There will be an overhead locker in the back. I may make that but will cost it up against my time etc.
Rear corners will have a angled storage pod each, housing speakers at the top and a pocket below. This will remove the problem of fitting the cards around the bend in the rear corners.
I'm speaking to Fabrik Mike about door trims and panels. I like the look of his wares and Ian will trim them for us. Not sure about around the Windows. We've made them look good so will probably leave "in the paint."
Sun visors trimmed by Ian. Table mount set in floor, we think.
At the bulkhead we're still scheming, but think that there will be a removable, cuboid, multifunction unit housing water supply with a tap at the top. Shelf on side for a bowl and another lower shelf for cooker - so this will be outside when in use. I may make but will again cost up.
Dual buddy seat next to this unit and single buddy seat will clip in when unit is removed , so we can maximise passengers when required.
As said, still evolving, but first time I've put it down in writing! We'll see how it finishes up.
Your/anyone's thoughts?
Steve
rusty1962
SSVC Member
Posts: 2590
Joined: Wed Sep 11, 2013 10:35 pm
Re: Rusty, our 1962 11 window bus, resto now in year two……er, three...
by type21f » Wed Mar 16, 2016 5:41 pm
Location for propex in the division cupboard....With gas bottle for cooker?
SWMBO...first question...was does it have a working heater for when we are in bed...
No not just me..
SWMBO...first question...was does it have a working heater for when we are in bed...
No not just me..
type21f
SSVC Member
Posts: 10322
Joined: Tue May 29, 2007 12:55 pm
Re: Rusty, our 1962 11 window bus, resto now in year two……er, three...
by Cleverchap » Thu Mar 17, 2016 12:47 am
I'm looking at doing my own interior as I've already got the material. It would consist of a top locker, 3/4 R+R bed and chest style fridge inside a short side cupboard next to the opening doors. Behind this (towards the rear of the kombi and below the top locker) will be a tall unit that will have a couple of lockers for storage. A table will be mounted on the long side panel but moveable for when the bed is up. I feel it would be nice to have a Devon style swing out cooker. In my experience sinks don't get used as all campsites have wash up areas, so they just take up valuable space.
I'm trying to find dimensions for the swing out cooker unit and the short side unit if any one has them to hand *hint* *hint*
I'm trying to find dimensions for the swing out cooker unit and the short side unit if any one has them to hand *hint* *hint*
Cleverchap
Registered user
Posts: 485
Joined: Thu Mar 10, 2005 2:08 pm
Re: Rusty, our 1962 11 window bus, resto now in year two……er, three...
by Cleverchap » Thu Mar 17, 2016 12:52 am
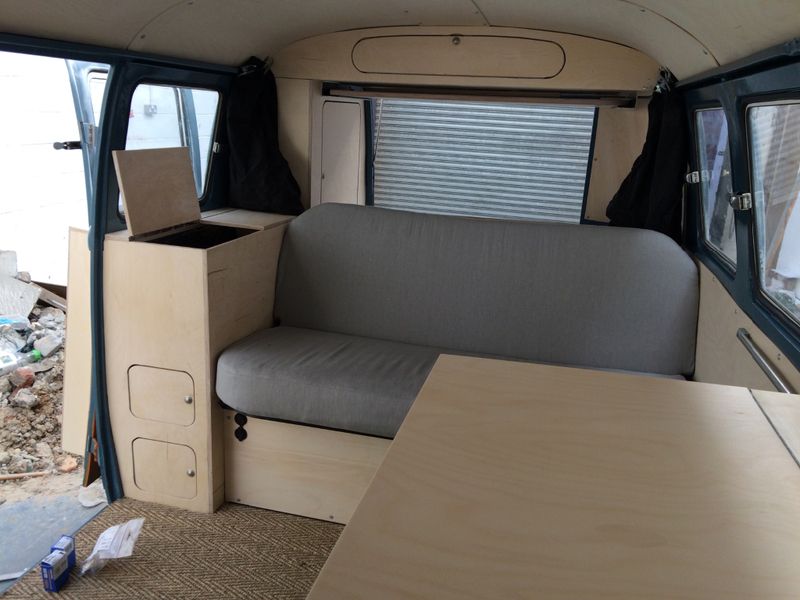
This is very similar to what I'm considering.

Cleverchap
Registered user
Posts: 485
Joined: Thu Mar 10, 2005 2:08 pm
Re: Rusty, our 1962 11 window bus, resto now in year two……er, three...
by rusty1962 » Thu Mar 17, 2016 7:02 am
That looks good. Agree with you about sink. We're planning a water spout to fill a kettle, but just a plastic bowl on a shelf for any "wild camping." The bowl can be taken to the wash up areas.
What are you doing at bulkhead end?
What are you doing at bulkhead end?
rusty1962
SSVC Member
Posts: 2590
Joined: Wed Sep 11, 2013 10:35 pm
Re: Rusty, our 1962 11 window bus, resto now in year two……er, three...
by Cleverchap » Thu Mar 17, 2016 9:57 am
Bulkhead end would be just the Devon style swing out cooker unit for now, with a sideways sliding top to maximise bench top/food prep space. I'm considering a shallow unit alongside the cooker but experience from my previous interior reminds me space for getting changed (especially when the bed is made up) is always restricted.
Cleverchap
Registered user
Posts: 485
Joined: Thu Mar 10, 2005 2:08 pm
Re: Rusty, our 1962 11 window bus, resto now in year two……er, three...
by rusty1962 » Thu Mar 17, 2016 11:00 pm
Slow progress I'm afraid. I've had a couple of days where I just can't get going and nothing seems to go well
I've spent ages chasing an electrical fault. The indicator warning light wouldn't flash. I've Googled, drawn diagrams, looked up flasher relay internal wiring etc. etc. but it wouldn't work. I thought perhaps I had a faulty flasher relay. Probably hasn't helped that I've fitted one with a separate warning light output for indicators dash lamp and trailer warning lamp, but as I saw it, it should still work
So, with this problem bumping along, I decided to put the split charge relay stuff in, which required more research and I also need to get a leisure battery. Any recommendations people? I'm looking at a 115A one on offer at Halfords if it will fit.
My VWLooms.com split charge kit came with no instructions and although a nicely made product, it's a bit "universal" so I decided to "bespoke" it a bit

It also lacked a fuse to relay link but as I've shortened the main wire considerably I can use the offcuts to make up what I need. Just need some terminals now so that's on hold. It soon became obvious that I would need to make up a plate to mount everything on. I'd seen one somewhere on another thread so I plagiarised it. Still….better than copying

Regular readers will remember that I posted this photo a few days back
The small packet was just a few bits from Autocraft, but I opened up the larger one next. Can I just take a moment to thank Simon at Red 9 Design? His Company's customer service has been outstanding. I bought a secondhand R9 front end off this forum a couple of years ago. It was still on the pallet and never fitted but there have been changes over time to improve the product. Simon has sent me all the parts to bring it right up to date

So another step backwards to fit the new column and linkage but it was good in the end

and the new column doesn't have a hole for the horn wire so I'll have to go the wireless route with a dash button backup. While I was underneath the bus, I sorted out a post for the Butty's Bits throttle linkage return spring. I think it looks neater than the stainless steel tie clip supplied

Another day dawned and I seemed to have been awake most of last night thinking about the indicator problem


 but this morning I awoke with a new thought. Have I really got 12v on both sides of the bulb? So I checked it out and I hadn't
I took out the speedo to have a better look. Here's the back of it

Now, the spade terminal at the top looks like an earthing point…..but it isn't. It's insulated from the casing…here's a closeup

It's supplied to the spade by keyswitch live (Ignition)

but the spade should connect with the bulb holder…..but it didn't…….
nothing, rien, nada….or that's what I should have…... but there was a resistance

I can only assume that when the unit was reworked, everything gets coat of lacquer, which insulates a bit like the lacquer on a coil, and that the lacquer wasn't removed between the bulb holder and the spade terminal…..strange though, but definitely no continuity. so I cleaned up the offending areas (obviously not being able to get to in between the spade and the bulb holder) and soldered in a connection

put it back in and I've got an indicator warning lamp
Still puzzling over the indicators being supplied from the key switch live and the hazards from the permanent live, but I'll get there soon
Then I decided to fit the front badge………… I've got all the correct bits, but the posts aren't really long enough…..perhaps it's the half inch of filler on the front clip
That's it
Cheers
Steve
rusty1962
SSVC Member
Posts: 2590
Joined: Wed Sep 11, 2013 10:35 pm
Re: Rusty, our 1962 11 window bus, resto now in year two……er, three...
by Vwstu » Thu Mar 17, 2016 11:35 pm
Fantastic progress, looking great too

Vwstu
Registered user
Posts: 201
Joined: Wed Jan 30, 2013 9:32 pm
Re: Rusty, our 1962 11 window bus, resto now in year two……er, three...
by Cleverchap » Fri Mar 18, 2016 6:00 pm
rusty1962 wrote:Still puzzling over the indicators being supplied from the key switch live and the hazards from the permanent live, but I'll get there soon
So you can leave your hazard lights flashing with the keys out, and you cant leave your indicator going when you park up and wander off
Cleverchap
Registered user
Posts: 485
Joined: Thu Mar 10, 2005 2:08 pm