You are viewing the Split Screen Van Club forum archive.
The forum archive is read-only.Unfortunately in 2021 the Split Screen Van Club forum suffered a ransomware attack and lots of the forum data was lost.
What threads that have been recovered are now searchable on this site. Some threads may be incomplete and some images are still being recovered.
Forum archive search
Forum Archive > Rides and Projects
UK 54
Re: UK 54
by tango54 » Sun Dec 13, 2015 11:00 pm
More cutting out.

Removed the inner front panel, remains of the inner front valance revealed


Pretty awful here, heater tube completely shot too

The RHD bit, some solid metal here under the brown stuff. Notice the gold paint under the steering box mount, which is over orange and then black before the orig stuff. The orange and black is also all over the beam etc.

A pile of fibreglass, zinc plate, plenty of rust and some BD metal

At this point the instinct is to stop pulling it apart in case I just end up with a big pile of rot, but still not quite back to a solid base to weld from.

Removed the inner front panel, remains of the inner front valance revealed


Pretty awful here, heater tube completely shot too

The RHD bit, some solid metal here under the brown stuff. Notice the gold paint under the steering box mount, which is over orange and then black before the orig stuff. The orange and black is also all over the beam etc.

A pile of fibreglass, zinc plate, plenty of rust and some BD metal

At this point the instinct is to stop pulling it apart in case I just end up with a big pile of rot, but still not quite back to a solid base to weld from.
tango54
Registered user
Posts: 24
Joined: Thu Oct 23, 2008 1:22 pm
Re: UK 54
by tango54 » Sun Dec 13, 2015 11:21 pm
A bit more cutting back. The chassis rails are heavy gauge so they need to be cut back to full thickness to weld on to.

Fiddly grafting but it needs to be done right from the start.

Sometime later with an Autocraft inner popped on the repaired chassis rails. I TIG'd the 2mm rails, it gave a cleaner deep weld


The cut out bits and the repairs

I have welded up the 20mm hole in the replacement front inner valance and drilled it to 8mm, is there anything else I should fix on this?

Fiddly grafting but it needs to be done right from the start.

Sometime later with an Autocraft inner popped on the repaired chassis rails. I TIG'd the 2mm rails, it gave a cleaner deep weld


The cut out bits and the repairs

I have welded up the 20mm hole in the replacement front inner valance and drilled it to 8mm, is there anything else I should fix on this?
tango54
Registered user
Posts: 24
Joined: Thu Oct 23, 2008 1:22 pm
Re: UK 54
by tango54 » Sun Dec 13, 2015 11:50 pm
So moving on.. I noticed the beam mount area on the RHS was bad so I dug in there whilst I was on the rails. I don't seem to have pic before I cut it out. I was concerned about keeping this accurate.

Made some panels, 2mm is hard work but it has to be right.


Happy with that. the original welds are pretty crude but I think I got it good/bad enough

The big plug welds almost look too tidy

Then I looked at the back of the right wheel arch, Erk. Maybe later.

Made some panels, 2mm is hard work but it has to be right.


Happy with that. the original welds are pretty crude but I think I got it good/bad enough

The big plug welds almost look too tidy

Then I looked at the back of the right wheel arch, Erk. Maybe later.
tango54
Registered user
Posts: 24
Joined: Thu Oct 23, 2008 1:22 pm
Re: UK 54
by Scotty » Mon Dec 14, 2015 2:17 pm
It must be nice to see new metal going back in. Looking good so far, keep up the good work
Scotty
SSVC Member
Posts: 1608
Joined: Sat Jul 26, 2003 10:08 am
Re: UK 54
by tango54 » Fri Dec 18, 2015 3:28 pm
Thanks, its dangerous coming here, I end up spending to long staring at other builds..
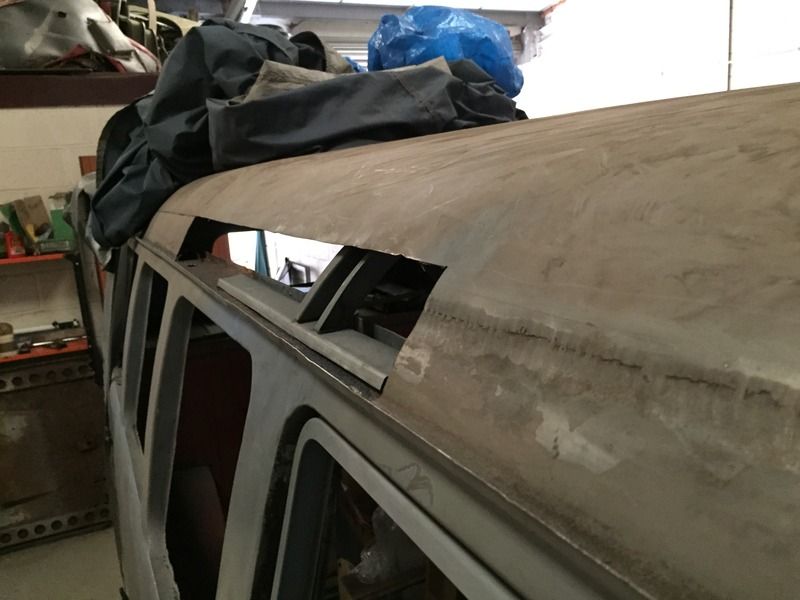
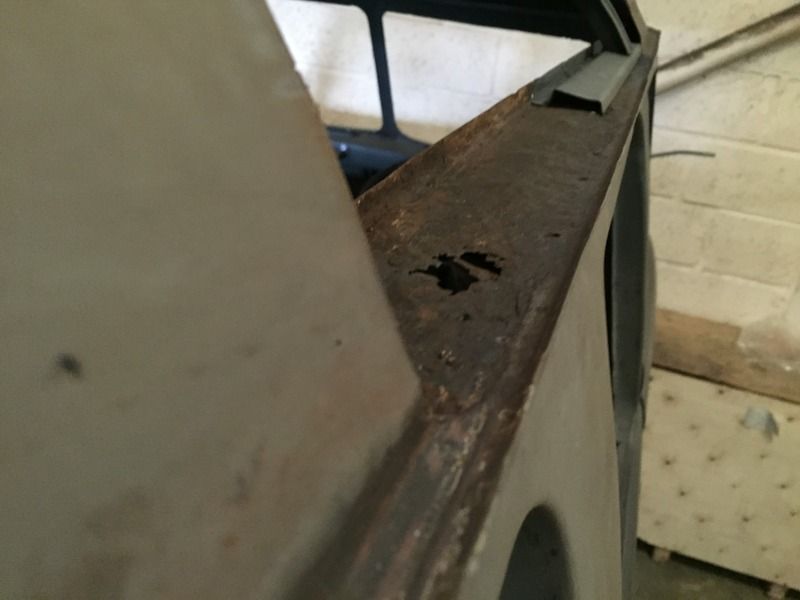
Well I moved onto the roof, does anyone have pics or can explain the joins at the top of the B pillar?
It looks like (on the inside) there is a slightly smaller piece of 'drip channel' on top of the B pillar that the long side channel slots under, and the same for the over cab door drip tray on the forward side. Not sure how that should be on the outside.
Old pic

tango54
Registered user
Posts: 24
Joined: Thu Oct 23, 2008 1:22 pm
Re: UK 54
by type21f » Fri Dec 18, 2015 5:15 pm
Not sure but it reminds of pics I took to explain the addition of a panel over the cargo doors..


The last picture is Sherry ship of Theseus. .. March 1962...
I took these pictures to explain that panel vans and kombis do not have headlinings and so they do not have the added panel. ...
For the microbus the panel is added for tensioning the headlining..and the finisher bead fits in the gap..
The thread was about how to add a curtain rail down the side and the poster had a bus based on a kombi...and could not understand why he had no place to screw it to..
G
type21f
SSVC Member
Posts: 10402
Joined: Tue May 29, 2007 12:55 pm
Re: UK 54
by tango54 » Sat Dec 19, 2015 12:52 am
Thanks G, its not an area I have seen repaired often, usually a whole clip grafted on it seems. There is more lead filling than I expected around the top of the B pillar, now I have dug into that I can see how the pillar joins to the over cab door piece and I think I understand how the drip channel joins. On this van it seems water sat in the drip tray and with no engine in it ran to the front and rotted out the cab end worst. The right A pillar is more (really!) rotten, I think that was the drain route. I should get more time on it tomorrow, hopefully get some metal welded back in.
I have used loads of the thin 1mm cutting discs on a standard 115mm grinder, I have a 90 degree die grinder which has been really useful with either a carbide burr or I also discovered roloc twist in things with 75mm clean and strip pads, but something more like a mini grinding disc and something less harsh than the carbide burr would be useful without going to dremel stuff, any ideas?
Here is what I found in the under the front. RH arch.

Zinc plate, rivets and fiberglass as mostly expected in the usual rot areas. The outrigger is solid and looks good.

I seem to remember that Rivets and glass resin fixes are fine and MOT legal, or were, but never on the chassis, so.. Filler was applied over the rivets to hide them.


I have used loads of the thin 1mm cutting discs on a standard 115mm grinder, I have a 90 degree die grinder which has been really useful with either a carbide burr or I also discovered roloc twist in things with 75mm clean and strip pads, but something more like a mini grinding disc and something less harsh than the carbide burr would be useful without going to dremel stuff, any ideas?
Here is what I found in the under the front. RH arch.

Zinc plate, rivets and fiberglass as mostly expected in the usual rot areas. The outrigger is solid and looks good.

I seem to remember that Rivets and glass resin fixes are fine and MOT legal, or were, but never on the chassis, so.. Filler was applied over the rivets to hide them.


tango54
Registered user
Posts: 24
Joined: Thu Oct 23, 2008 1:22 pm
Re: UK 54
by spit nolan » Sat Dec 19, 2015 11:08 pm
spit nolan
SSVC Member
Posts: 1166
Joined: Tue Feb 28, 2006 12:33 pm
Re: UK 54
by spit nolan » Sat Dec 19, 2015 11:12 pm
I can try and get some better photos when I'm next up there but will probably be after new year now.
spit nolan

SSVC Member
Posts: 1166
Joined: Tue Feb 28, 2006 12:33 pm
Re: UK 54
by tango54 » Thu Dec 24, 2015 9:21 pm
Thanks Spit
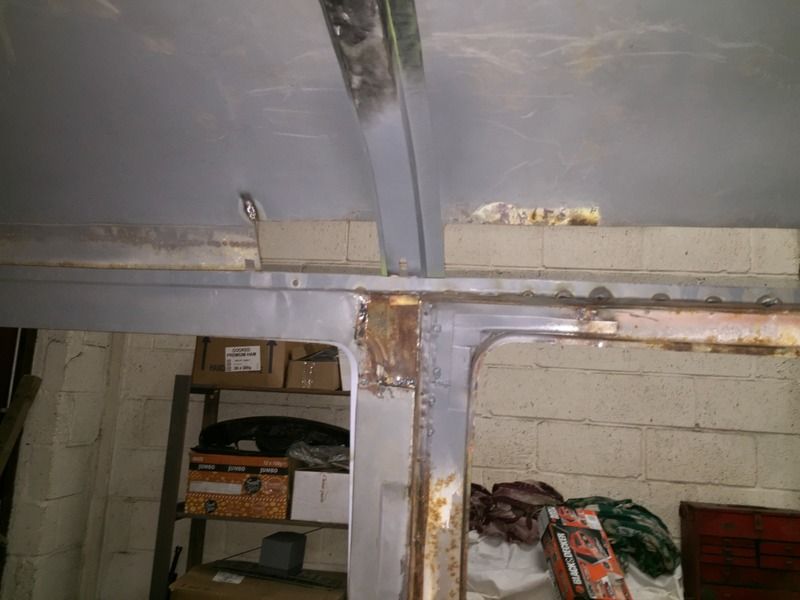
Do you know if that roof support has been replaced? I am not sure if I can see some green on there, also on this one the back is closed in with a flat strip on the back for the lower part

I got on with the roof side over the doors, the worst side I think. Replaced the gutter back to the corner, had to rebuild some areas to weld it onto and it took a lot of careful tweaking to get it straight again. I have just popped the new roof strip in there for now, I need to do the strengthening strip and cable holes and possibly rework the ends of the roof supports before I can close it up. And I need more clamps!


Do you know if that roof support has been replaced? I am not sure if I can see some green on there, also on this one the back is closed in with a flat strip on the back for the lower part

I got on with the roof side over the doors, the worst side I think. Replaced the gutter back to the corner, had to rebuild some areas to weld it onto and it took a lot of careful tweaking to get it straight again. I have just popped the new roof strip in there for now, I need to do the strengthening strip and cable holes and possibly rework the ends of the roof supports before I can close it up. And I need more clamps!


tango54
Registered user
Posts: 24
Joined: Thu Oct 23, 2008 1:22 pm
Re: UK 54
by 67ben » Thu Dec 24, 2015 9:30 pm
Loving the progress

I can take some pictures of my 54 kombi roof structure in a few days if that helps you its un touched and original in the inner roof area.
Cheers ben

I can take some pictures of my 54 kombi roof structure in a few days if that helps you its un touched and original in the inner roof area.
Cheers ben
67ben
SSVC Member
Posts: 1491
Joined: Thu Sep 08, 2005 7:58 pm
Re: UK 54
by tango54 » Thu Dec 24, 2015 10:27 pm
That would be great Ben, I have got a decent idea of the panel fittings from Spit and type21f's pics but I am not sure how the cable routes there.
I have Christmas to get on with.. or the other chassis rail.. or the shopping list of panels..
Alex
I have Christmas to get on with.. or the other chassis rail.. or the shopping list of panels..
Alex
tango54
Registered user
Posts: 24
Joined: Thu Oct 23, 2008 1:22 pm
Re: UK 54
by spit nolan » Thu Dec 24, 2015 11:20 pm
Yeh the end of the roof support has been replaced with some of the green stuff before I got the bus. I've looked through all my pics and these are the only ones I have of this bit at the mo, can't get to the bus at the moment to get any more either, as it's locked in Martin's workshop and he had the cheek to Bugger off on holiday for Christmas hahahaha
spit nolan

SSVC Member
Posts: 1166
Joined: Tue Feb 28, 2006 12:33 pm
Re: UK 54
by tango54 » Sun Jan 10, 2016 3:47 pm
Did a little more Chassis rail beam mount but not much over Xmas.
I found some pics on theBustransfer.com site of a 53 they did, nice work. They cut off the end of the roof support to fix it then welded it back in, seems easier to remove the whole thing since both ends of the forward one are shot, there are not too many spot welds in the center of the support joining it to the roof panel. It looks like the front support has slots for the cabling, and the rear support just 8mm holes, as your replacement support does too Spit.

I have a spot welder so I am considering repairing the roof as a panel on the van but not joining it back to the gutter as I go, and then remove the remaining spot welds at the back and lift the whole thing off making it easier to get to the rest of the gutter etc. Then reassemble like factory - spot the strengtheners to the roof edges and supports, drop the roof onto the gutter and spot around the outside and along the strengthener on the inside.
Does this sound correct? Anyone see any issues? Done it before?
I found some pics on theBustransfer.com site of a 53 they did, nice work. They cut off the end of the roof support to fix it then welded it back in, seems easier to remove the whole thing since both ends of the forward one are shot, there are not too many spot welds in the center of the support joining it to the roof panel. It looks like the front support has slots for the cabling, and the rear support just 8mm holes, as your replacement support does too Spit.

I have a spot welder so I am considering repairing the roof as a panel on the van but not joining it back to the gutter as I go, and then remove the remaining spot welds at the back and lift the whole thing off making it easier to get to the rest of the gutter etc. Then reassemble like factory - spot the strengtheners to the roof edges and supports, drop the roof onto the gutter and spot around the outside and along the strengthener on the inside.
Does this sound correct? Anyone see any issues? Done it before?
tango54
Registered user
Posts: 24
Joined: Thu Oct 23, 2008 1:22 pm
Re: UK 54
by Vwdubs74 » Sun Jan 10, 2016 5:35 pm
Tango, where can you get those clamps you are using? I have also seen what look to be magnets as well. Would be useful for my build.
Vwdubs74
Registered user
Posts: 73
Joined: Sun Jun 15, 2014 9:03 pm

