You are viewing the Split Screen Van Club forum archive.
The forum archive is read-only.Unfortunately in 2021 the Split Screen Van Club forum suffered a ransomware attack and lots of the forum data was lost.
What threads that have been recovered are now searchable on this site. Some threads may be incomplete and some images are still being recovered.
Forum archive search
" Trix " our 66 adventure....& refresh begins
Re: " Trix " our 66 adventure....& refresh begins
by Bren Ralls » Sun Mar 13, 2016 10:38 pm
Slow on the update front but been cracking on.
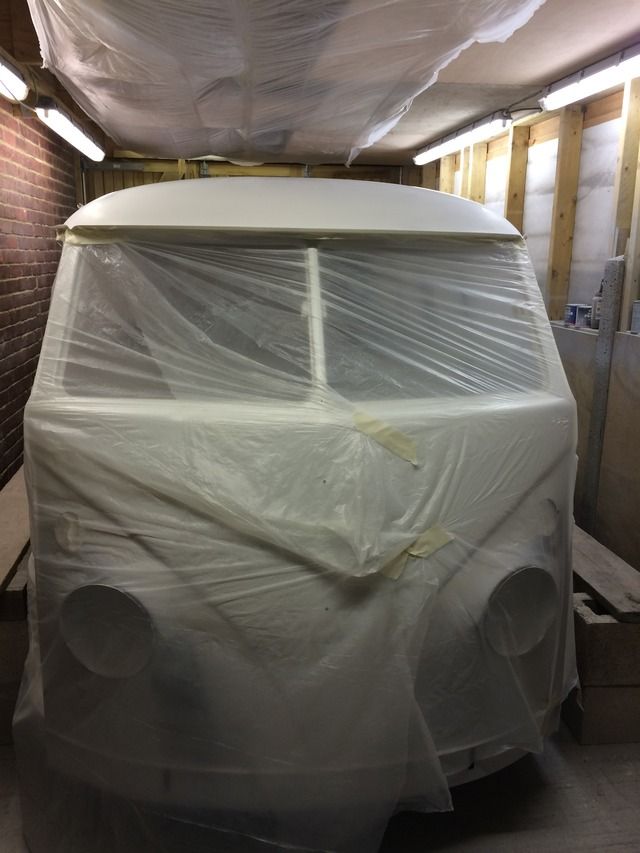
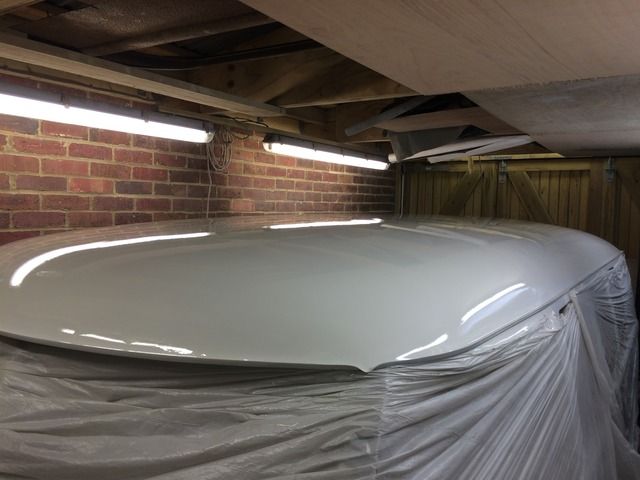
Wednesday got roof flatted and in white. Got bitten by the dust in the garage eaves as this got disturbed over night by the wind so a few bits to sort.
Thursday flatted back cargo area and cab giving this area its final coat, now is just polish up.
Friday was a few hours flatting back above swage line, back, sides and front and prep for saturday. Then hit the pub meeting up with markp & Graham who were off to ninove. Was really weird seeing lots of busses but not having my own there. Found myself drawn to shut lines, edges and trims. Having spent so long doing my own found myself wondering was I right .
Cracking evening catching up with the gang.
Saturday painted all above swage line and all popouts then moved outside in the sun flatting back cab doors, valance and engine lid sneaking some white on the cab doors before calling it a day.
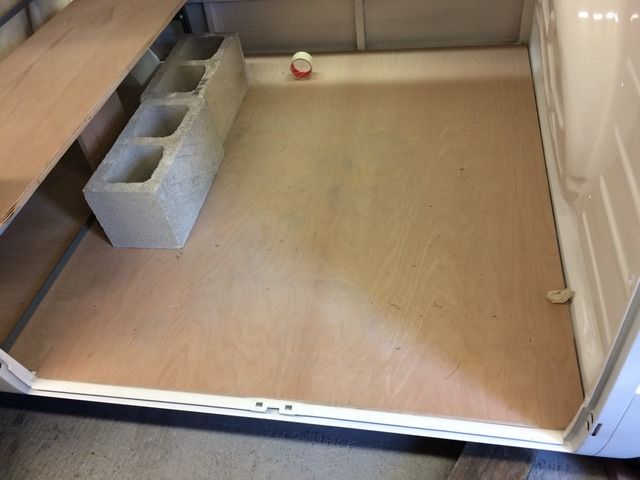
Sunday and last day in the cave for a few days & with upholsterers visiting Wednesday eve spent a few hours getting floor in. Used 12mm ply as wanted something with a bit of meat to screw into. The ply I seam sealed to floor so should be solid once it cures.
Then wrestled our new seat in, as felt it needed to be in for measuremnts. We replaced the thin ply that was supplied to some 18 mm, reason being to make fixing easy as I can just drill and screw through plus it makes whole thing more rigid. We also exstaend seat base by 3" as it then gives us a 6ft bed so no dangling feet out the end.
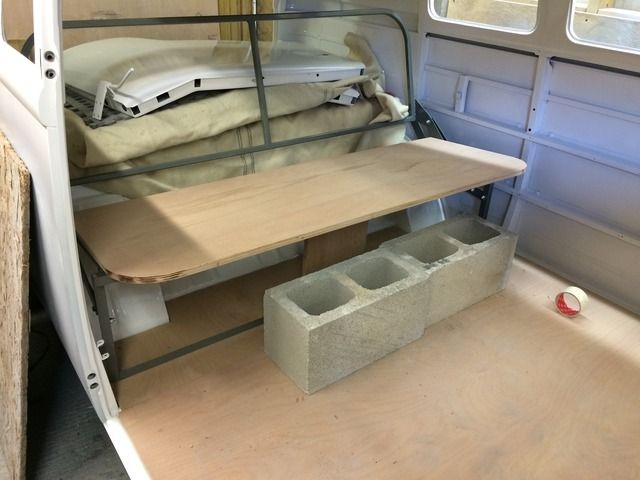
Handy old 9" hollow blocks added some weight to the joint.
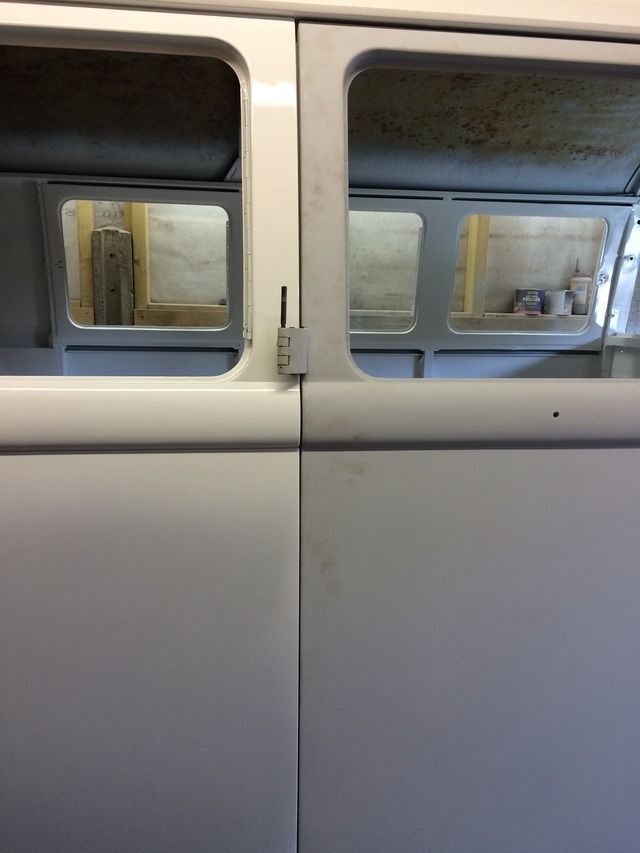
During the build knew to be carefully on adjusting door when on axle stands so thought I had solved issue as blocked always on the beams making sure bus was always level side to side and front to back. Doors were spot on but alas now on wheels rear cargo door had dropped. So glad I checked prior to paint but a few tweeks and there again.

Sorted front headlight bowl's that were catching light chrome surround, bit of an arse as front was ready for colour so a tidy up required but all fitting good now.
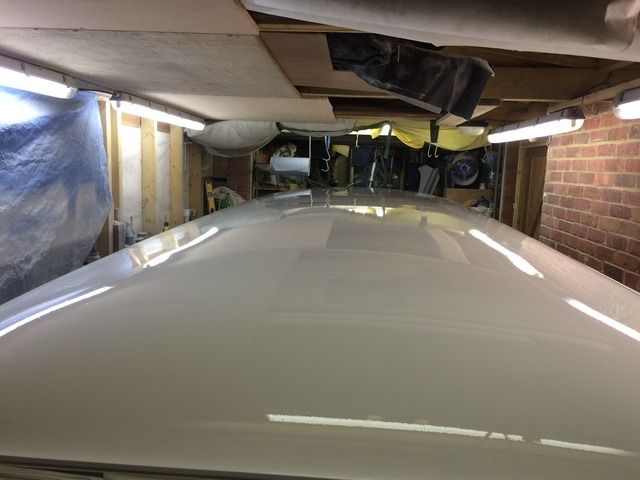
Final part of day flatted back roof, cleaned up and prepped bus with some cave modification to stop any unwanted dirt dropping through.
Final colour is now on roof and so far so good on roof covers.
That's me laters..
Wednesday got roof flatted and in white. Got bitten by the dust in the garage eaves as this got disturbed over night by the wind so a few bits to sort.
Thursday flatted back cargo area and cab giving this area its final coat, now is just polish up.
Friday was a few hours flatting back above swage line, back, sides and front and prep for saturday. Then hit the pub meeting up with markp & Graham who were off to ninove. Was really weird seeing lots of busses but not having my own there. Found myself drawn to shut lines, edges and trims. Having spent so long doing my own found myself wondering was I right .
Cracking evening catching up with the gang.
Saturday painted all above swage line and all popouts then moved outside in the sun flatting back cab doors, valance and engine lid sneaking some white on the cab doors before calling it a day.
Sunday and last day in the cave for a few days & with upholsterers visiting Wednesday eve spent a few hours getting floor in. Used 12mm ply as wanted something with a bit of meat to screw into. The ply I seam sealed to floor so should be solid once it cures.

Then wrestled our new seat in, as felt it needed to be in for measuremnts. We replaced the thin ply that was supplied to some 18 mm, reason being to make fixing easy as I can just drill and screw through plus it makes whole thing more rigid. We also exstaend seat base by 3" as it then gives us a 6ft bed so no dangling feet out the end.

Handy old 9" hollow blocks added some weight to the joint.
During the build knew to be carefully on adjusting door when on axle stands so thought I had solved issue as blocked always on the beams making sure bus was always level side to side and front to back. Doors were spot on but alas now on wheels rear cargo door had dropped. So glad I checked prior to paint but a few tweeks and there again.


Sorted front headlight bowl's that were catching light chrome surround, bit of an arse as front was ready for colour so a tidy up required but all fitting good now.
Final part of day flatted back roof, cleaned up and prepped bus with some cave modification to stop any unwanted dirt dropping through.

Final colour is now on roof and so far so good on roof covers.
That's me laters..
Bren Ralls
SSVC Member
Posts: 1143
Joined: Mon Sep 12, 2011 6:16 am
Re: " Trix " our 66 adventure....& refresh begins
by mo » Mon Mar 14, 2016 9:26 pm
Niiiiice looking good !!
mo
Registered user
Posts: 166
Joined: Thu Mar 17, 2005 1:30 pm
Re: " Trix " our 66 adventure....& refresh begins
by Bren Ralls » Sun Mar 20, 2016 9:59 am
Cheers mo getting there although sometimes like this week is 1 forward 2 back.
This week made space so cleared out, might put these up for sale later as cuts for a late split lol.
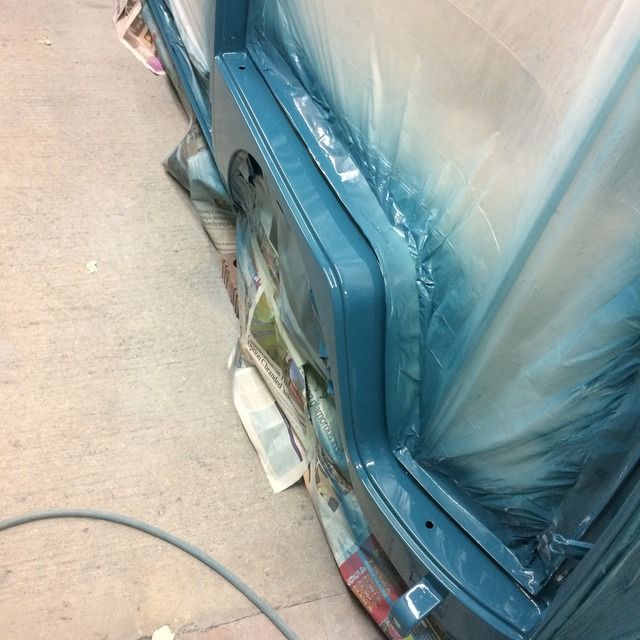
Then has been rubbing down and doing white ie above swage line which is now done. Then all doors & hatches.
Bumpers after blasting was surprising how beat up they were so fair bit of panel beating to straighten. Then a bit of filler time prior to paint prep but still some work before that.
Now the good bit so prepped for blue but prior to anything wasn't sure on joint line from front v to cab door so re fitted n/s door to line up. Whole world dropped as door now didn't fit right. Had spent ages gapping it & it catches on inner section for some reason. Lost an hour buggering around which resulted in knackering several evenings work.
Having lost valuable time got masked up but at near 11pm quit.

So plan is blue tonight when I finish this day shift .
This week made space so cleared out, might put these up for sale later as cuts for a late split lol.

Then has been rubbing down and doing white ie above swage line which is now done. Then all doors & hatches.
Bumpers after blasting was surprising how beat up they were so fair bit of panel beating to straighten. Then a bit of filler time prior to paint prep but still some work before that.
Now the good bit so prepped for blue but prior to anything wasn't sure on joint line from front v to cab door so re fitted n/s door to line up. Whole world dropped as door now didn't fit right. Had spent ages gapping it & it catches on inner section for some reason. Lost an hour buggering around which resulted in knackering several evenings work.


Having lost valuable time got masked up but at near 11pm quit.


So plan is blue tonight when I finish this day shift .
Bren Ralls
SSVC Member
Posts: 1143
Joined: Mon Sep 12, 2011 6:16 am
Re: " Trix " our 66 adventure....& refresh begins
by Bren Ralls » Sun Mar 20, 2016 9:24 pm
Tick tock tick tock & clock watching all day and itching to get home.
Worth the wait , although has cost me more iou's to post these.


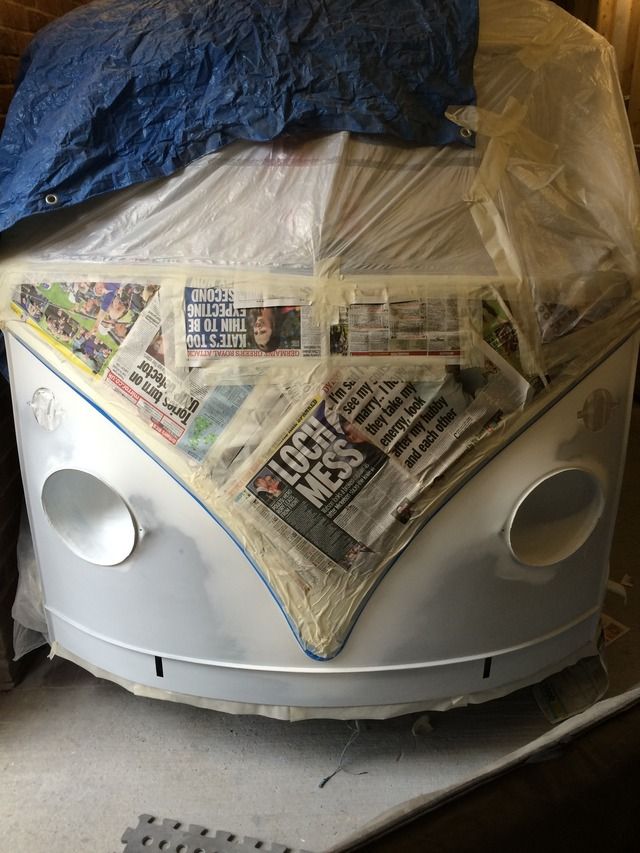
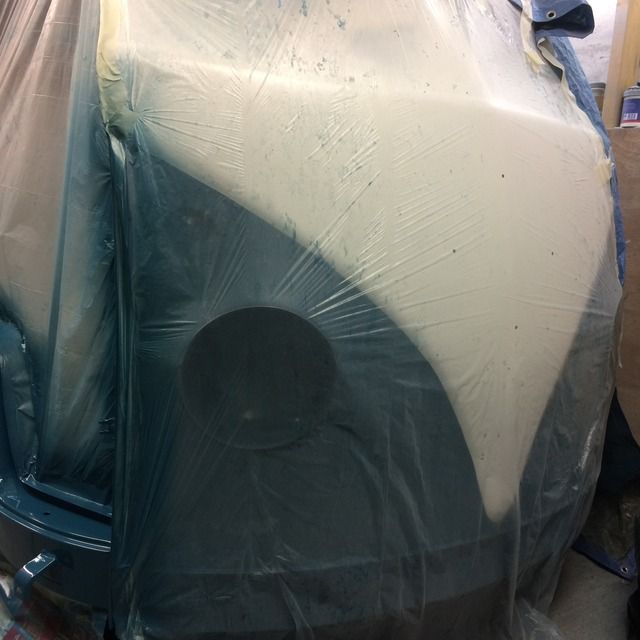
And some of the white which is all well masked up at the moment

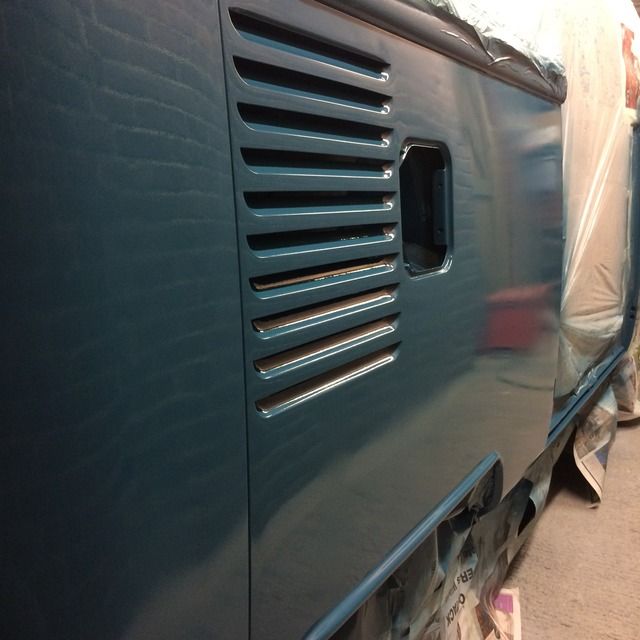
Just a small polish up and done on the white. Blue will get a flat back and done again, although long panel may tinker with as its highlighted a few little areas that need attention. Then can shift bus across and short panel side can go in blue..
Worth the wait , although has cost me more iou's to post these.


And some of the white which is all well masked up at the moment


Just a small polish up and done on the white. Blue will get a flat back and done again, although long panel may tinker with as its highlighted a few little areas that need attention. Then can shift bus across and short panel side can go in blue..
Bren Ralls
SSVC Member
Posts: 1143
Joined: Mon Sep 12, 2011 6:16 am
Re: " Trix " our 66 adventure....& refresh begins
by ted698 » Sun Mar 20, 2016 9:56 pm
Wow, looking good Bren.... Full on respect for a single garage repaint!
ted698
SSVC Member
Posts: 1011
Joined: Mon May 13, 2013 6:12 pm
Re: " Trix " our 66 adventure....& refresh begins
by Cleverchap » Sun Mar 20, 2016 11:13 pm
Stunning!
Cleverchap
Registered user
Posts: 485
Joined: Thu Mar 10, 2005 2:08 pm
Re: " Trix " our 66 adventure....& refresh begins
by rusty1962 » Sun Mar 20, 2016 11:39 pm
Fantastic work. Looks great!
rusty1962

SSVC Member
Posts: 2589
Joined: Wed Sep 11, 2013 10:35 pm
Re: " Trix " our 66 adventure....& refresh begins
by Bren Ralls » Mon Mar 21, 2016 9:53 am
Cheers guys very happy with finish in what is an un sterile condition. Paint will need flatting and hitting with some 3000 to loose some orange peel. Still learning on getting an out the gun finish but getting closer.
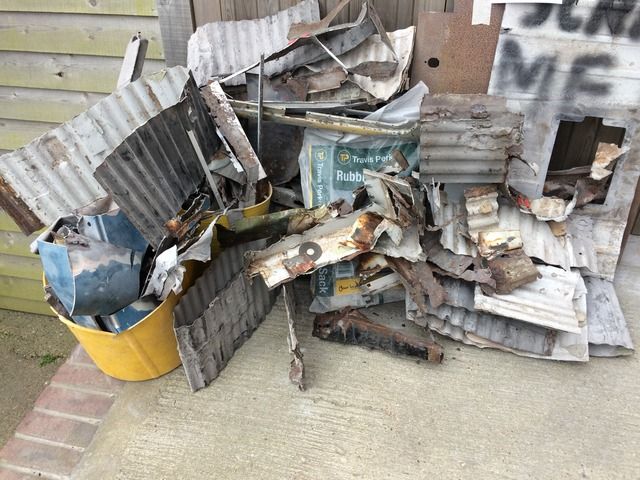
Also found this one.
Also found this one.

Bren Ralls
SSVC Member
Posts: 1143
Joined: Mon Sep 12, 2011 6:16 am
Re: " Trix " our 66 adventure....& refresh begins
by Bren Ralls » Mon Mar 21, 2016 10:24 pm
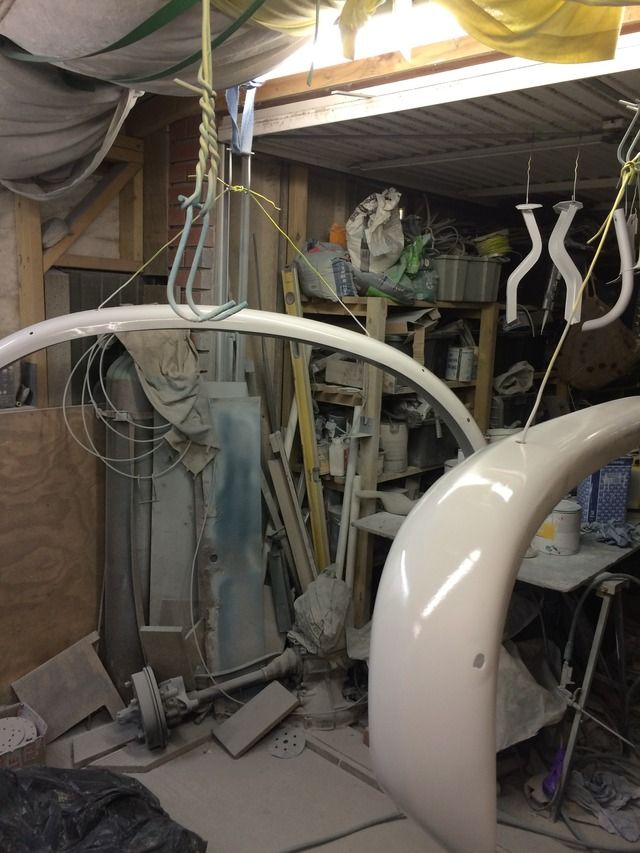
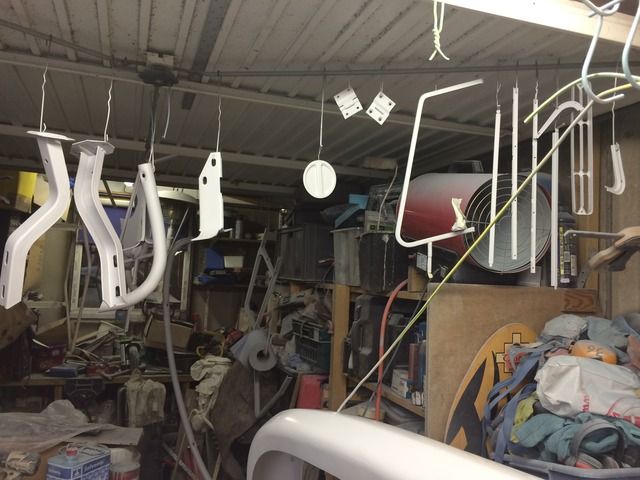
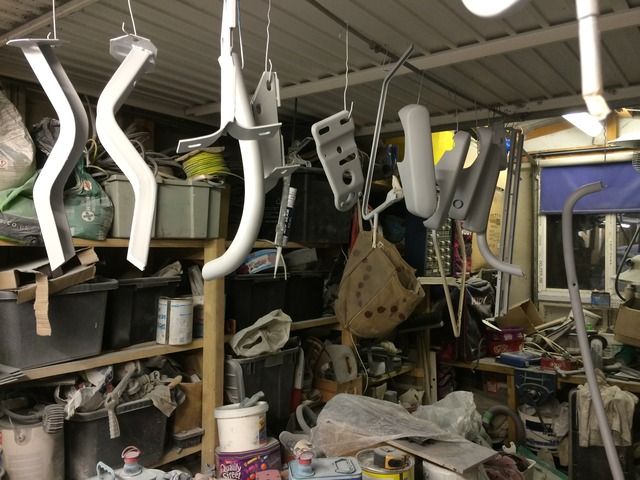
Stayed in warm tonight stripping down last 3 pop outs, safaris and cab door tops.
Generally popouts knew the knack.
Safaris were a doddle once silicone seal broke.
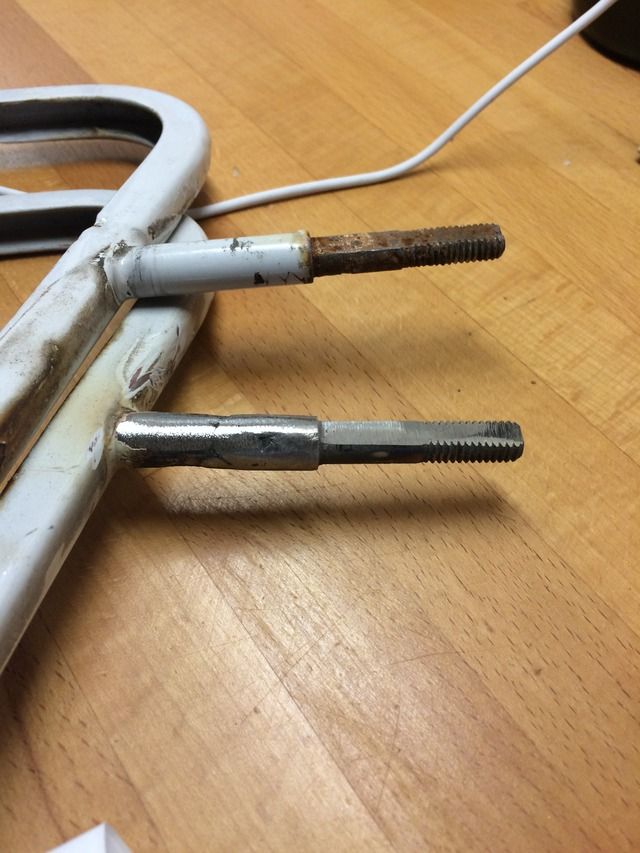
Door tops proved an ass, as one 1/4 bolt snapped but was well rusted away.
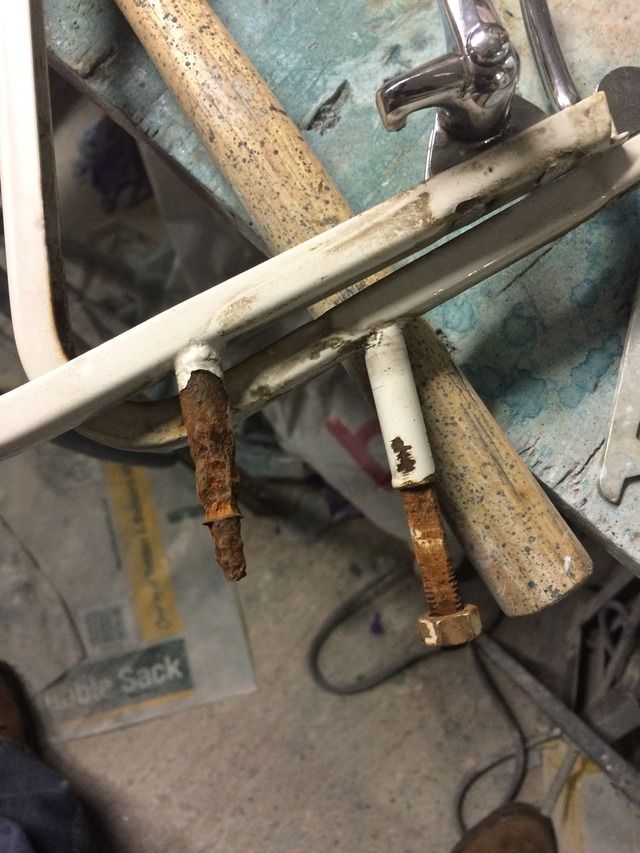
Have a plan & with a bit of tinkering this bolt will make good.
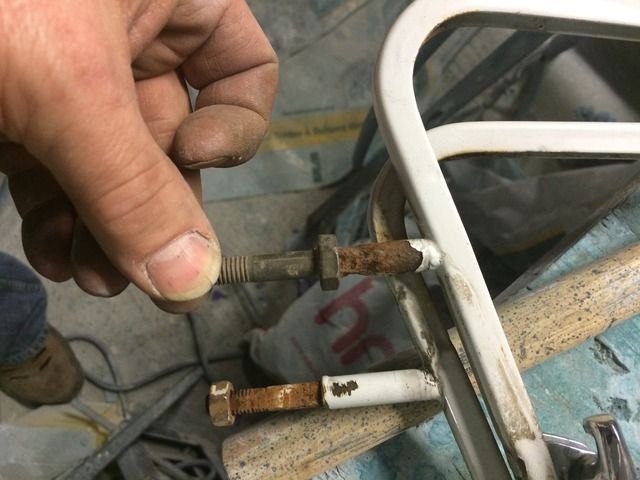
Once welded on can grind down head to produce the shoulder to retain washer.
Rest of windows now ready for paint prep.
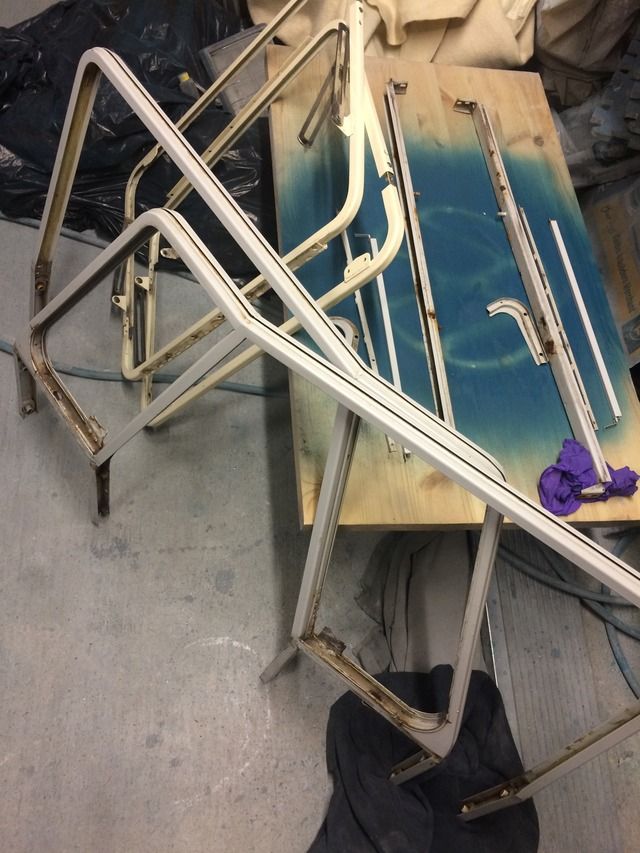
2 night shifts now so next cave time is Thursday evening but then get whole Easter weekend in the cave so 4 full days play.
Generally popouts knew the knack.
Safaris were a doddle once silicone seal broke.
Door tops proved an ass, as one 1/4 bolt snapped but was well rusted away.

Have a plan & with a bit of tinkering this bolt will make good.

Once welded on can grind down head to produce the shoulder to retain washer.
Rest of windows now ready for paint prep.

2 night shifts now so next cave time is Thursday evening but then get whole Easter weekend in the cave so 4 full days play.
Bren Ralls
SSVC Member
Posts: 1143
Joined: Mon Sep 12, 2011 6:16 am
Re: " Trix " our 66 adventure....& refresh begins
by markp » Thu Mar 24, 2016 7:48 pm
I have not looked for a wile now ... ( wanted to have a big suprise )
and wow
I got it
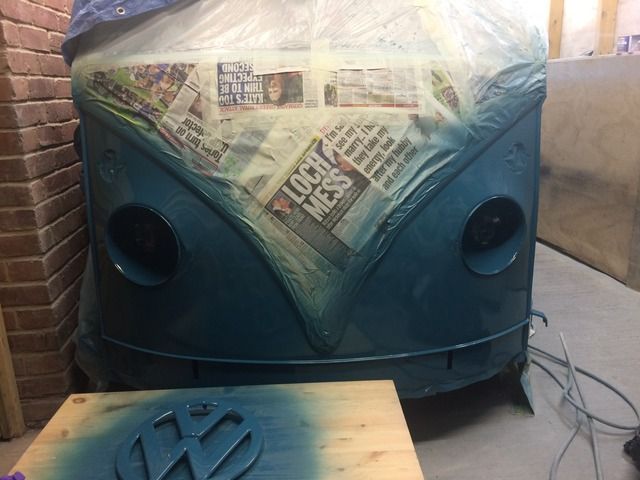
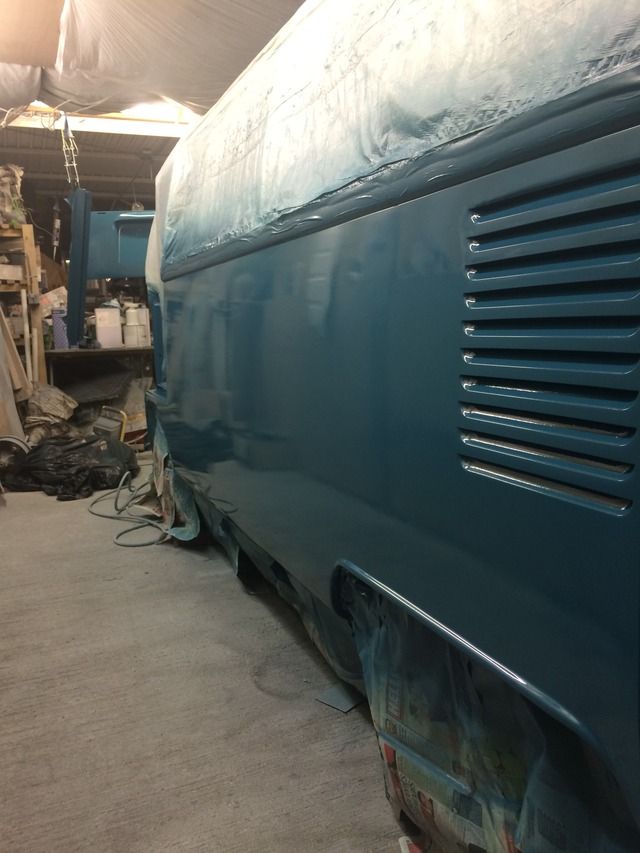
we got BLUE
WELL DONE FELLA
Looks fab
chuffed for you .... Remember everyone that Bren does not do this for a living and to crack on with the speed he has and to detail he has
puts some resto businesses to shame .
well done mate and proud of you buddy
Love to see people have a go them selves ..... You and Steve ( rusty ) are really showed people that you can have a dam good go your self
and its all a massive learning curve
hates off to you
Mark
and wow
I got it
we got BLUE
WELL DONE FELLA
Looks fab
chuffed for you .... Remember everyone that Bren does not do this for a living and to crack on with the speed he has and to detail he has
puts some resto businesses to shame .
well done mate and proud of you buddy
Love to see people have a go them selves ..... You and Steve ( rusty ) are really showed people that you can have a dam good go your self
and its all a massive learning curve
hates off to you
Mark
markp
SSVC Member
Posts: 4688
Joined: Wed Jul 20, 2011 9:56 pm
Re: " Trix " our 66 adventure....& refresh begins
by wejjy » Thu Mar 24, 2016 7:53 pm
Looking amazing mate, as mark said, to see the speed you've done this resto and to such a fantastically high level of finish is special!!
Now take the masking off and show us the Blue and White together Im dying to see it!! Or is that too much of an IOU??
Now take the masking off and show us the Blue and White together Im dying to see it!! Or is that too much of an IOU??
wejjy

Registered user
Posts: 1459
Joined: Sun Jun 05, 2005 8:40 am
Re: " Trix " our 66 adventure....& refresh begins
by Bren Ralls » Thu Mar 24, 2016 10:38 pm
Cheers mark chuffed I am but with anyone spending hours in the cave normally means a very understanding wife / partner and San has been great.
Cheers wejjy little treat later and hopefully after these next four days will see all paint done. Tried doing a front shot earlier but light in garage seemed to change colour on phone so didn't look realistic colour combo.
Long panel and front all two coats now so just waiting to harden off.
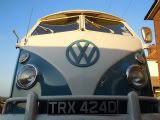
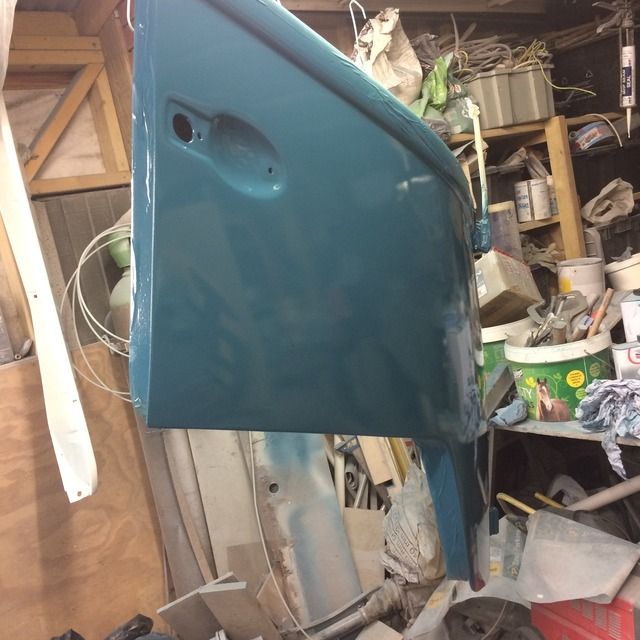
Remember this
Didn't turn out to bad.
Tonight was short side and one door, checked door first few spot on. N/s door sorted now but needs a bit of work before now before paint
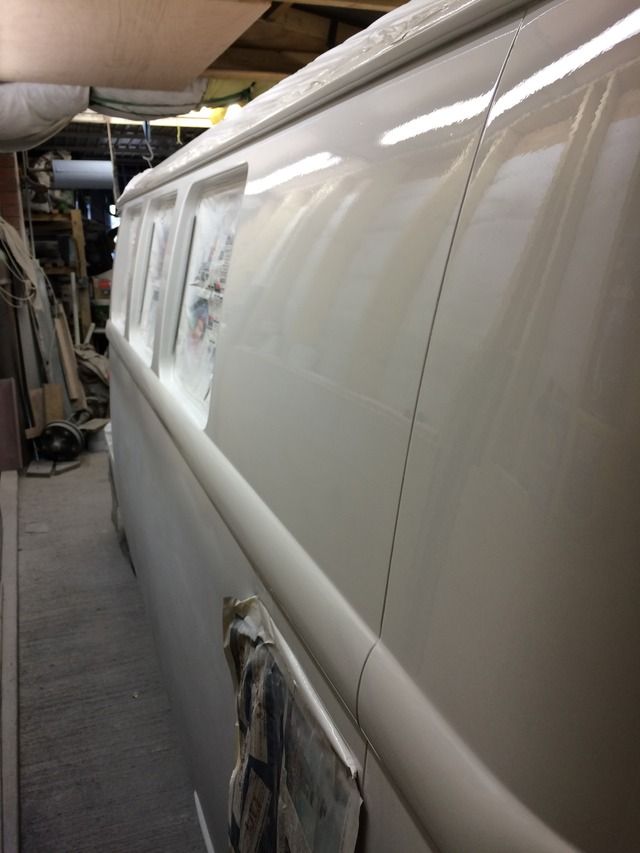
Almost getting an out the gun finish and shine getting there
Laters
Cheers wejjy little treat later and hopefully after these next four days will see all paint done. Tried doing a front shot earlier but light in garage seemed to change colour on phone so didn't look realistic colour combo.
Long panel and front all two coats now so just waiting to harden off.
Remember this
Didn't turn out to bad.

Tonight was short side and one door, checked door first few spot on. N/s door sorted now but needs a bit of work before now before paint


Almost getting an out the gun finish and shine getting there
Laters
Bren Ralls
SSVC Member
Posts: 1143
Joined: Mon Sep 12, 2011 6:16 am
Re: " Trix " our 66 adventure....& refresh begins
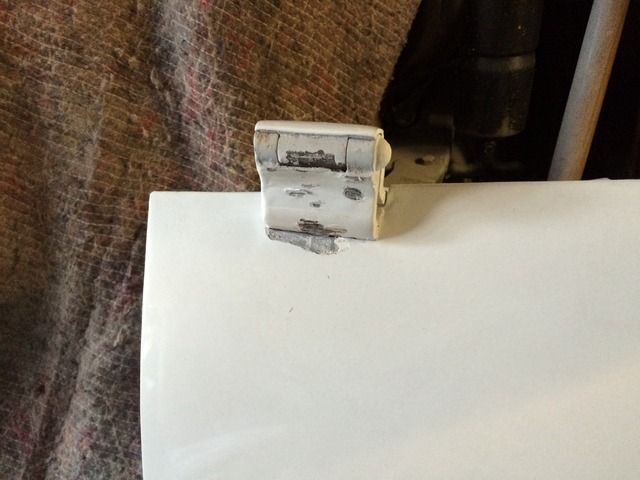
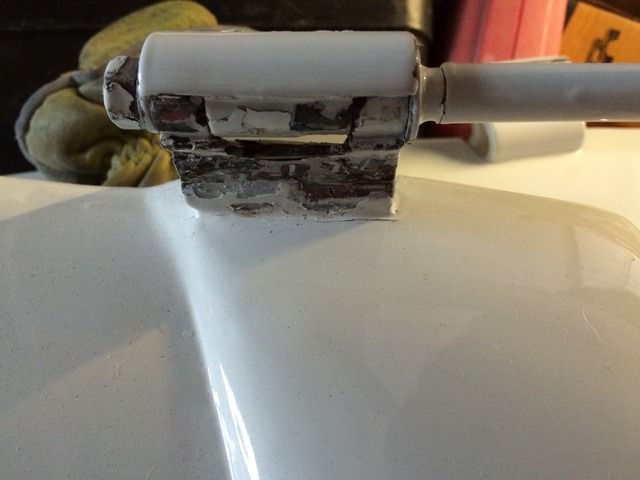
by Cleverchap » Thu Mar 24, 2016 11:44 pm
Love the quarter light repair bro.
Cleverchap
Registered user
Posts: 485
Joined: Thu Mar 10, 2005 2:08 pm
Re: " Trix " our 66 adventure....& refresh begins
by Bren Ralls » Fri Mar 25, 2016 10:46 pm
Cleverchap wrote:Love the quarter light repair bro.
Worked a treat, at first thought it would be scrap but a little improvisation and voilà.
Bren Ralls
SSVC Member
Posts: 1143
Joined: Mon Sep 12, 2011 6:16 am
Re: " Trix " our 66 adventure....& refresh begins
by Bren Ralls » Fri Mar 25, 2016 10:58 pm
Today had so many plans but got stuck in the world of filling sanding & prep work on bumpers plus lots of small bits which took all day.
Around 6 ish was ready so some etch primer and on to high build at 9pm, no rest when vf is looming real quick now.
Was a work of art finding enough room to hook all the stuff up and work but surprising how skinny you can be even with my fuller figure & the wrong side of a biscuit pack.
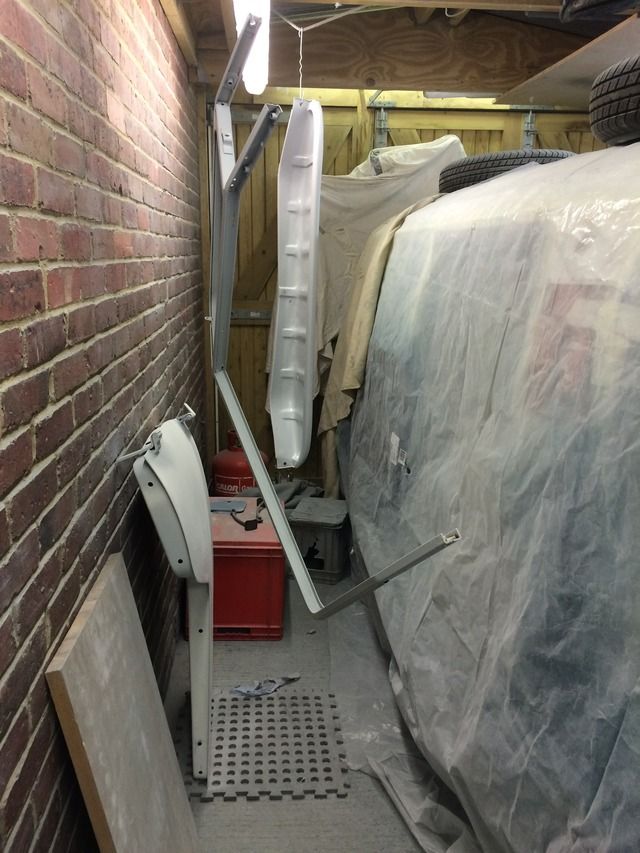
Kind of reminds me quick how little space I have.
Tomorrow is prep all doors , hatches etc and 2nd white coat. Plus more high build first thing on bumpers & over riders.
Around 6 ish was ready so some etch primer and on to high build at 9pm, no rest when vf is looming real quick now.
Was a work of art finding enough room to hook all the stuff up and work but surprising how skinny you can be even with my fuller figure & the wrong side of a biscuit pack.


Kind of reminds me quick how little space I have.
Tomorrow is prep all doors , hatches etc and 2nd white coat. Plus more high build first thing on bumpers & over riders.
Bren Ralls
SSVC Member
Posts: 1143
Joined: Mon Sep 12, 2011 6:16 am