You are viewing the Split Screen Van Club forum archive.
The forum archive is read-only.Unfortunately in 2021 the Split Screen Van Club forum suffered a ransomware attack and lots of the forum data was lost.
What threads that have been recovered are now searchable on this site. Some threads may be incomplete and some images are still being recovered.
Forum archive search
Betty the 1960 Panel Van
by Chud » Sun Mar 13, 2016 7:34 pm
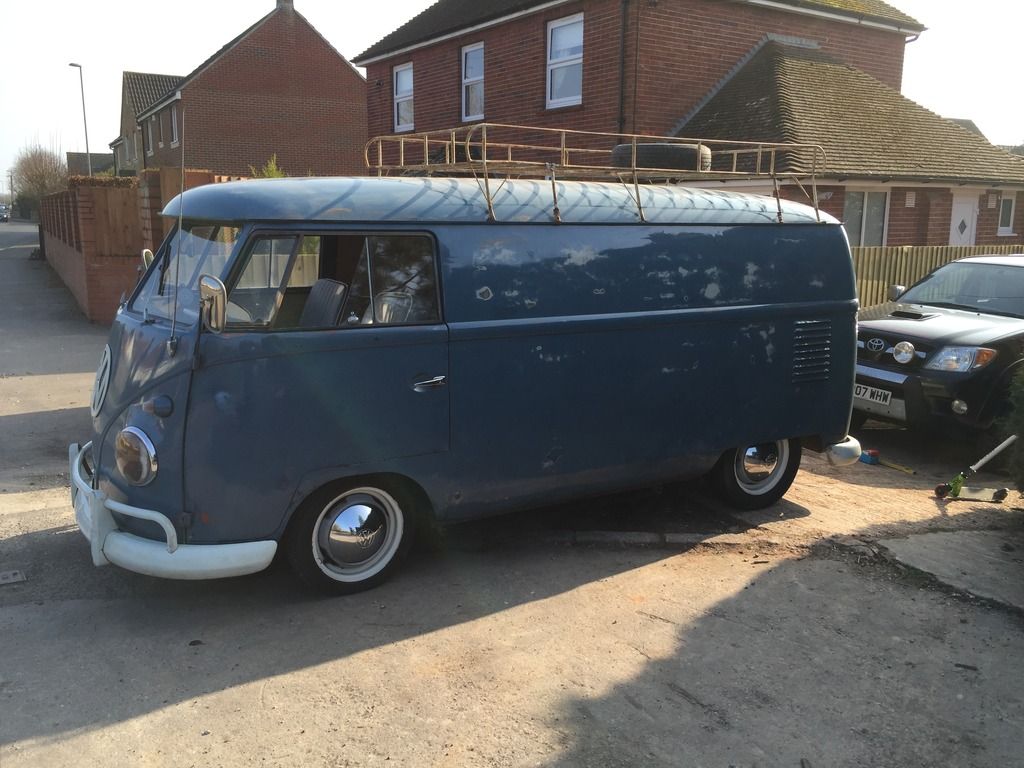
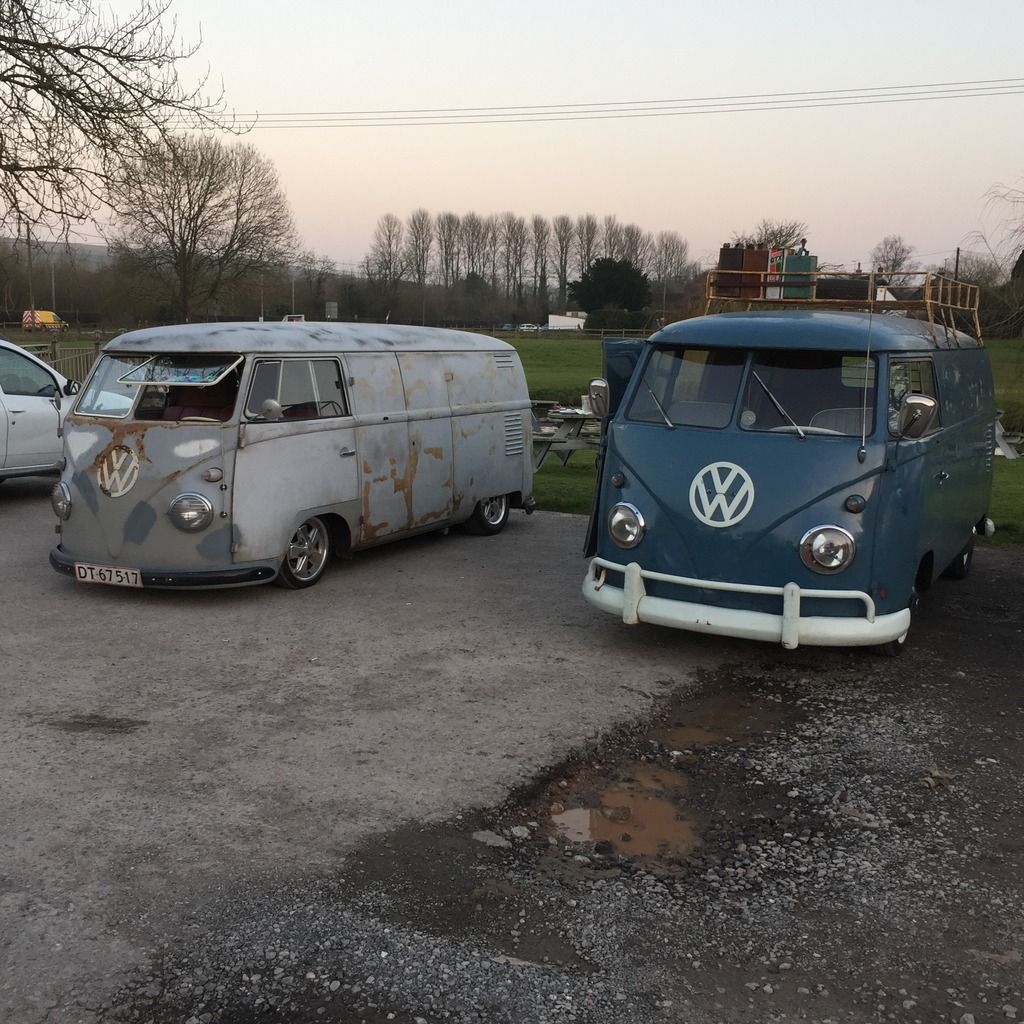
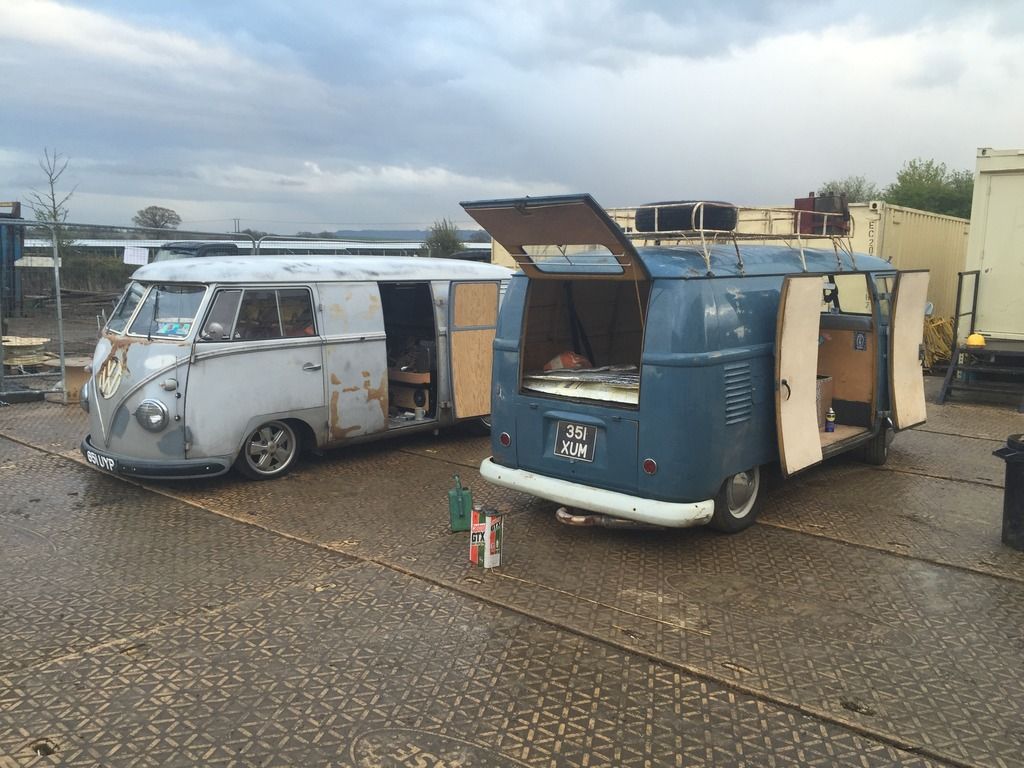
Hi, my name is Tim and I've been lurking about reading and the suchlike for a while but not posted until now as today was the day the wife and I became proud owners of Betty, the Dove Blue 1960 Walk-Thru panel van. We left Dorset at 5am and headed for Newquay, and were back on our way again and home for lunch.
I haven't had a chance to take any arty pics as yet as I've been spending the afternoon messing about sorting some bits out, and then we went for a drive to have tea with my mate in his DD panel van but they'll come soon.
Anyway, enough of my drivel, heres the only two pics I have to offer at the moment.
Cheers
I haven't had a chance to take any arty pics as yet as I've been spending the afternoon messing about sorting some bits out, and then we went for a drive to have tea with my mate in his DD panel van but they'll come soon.
Anyway, enough of my drivel, heres the only two pics I have to offer at the moment.


Cheers
Chud
SSVC Member
Posts: 29
Joined: Sat Feb 06, 2016 10:21 pm
Re: Betty the 1960 Panel Van
by Vwstu » Sun Mar 13, 2016 9:33 pm
Looks cool, what do you have planned for it then? Will keep a look out for the pics.
Vwstu
Registered user
Posts: 201
Joined: Wed Jan 30, 2013 9:32 pm
Re: Betty the 1960 Panel Van
by Chud » Tue Mar 15, 2016 9:24 pm
Cheers mate, gonna leave as is outside apart from a bit lower but I have to change the exhaust first as its one of those ones that stick out past the bumper with a U bend and it's as low as it can go with that clearing at the moment. The most work will be done on the rear interior but still trying to decide what route to go down for that as we'd like a useable camping setup.
Chud
SSVC Member
Posts: 29
Joined: Sat Feb 06, 2016 10:21 pm
Re: Betty the 1960 Panel Van
by Vwstu » Tue Mar 15, 2016 11:24 pm
Cool what exhaust you thinking of? I've just put a vintage speed on my panel van for that very reason, mine had a very badly welded home made exhaust. U bend that stuck out, turbo muffler type of exhaust. The vintage speed one is fab
 outside looks really cool as it is and lower is cool too
look forward to seeing what you do to it.
outside looks really cool as it is and lower is cool too
look forward to seeing what you do to it.
outside looks really cool as it is and lower is cool too
look forward to seeing what you do to it.Vwstu
Registered user
Posts: 201
Joined: Wed Jan 30, 2013 9:32 pm
Re: Betty the 1960 Panel Van
by Chud » Wed Mar 16, 2016 7:33 am
I believe it was the vintage speed ones I was looking at - tucks right up and just exits to one side off centre? Have you got a photo? There's so many on offer and I've graduated from old school Mazdas which you struggle to find anything so it's a bit weird having so much choice.

Chud
SSVC Member
Posts: 29
Joined: Sat Feb 06, 2016 10:21 pm
Re: Betty the 1960 Panel Van
by Vwstu » Thu Mar 17, 2016 11:30 pm
It's worth checking out the vintage speed website. I was advised to contact Dan Simpson, he's the uk agent. He can tell you all you need to know. I e mailed him and he responded very quickly, he obviously knows his stuff, very good to deal with and the quality of the exhausts is fantastic.
Vwstu
Registered user
Posts: 201
Joined: Wed Jan 30, 2013 9:32 pm
Re: Betty the 1960 Panel Van
by markp » Thu Mar 24, 2016 7:53 pm
welcome buddy
Love that panel dude
Congrats on a nice looking bus
bet your face hurts from smiling too much after driving it

Mark
Love that panel dude
Congrats on a nice looking bus
bet your face hurts from smiling too much after driving it
Mark
markp
SSVC Member
Posts: 4688
Joined: Wed Jul 20, 2011 9:56 pm
Re: Betty the 1960 Panel Van
by Chud » Fri Mar 25, 2016 3:28 pm
Cheers Mark, yeah love it - haven't stopped smiling.
Chud
SSVC Member
Posts: 29
Joined: Sat Feb 06, 2016 10:21 pm
Re: Betty the 1960 Panel Van
by e m p i » Sat Mar 26, 2016 8:11 pm
Nice ride. Look forward to seeing what you do with it. Don't forget to post some "before" pic of the interior so we can see what you started out with
Cheers, Lee.
Cheers, Lee.
e m p i
Registered user
Posts: 5129
Joined: Fri Jan 28, 2005 3:51 pm
Re: Betty the 1960 Panel Van
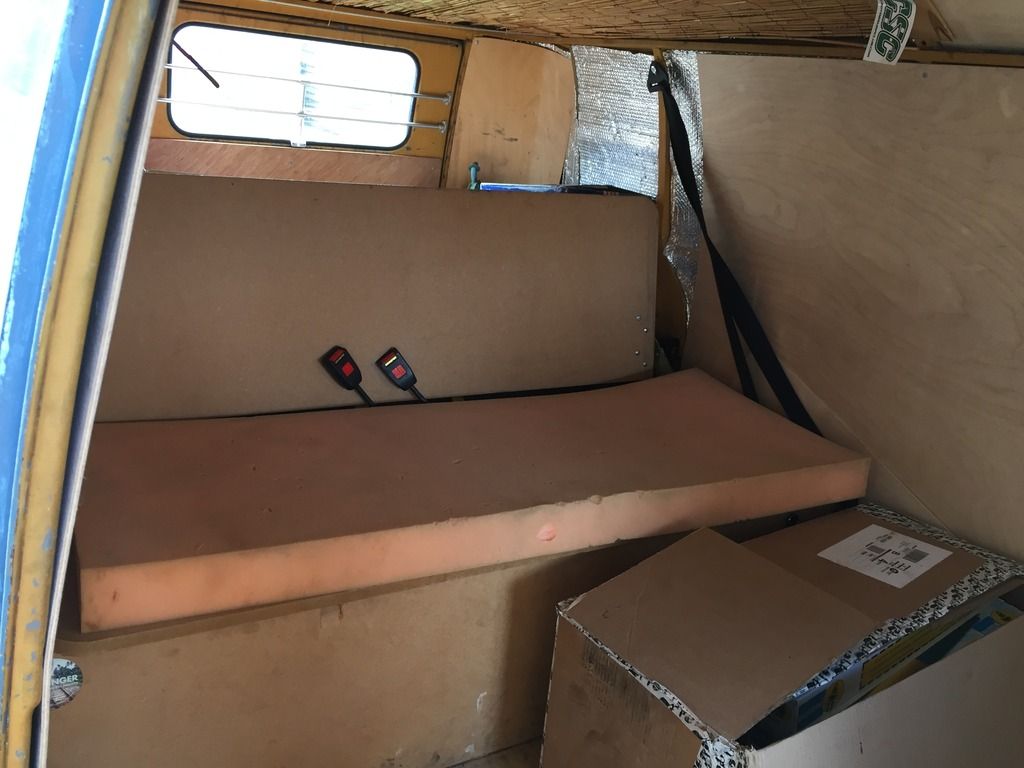
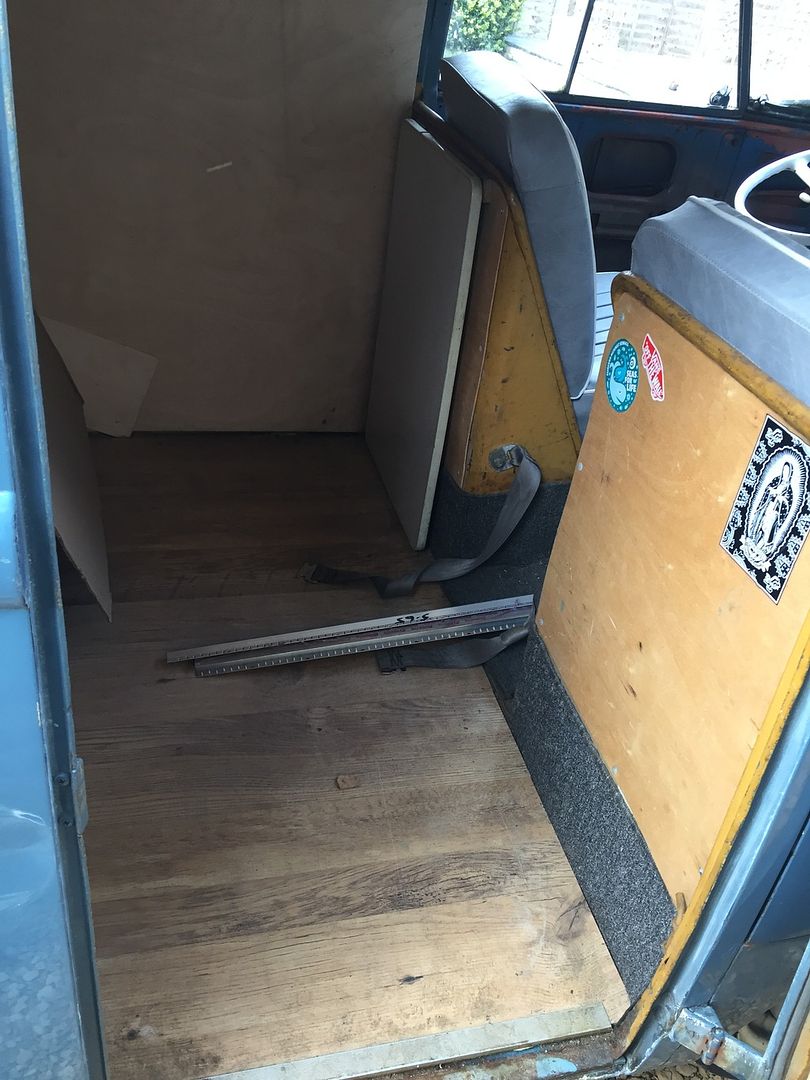
by Chud » Sat Apr 23, 2016 3:06 pm
Cheers Lee, here she is as it stands at the moment - looking pretty bleak at the moment. The front seats have been reupholstered by the previous owner and I like them. She's going in the trimming shop in two weeks for a full retrim to match the front seats and this includes everything - back and front so pretty excited about that now as will transform her.
Pics before though...


So the trimmers are doing the bed to match the front seats, panel underneath the bed, panels on back of bulkheads, new headlining, all door/side panels and nose panel. Should look pretty cool - so my job this week is to take her away with me to work (I work away in the week) and use the evenings I have free to insulate and sound deaden her.
If anyone has any experience good or bad of a particular product then a heads up would be great. Also on the job list before retrim is fit the stereo equipment so a busy week ahead.
Chud
SSVC Member
Posts: 29
Joined: Sat Feb 06, 2016 10:21 pm
Re: Betty the 1960 Panel Van
by e m p i » Sun Apr 24, 2016 11:25 am
Looks like you're gonna be busy this week!
I've got 25mm celotex in between the panels on mine. You just cut it roughly to size then jam it in the gaps between the panel cross members. Have a look in my build thread and you'll see what I mean. You can tape across it as well if you like but I didn't bother. Also, get some of the plastic sheets to glue over the cab doors behind the trim panels as this will stop the water getting to your panels.
Look forwards to seeing how it all comes out.
Cheers, Lee
e m p i
Registered user
Posts: 5129
Joined: Fri Jan 28, 2005 3:51 pm
Re: Betty the 1960 Panel Van
by Chud » Sun Apr 24, 2016 9:04 pm
Good shout about the plastic sheet - I was sat in traffic in torrential rain the other day watching my door cardless door fill with water wondering how I'd preserve the interior. I am going to do the window seals this week too though so that'll help a bit.
I'll check out your thread, cheers.
I'll check out your thread, cheers.
Chud
SSVC Member
Posts: 29
Joined: Sat Feb 06, 2016 10:21 pm
Re: Betty the 1960 Panel Van
by Bren Ralls » Sun Apr 24, 2016 9:37 pm
Great looking van bud.
From personal experience as your unsure don't rush into anything exspensive for interior camping setup wise. Cobble something together to get you by, Viccy farm this coming weekend will be a good opertunity to see lots of ideas of setups. We found each time you use the bus you get different ideas & different requirements.
I made a simple ply cabinet for £30 housing the fridge & stove 3 years back, only now do we realy know how we want it.
Bren Ralls

SSVC Member
Posts: 1143
Joined: Mon Sep 12, 2011 6:16 am
Re: Betty the 1960 Panel Van
by miles » Mon Apr 25, 2016 12:12 am
Lov your dove blue panel van

miles
Registered user
Posts: 3692
Joined: Thu Oct 17, 2002 4:01 pm
Re: Betty the 1960 Panel Van
by Chud » Fri Apr 29, 2016 9:36 pm
Cheers Bren, once she's back from the trimmers we'll use her for some trips and see how it goes. We're hoping the awning will give us some flexibility but we'll see.
And thanks Miles.
Well this week certainly did turn out to be busy with Ben and myself getting stuck in on a long list of jobs after our daily duties and made use of our compound and armoury of tools.
For the most part this week I kind of felt like I was going backwards as the longer I farted about the less like a camper she looked. On closer inspection I wasn't happy with the bed and seeing as I'm going to the expense of having all trimmed it seemed daft to scrimp on the foundations of this so that ended up in the skip. I spoke to Lee and he was up against it with a backlog but luckily Mark at T2D had one in stock ready to ship. Whilst I waited for the bed to arrive I removed the existing ply lining and set about sound deadening and insulating. I used self adhesive 'dead mat' bought from eBay and I used 25 in total - we are going to buy ten more between us though as my roof could do with some more.
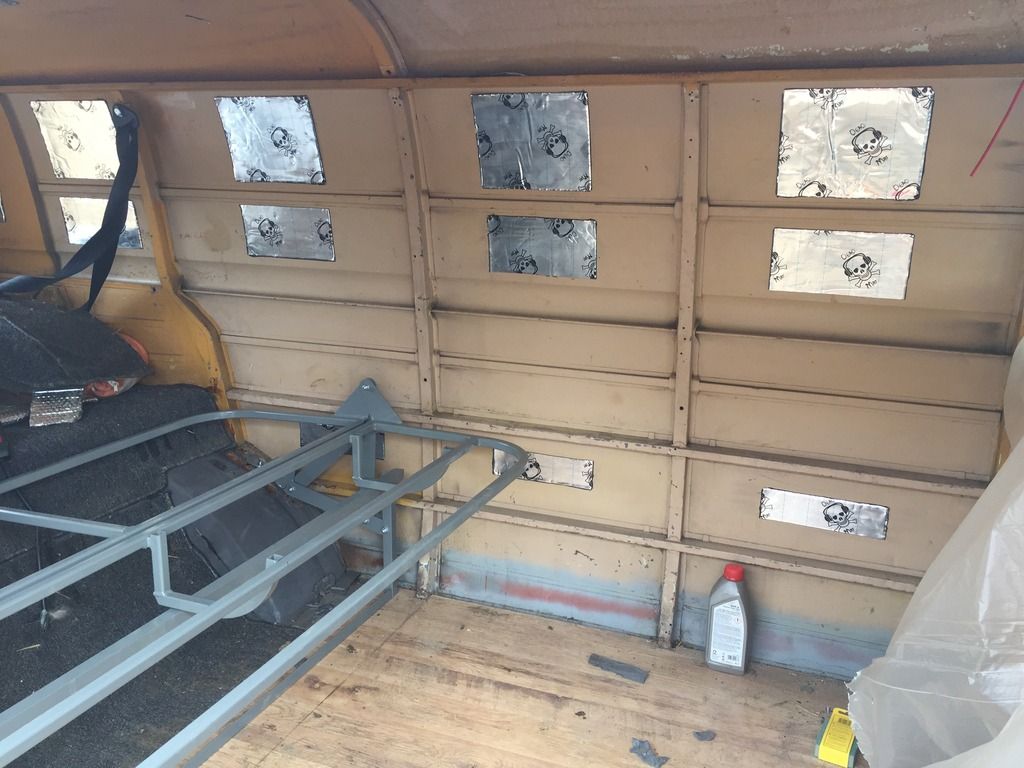
And then I started flinging celotex about.
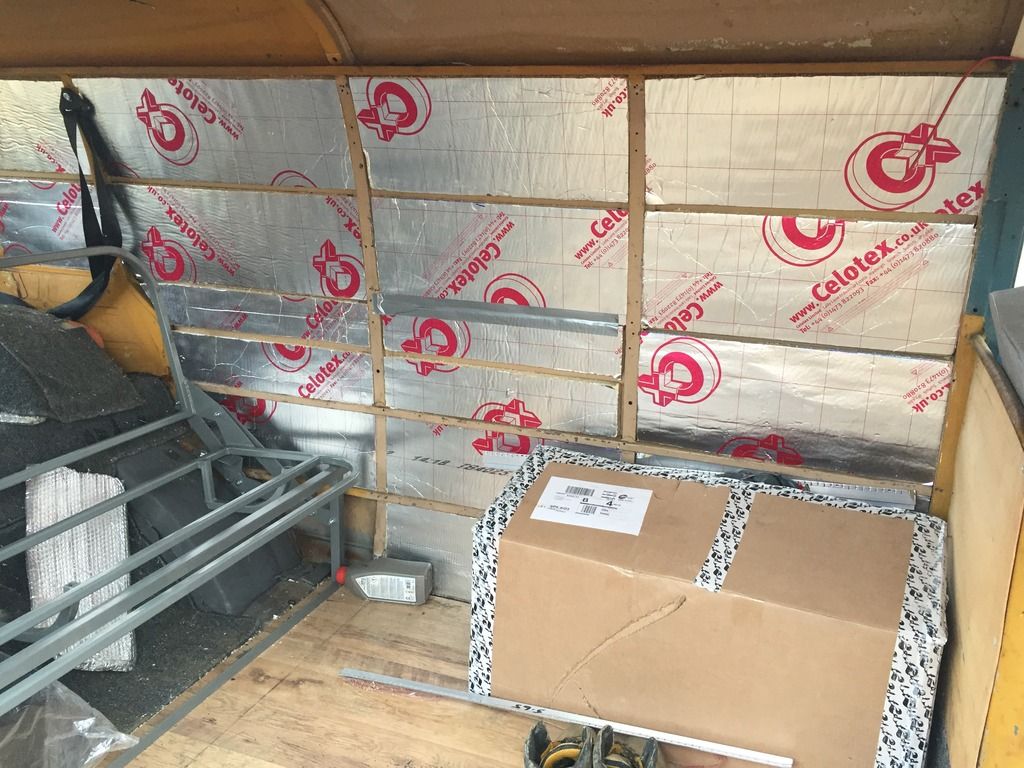

I'm really happy with how the deadening performs, I no longer feel like I'm driving a kettle drum around and the insulation seems to have made a massive difference but I won't see the full benefits until the roof is done and lined.
As you can see in the pictures the bed turned up as promised and installation was painless.
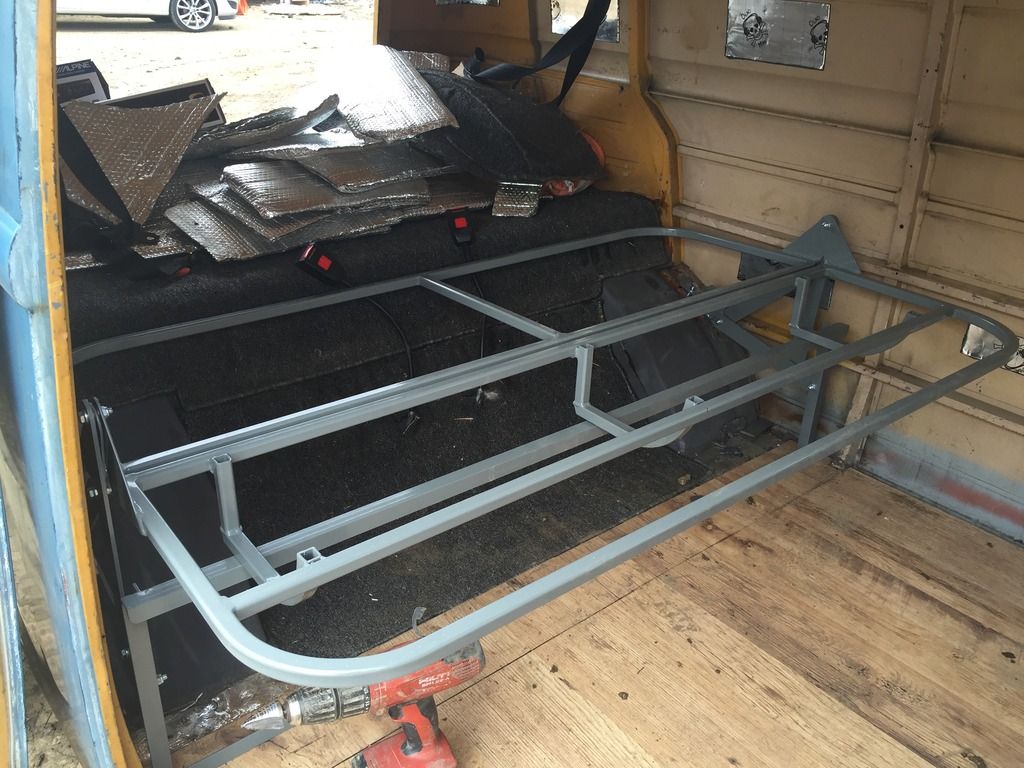
After that I thought I'd have a crack at replacing the cab door rubbers so with the help of a mate on site we made a start. The outer rubber went fine, lulled us into a false sense of security and rapidly spiralled into the worst 2.5 hours of rubber based activity that I've ever had. The window channels went okay, but the quarter light nearly ended up being taped up for the drive home, so close were we of losing the will to live with it. We did succeed in the end though so one door down, one to go. I didn't take any pictures, I was far too fragile.
Off to the trimmers tomorrow to confirm colour matches.
And thanks Miles.
Well this week certainly did turn out to be busy with Ben and myself getting stuck in on a long list of jobs after our daily duties and made use of our compound and armoury of tools.

For the most part this week I kind of felt like I was going backwards as the longer I farted about the less like a camper she looked. On closer inspection I wasn't happy with the bed and seeing as I'm going to the expense of having all trimmed it seemed daft to scrimp on the foundations of this so that ended up in the skip. I spoke to Lee and he was up against it with a backlog but luckily Mark at T2D had one in stock ready to ship. Whilst I waited for the bed to arrive I removed the existing ply lining and set about sound deadening and insulating. I used self adhesive 'dead mat' bought from eBay and I used 25 in total - we are going to buy ten more between us though as my roof could do with some more.

And then I started flinging celotex about.


I'm really happy with how the deadening performs, I no longer feel like I'm driving a kettle drum around and the insulation seems to have made a massive difference but I won't see the full benefits until the roof is done and lined.
As you can see in the pictures the bed turned up as promised and installation was painless.

After that I thought I'd have a crack at replacing the cab door rubbers so with the help of a mate on site we made a start. The outer rubber went fine, lulled us into a false sense of security and rapidly spiralled into the worst 2.5 hours of rubber based activity that I've ever had. The window channels went okay, but the quarter light nearly ended up being taped up for the drive home, so close were we of losing the will to live with it. We did succeed in the end though so one door down, one to go. I didn't take any pictures, I was far too fragile.
Off to the trimmers tomorrow to confirm colour matches.
Chud
SSVC Member
Posts: 29
Joined: Sat Feb 06, 2016 10:21 pm